The Light Puzzle in Silent Hill f’s Worship Hall blends eerie imagery with logic-driven design. After navigating color-coded doors and crest challenges, players eventually reach Sakuko’s cell — and here, the shrine’s haunting atmosphere shifts into a cage-filled riddle. By rotating fox and rabbit statues, you must manipulate suspended cages until they align at the same height. Solving this puzzle not only clears the way forward but also unlocks key items that tie directly into the story’s next major sequence.
Where to Find the Light Puzzle in the Worship Hall
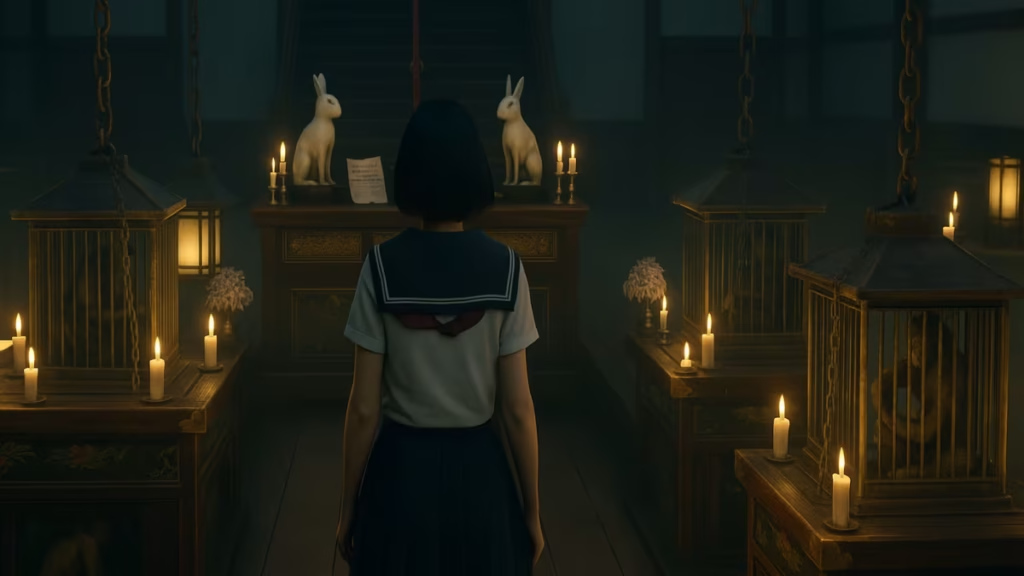
You’ll encounter this puzzle in the eastern chambers of the Worship Hall, after retrieving crests and operating lever doors. In Sakuko’s cell, a note on the altar introduces the solution with a cryptic hint:
“Two must face each other as one to pray for mutual prosperity. Those who do shall lift their heads to level height as if they were reflections in a mirror. With the shading of light shall you condemn the past to the dark.”
Turning around, you’ll notice two raised platforms, each holding a pair of statues — one fox and one rabbit. These statues directly control the heights of the hanging cages behind them.
How the Puzzle Works
The Light Puzzle looks simple, but overlapping statue effects make it trickier than it first appears:
- Four statues total: left platform (fox + rabbit) and right platform (fox + rabbit).
- Rotation mechanic: each statue raises or lowers two cages.
- Overlap effect: some cages are linked to multiple statues, meaning one adjustment can undo another.
- Objective: align all cages at the same height. Once done, the cages unlock and reveal two critical items.
Pro tip: If things get messy, solve one platform at a time (left cages first, then right) and correct the middle overlap last.
Puzzle Solutions by Difficulty
You can brute-force the cages by trial and error, but the fastest path is to align the statues to the intended pattern for your difficulty.
| Difficulty | Left Platform (Fox + Rabbit) | Right Platform (Fox + Rabbit) | Direction Order (left → right) |
|---|---|---|---|
| Story | Face each other | Face each other | Fox (E) → Rabbit (W) → Fox (E) → Rabbit (W) |
| Hard | Face away from each other | Face away from each other | Fox (W) → Rabbit (E) → Fox (W) → Rabbit (E) |
| Lost in the Fog | Face away from each other | Both face left | Fox (W) → Rabbit (E) → Fox (W) → Rabbit (W) |
Legend: E = East (right), W = West (left), based on Hinako facing the altar.
Rewards from the Puzzle
When all cages are aligned:
- Open the cages to collect the Restrain Lampshade and the Talon Lampshade.
- Place both Lampshades on the altar’s lanterns to dim the light.
- Doing this reveals the White Rabbit Emblem Key, a critical item used to progress the main quest.
What to Do After Getting the White Rabbit Emblem Key
With the White Rabbit Emblem Key in hand, return to the Worship Hall’s main door. Insert it into the right fox statue lock, which opens the path to Shu’s chamber of prized possessions. This begins another puzzle-driven sequence where Hinako must place items on pedestals to advance the “Farewell Ceremony” storyline.
Related Guides You Might Like:
- Silent Hill f Game Length: How Long to Beat & Endings
- Best Settings for Silent Hill f on PC to Boost Performance
- All Silent Hill f Hinako Costumes and Outfits
- How to Heal and Restore Sanity in Silent Hill f | Full Survival Guide
- Silent Hill f Consumables Guide: All Items and Effects
- Silent Hill f New Game Plus: Unlockables, Endings & Weapons
- Shimizu Residence Silent Hill f: All Puzzles, Crests & Boss Guide
- Silent Hill f All Endings List: How to Unlock All 5 Endings
- Silent Hill f Sacred Sword Guide – How to Find All Jizo Statues and Offerings
- Silent Hill f Middle School Locker Puzzle – All Codes & Rewards
- How to Solve Shrine Vault Puzzle Silent Hill f (All Difficulties)
The Light Puzzle highlights Silent Hill f’s signature approach to design: turning unsettling imagery into carefully layered logic. It forces players to engage with mechanics while reinforcing the game’s themes of duality, reflection, and hidden darkness.
Whether you’re breezing through Story mode or wrestling with the more complex Lost in the Fog, the end result is the same — another step deeper into the shrine and another reminder that in Silent Hill, even light cannot always be trusted.
TThe Light Puzzle isn’t just a mechanical challenge — it’s a piece of storytelling disguised as gameplay. Its solution unlocks progression, but its design reinforces Silent Hill f’s unsettling atmosphere. In the Worship Hall, players learn that sometimes the only way forward is to bury the light and embrace the dark. Play Now!

