The PW7A2, better known as the modern MP7, is one of the most efficient submachine guns in Battlefield 6. Compact, lightweight, and extremely fast-firing, this weapon dominates close-quarters engagements. With the right setup, it can become a laser-accurate menace capable of shredding through squads in seconds. Here’s the best PW7A2 loadout to maximize its potential in both close and mid-range fights.
Why the PW7A2 Stands Out
The PW7A2 fires at an incredible 947 rounds per minute — among the highest in the entire SMG category. Despite its ferocious rate of fire, the weapon exhibits almost no horizontal recoil, allowing you to stay on target even while moving. It’s a perfect pick for flanking specialists who thrive in fast, unpredictable gunfights.
Unlike other SMGs that struggle beyond 20 meters, the PW7A2 remains accurate up to about 50 meters when properly tuned. Its blend of stability and hip-fire precision makes it one of the most versatile weapons for Engineers or Assault players who like to stay mobile.
Best PW7A2 Loadout Setup
Below is a balanced setup designed to enhance recoil control, mobility, and time-to-kill while keeping the weapon flexible for different combat scenarios.
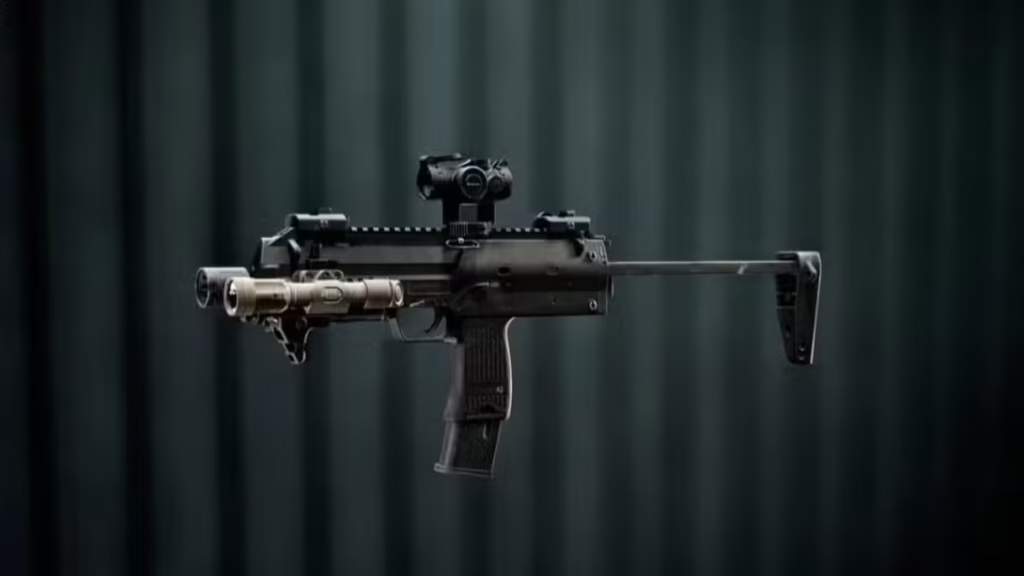
| Attachment Slot | Recommended Option | Purpose |
|---|---|---|
| Muzzle | Single-Port Brake | Reduces recoil drift without compromising ADS speed. |
| Barrel | 180mm Standard | Keeps handling fast and stable for close-range fights. |
| Underbarrel | Slim Angled Grip | Improves ADS speed and offers vertical recoil control. |
| Magazine | 30RND Standard Mag (or 40RND if unlocked) | Standard mag ensures mobility; 40RND adds endurance for multi-kills. |
| Ammunition | Hollow Point Rounds | Increases headshot multiplier for faster kills. |
| Scope | Mini Flex 1.00x | Clear, low-profile optic ideal for short engagements. |
| Accessory | 120MW Blue Laser | Significantly boosts hip-fire accuracy and ADS movement. |
Why This Build Works
This configuration capitalizes on the PW7A2’s natural strengths. The Single-Port Brake and Slim Angled Grip deliver stability without slowing you down, letting you snap to targets instantly. The 120MW Blue Laser, though visible, gives a huge hip-fire accuracy bonus — perfect for run-and-gun players. Hollow Point ammo adds extra headshot damage, making each burst more lethal in close fights.
If you prefer stealthier flanking, swap the muzzle for a Long Suppressor to stay off radar, though it slightly slows your ADS speed.
Alternative Attachments (Aggressive Loadout)
For players who prefer a more relentless playstyle focused purely on speed and hip-fire dominance:
- Top Accessory: 50MW Green Laser — better hip-fire grouping, visible to enemies.
- Underbarrel: Classic Vertical Grip — maximum control during spray bursts.
- Ammunition: Full Metal Jacket — better wall penetration and sustained fire.
- Magazine: 40RND Extended — for clearing objectives or defending chokepoints.
This setup trades precision at mid-range for superior control in fast indoor encounters.
Best Class Pairing
The PW7A2 performs best when paired with the Engineer class. Engineers receive a hip-fire control boost when using SMGs, perfectly complementing the PW7A2’s strengths. Here’s a class setup that fits the weapon’s fast, aggressive style:
- Class: Engineer
- Secondary Weapon: P18
- Gadget 1: RPG-7V2 (simple and powerful anti-vehicle tool)
- Gadget 2: AV Mine (ideal for holding choke points)
- Throwable: Frag Grenade
- Melee: Combat Knife
If you’re playing on infantry-only maps, switching to Assault offers flexibility through its sling ability — giving you the option to carry a carbine or shotgun as a backup.
Quick Tips for Mastering the PW7A2
- Stay on the move: Use your superior mobility to outflank and surprise enemies.
- Keep engagements short: The weapon shines within 25–40 meters. Avoid long-range duels.
- Control your bursts: Although recoil is minimal, controlled bursts keep headshots consistent.
- Leverage hip-fire: With laser accessories, you can confidently engage without aiming down sights.
- Use cover aggressively: Combine the PW7A2’s agility with slide and peek tactics for unpredictable positioning.
The PW7A2 remains one of Battlefield 6’s most rewarding weapons for players who thrive on precision and speed. Whether you prefer silent flanking or pure chaos at close range, this SMG adapts easily to your playstyle. With the loadouts and strategies above, you can turn the PW7A2 into a compact powerhouse that dominates tight corridors and city maps alike. Play Now!
Related Guides You Might Like:
- All Battlefield 6 Campaign Collectibles & Dog Tag Locations
- Battlefield 6 Best Loadouts for Every Vehicle
- Battlefield 6 Escalation Mode Guide and Strategy Tips
- Battlefield 6 All Vehicles List: Every Tank, Jet, and Helicopter
- Nile Guard Collectibles Battlefield 6: All Dog Tag Locations
- Battlefield Pro Token in Battlefield 6: How to Get & Redeem
- Battlefield 6: How to Spot and Ping Enemies
- How To Use the Range Finder in Battlefield 6
- How to Activate XP Boosters in Battlefield 6
- All Battlefield 6 Operation Gladius Dog Tag Locations
- Battlefield 6 No Sleep Dog Tags: All Collectible Locations and Rewards
- All Dog Tag Collectibles in The Rock Mission – Battlefield 6 Complete Guide
- All Battlefield 6 Recon Class Challenges and Rewards Guide
- Battlefield 6 Review – The Best Entry in a Decade

