If you are using a Samsung Galaxy Book and trying to access your files, you might suddenly see an error message like: “C:\ is not accessible – Access denied.”
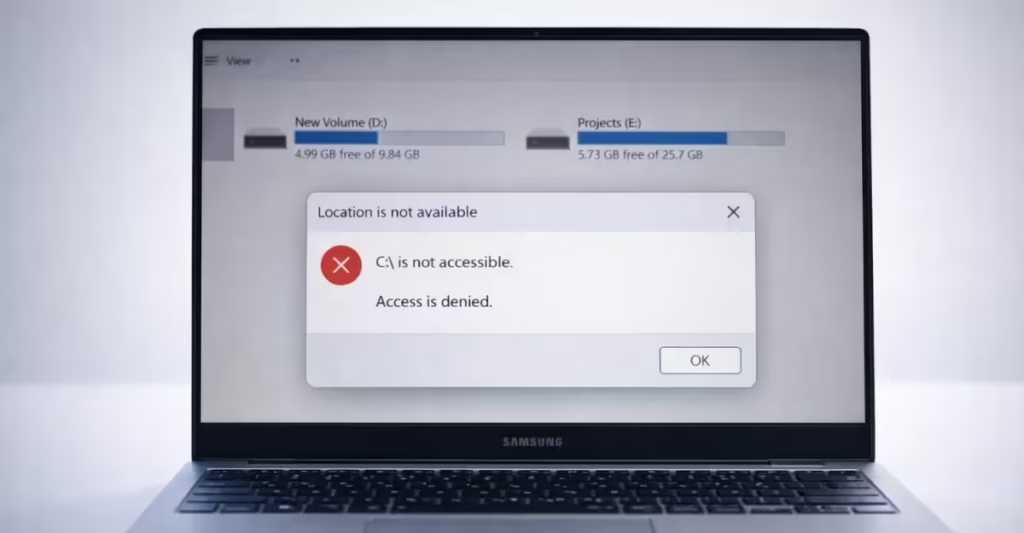
When this issue occurs, Windows blocks access to the C: drive, preventing you from opening files, launching applications, or performing normal system tasks. Programs such as Outlook, web browsers, Office apps, and system utilities may also fail to start because the operating system cannot read the main system drive.
What Causes the C Drive “Access Denied” Error on Samsung Devices
Microsoft confirmed that the issue affects certain Samsung Galaxy Book laptops and Samsung desktop models running Windows 11 24H2 and 25H2.
The problem appears after installing the February 2026 security update (KB5077181) or later updates.
However, Microsoft clarified that Windows updates are not the direct cause. The issue originates from the Samsung Galaxy Connect application, which modifies system permissions incorrectly.
When the app interacts with Windows security permissions, the system detects a conflict and revokes administrator ownership of the C drive to protect system integrity.
Once this happens, Windows blocks access to files and applications.
Devices Reported With the Issue
The issue has mainly been observed on Samsung Galaxy Book 4 series and certain Samsung desktop models.
Examples include:
- NP750XGJ
- NP750XGL
- NP754XGJ
- NP754XFG
- NP754XGK
- DM500SGA
- DM500TDA
- DM500TGA
- DM501SGA
These systems run Windows 11 version 24H2 or 25H2.
How to Fix the Samsung Galaxy Book C Drive Access Denied Error
If your Samsung Galaxy Book suddenly shows “C:\ is not accessible – Access denied”, follow these steps in order. Each step helps restore drive permissions and prevent the issue from happening again.
Step 1. Boot Windows Into Safe Mode
First, start Windows in Safe Mode so the system loads minimal drivers and services.
- On the Windows sign-in screen, hold SHIFT and click Restart.
- Navigate to Troubleshoot → Advanced Options → Startup Settings.
- Click Restart.
- Press 5 to select Safe Mode with Networking.
Safe Mode allows you to access system tools even when permission conflicts block normal login.
Step 2. Fix the Black Screen (If Explorer Doesn’t Load)
Some users see only a black screen with a cursor after signing in. This happens because Explorer.exe fails to launch.
Follow these steps to start the desktop manually:
- Press Ctrl + Alt + Delete.
- Select Task Manager.
- Click Run New Task.
- Type:
explorer.exe- Press Enter.
Your desktop should appear after Explorer starts.
Step 3. Restore C Drive Permissions
Step 3: Restore C Drive Ownership
Now restore administrator ownership of the drive.
- Open Command Prompt as Administrator.
- Run this command:
takeown /f C:\ /r /d yThis command assigns ownership of the drive back to the administrator account.
Step 4: Grant Full Administrative Permissions
Next, restore full control permissions.
Run the following command:
icacls C:\ /grant Administrators:F /t /c /lThis step gives the Administrators group full access to files and folders on the C drive.
Step 5: Reset Corrupted Permission Entries
Finally, clean up broken permission entries created by the Samsung software.
Run:
icacls C:\ /reset /t /c /lThis rebuilds the permission structure and removes invalid entries.
Step 6: Back Up Important Files Immediately
Once the drive becomes accessible again:
- Copy important documents.
- Export browser profiles or saved passwords.
- Back up project files and personal data.
The system may still contain corrupted configuration files.
Step 7: Perform a Samsung Factory Restore
To permanently eliminate the issue, perform a full system reset.
- Restart your laptop.
- Press F4 repeatedly during the Samsung logo screen.
- Open Samsung Recovery.
- Follow the prompts to restore factory settings.
This rebuilds the Windows installation and removes corrupted permission structures.
Step 8: Prevent the Issue From Returning
After the reset, apply these precautions immediately.
Disable Microsoft Store Auto Updates
- Open Microsoft Store.
- Click Profile → Settings.
- Turn App updates OFF.
This prevents problematic Samsung apps from reinstalling automatically.
Uninstall Problematic Samsung Apps
Remove these applications if they appear:
- Samsung Galaxy Connect
- Samsung Storage Share
- Samsung Shared Folder
These apps trigger the permission conflict.
Update Windows Normally
Once those apps are removed, install Windows updates normally.
The Windows update itself does not cause the issue.
Microsoft and Samsung confirmed the root cause and temporarily removed the problematic Galaxy Connect app from the Microsoft Store to stop further installations.
Samsung later republished a stable version of the application while engineers continue working on long-term fixes.

