Grand Mother Silk is one of Hollow Knight: Silksong’s most demanding encounters — a climactic duel that blends precision dodging, aerial control, and resource management. Found at the top of The Cradle, this boss marks the end of Act 2 and the threshold to Act 3, where Hornet’s toughest trials truly begin.
Preparing for the Fight
Before you enter The Cradle, it’s worth investing time in upgrading Hornet’s essential gear. The battle demands endurance, mobility, and strong Needle attacks. Aim to complete the following before attempting the boss:
| Upgrade | Benefit |
|---|---|
| All Needle Upgrades (x3) | Boosts attack power significantly. |
| 16 Mask Shards | Increases total health to ten Masks. |
| 18 Spool Fragments | Expands Silk capacity. |
| 3 Silk Hearts | Improves Silk regeneration rate. |
| 4 Tool Pouches & Crafting Kits | Allows more Tools and enhances their strength. |
You don’t need every upgrade to win, but the fight becomes far more forgiving if you’ve built Hornet’s health, Needle, and Tools beforehand.
How to Reach Grand Mother Silk
After defeating Lace for the second time in The Cradle, head right from her arena to find Terminus Ventrica Station. Rest at the Bench there — it’s your last safe stop before the final climb.

From the Station:
- Exit left, ascend the shaft, and take the left doorway at the top.
- Keep moving left to enter The Cradle proper.
- Complete the platforming sequence: activate levers to lift moving platforms and pogo off spikes when necessary.
- At the top lies a glowing silk orb. Interact with it and choose “Challenge” to trigger the Grand Mother Silk encounter.
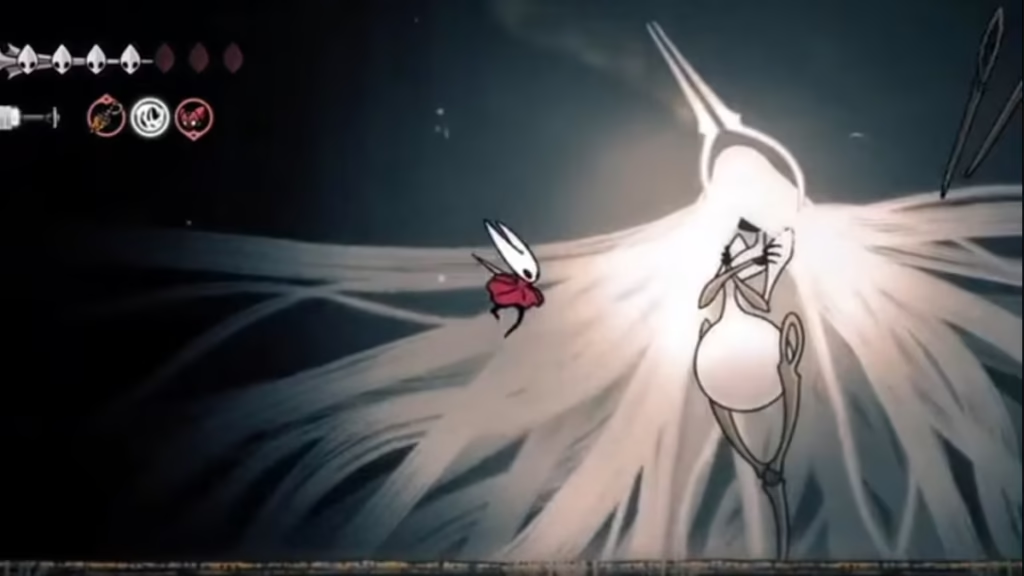
Grand Mother Silk Fight Overview
Grand Mother Silk (GMS) wields six enchanted needles and threads them with lethal precision. The fight unfolds in six escalating phases, each adding new hazards like explosive webs, falling rocks, and spike traps. While it sounds overwhelming, her attack cues are clear and consistent once learned.
Your target is her stomach, the only part that takes damage. The key to victory lies in aerial control — chaining jump slashes and pogo strikes while avoiding overlapping projectile patterns.
Phase Breakdown and Attack Patterns
Phase 1–2: Needle Barrage and Claw Swipes
GMS opens with a flurry of needle-based attacks:
- Needle Charge: Fires six needles (three horizontal, three vertical). Jump through the gap in the middle.
- Needle Swipe: Needles boomerang back after hitting walls — double-jump or dash away on the return.
- Claw Swipe: She raises a claw before slashing upward, followed by plunging her needles into the ground. Jump over and counterattack her mid-recovery.
From Phase 2 onward, she adds Explosive Webs that detonate after a short delay — stay mobile and never linger where silk threads pulse.
Phase 3–4: Environmental Hazards
The mid-fight introduces more stage hazards:
- Needle Rain: Six needles stab downward. Move laterally between impacts.
- Falling Rocks: Silk threads descend from above before rocks crash down — avoid the marked zones.
- Spike Traps: Silk threads rise from the floor before spikes erupt. Use pogo jumps to cross safely.
These hazards never overlap — when one appears, the other is disabled — giving you breathing room to reposition.
Phase 5–6: Speed and Pressure

GMS becomes faster, chaining attacks back-to-back:
- Dashes become unpredictable, forcing you to stay centered.
- Web explosions and needle volleys occur simultaneously.
- At half health, she fakes defeat, vanishes briefly, and returns angrier — the true midpoint of the battle.
Your goal here is to maintain pressure with short aerial combos and dodge preemptively rather than reactively. Her telegraphs are brief, so keep Silk reserves ready for Binding heals.
Best Strategy and Openings
- Attack Timing: Hit her stomach between volleys or after she finishes her Claw Swipe.
- Aerial Advantage: Use pogo strikes on needles or spike traps to stay airborne and chain hits.
- Thread Storm: This Silk Skill is ideal when she pauses or just after a dash, dealing sustained damage.
- Web Attack Windows: The safest time to heal (Bind) is during her Web charge — stay outside the threads and use the downtime.
Remember, GMS deals triple damage if her web explosion hits you. Dodge first, heal later.
Recommended Tools and Crests
The right loadout can simplify the battle drastically. Focus on mobility, survivability, and passive damage rather than heavy offense.
| Type | Tool / Crest | Benefit |
|---|---|---|
| Crest | Reaper Crest | Restores Silk on attack after Binding. Excellent sustain tool. |
| Skill | Thread Storm | Multi-hit Silk Skill for burst damage. |
| Yellow Tool | Magnetite Dice | Chance to negate incoming damage. |
| Blue Tool | Fractured Mask | Grants one extra life if defeated at low health. |
| Red Tool | Cogfly | Summons an ally that attacks automatically; pairs well with poison. |
| Red Tool (Alt) | Flintslate | Adds fire damage to Needle strikes. |
| Potion Tool | Flea Brew | Boosts speed and attack rate temporarily. |
If using the Pollip Pouch, all offensive Tools gain poison — a valuable passive for prolonged fights.
Twisted Child Variant Strategy
If you attempt the Twisted Child ending, the battle becomes a minimalist endurance test:
- The Twisted Bud disables Tools, Silk Skills, and healing.
- Rely purely on Needle upgrades and precise dodging.
- Get early hits during the opening cutscene — every point of damage counts.
- Learn to pogo off her needles to maintain constant aerial attacks.
Your goal here is survival and patience — this variant heavily rewards mastery of Hornet’s base combat.
Endings Connected to Grand Mother Silk
Your post-fight choice determines which ending path you unlock:
| Ending | Requirement |
|---|---|
| Weaver Queen | Defeat and Bind Grand Mother Silk after the fight. |
| Snared Silk | Complete the “Silk and Soul Wish” in Act 2, then play your Needolin instead of Binding. Unlocks Act 3. |
| Twisted Child | Defeat GMS while cursed by Greyroot’s Twisted Bud. |
Beating her under specific conditions grants the Weaver Queen, Snared Silk, or Twisted Child trophies, each offering unique lore and visual finales.
Related Guides You Might Like:
- Silksong Whispering Vaults Walkthrough and Boss Guide
- Silksong Cogwork Core Walkthrough and Puzzle Guide
- Silksong – How to Find and Beat the Wailing Mother
- How to Beat Unravelled in Silksong Boss Fight
- All Silksong Crafting Kit Locations and Upgrade Guide
- How to Get Double Jump in Silksong (Faydown Cloak Guide)
- Silksong Act 3 Guide – How to Unlock the Silk and Soul Quest
- The Unravelled Boss Guide – Hollow Knight Silksong
- How to Beat Moorwing in Silksong: Location, Moveset & Strategy
- Raging Conchfly Boss Guide | Hollow Knight Silksong
- How to Beat The Mist in Hollow Knight Silksong
- All Mementos in Hollow Knight: Silksong – How to Find Them All
- Silksong Trophy Guide: How to Unlock All Achievements
- A Vassal Lost Hollow Knight Silksong Quest Guide
- Bind Eva in Silksong: Sylphsong Ability & Entwined Achievement
- Where to Find Shakra in Hollow Knight Silksong
- Silksong Craftmetal Locations Guide – All 8 Spots and Uses
- Silksong Crest Locations and Effects Guide: All Crests Explained
- Hidden Hunter Quest Silksong Guide
- Rosary Cannon in Silksong: Location, How to Get It, and Best Uses
- Flintslate in Silksong: Location, Effects, and Best Combat Uses
- Hollow Knight Silksong Lost Merchant Walkthrough
The Grand Mother Silk encounter encapsulates Silksong’s signature design — punishing but fair, cinematic yet skill-based. Once you internalize her rhythm and respect her telegraphs, the fight transforms from chaos into choreography.
Conquer her, and you’ll not only earn one of Silksong’s defining victories but also unlock paths toward its most mysterious endings. Play Now!

