Windows updates normally install automatically in the background. However, some users suddenly see install error 0x800f0991 while installing a Windows update or cumulative patch.
When this error appears, Windows fails to complete the update process. The installation stops midway and shows a message such as:
Install error – 0x800f0991
This issue usually happens when Windows component store files become corrupted, system update files are missing, or the Windows Update cache breaks during installation.
However, you can fix the error with a few practical troubleshooting steps. Follow the solutions below in order until Windows installs the update successfully.
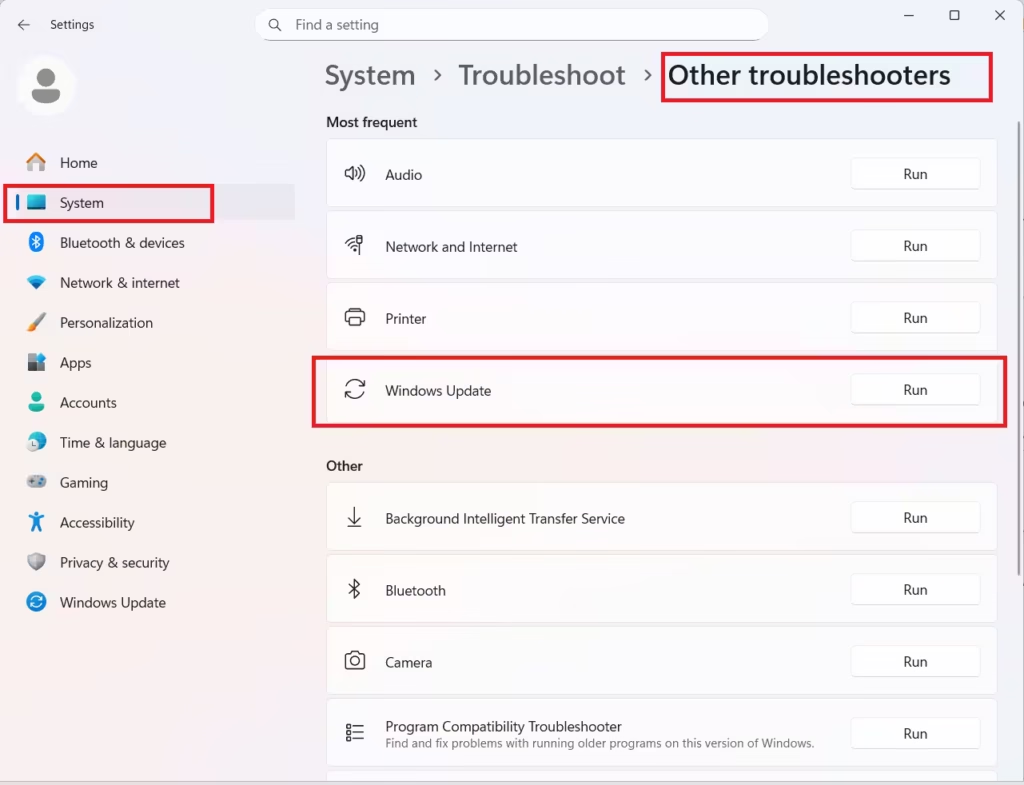
Method 1: Run the Windows Update Troubleshooter
Windows includes a built-in troubleshooting tool that detects update problems and repairs common configuration issues automatically.
Steps
- Open Settings
- Go to System
- Click Troubleshoot
- Select Other troubleshooters
- Find Windows Update
- Click Run
Allow Windows to complete the diagnostic process. Restart the computer and try installing the update again.
Method 2: Repair Windows System Image Using DISM
DISM repairs the Windows system image and replaces corrupted component store files. This fix resolves many update installation errors.
Steps
- Press Start
- Search for Command Prompt
- Right-click it and choose Run as Administrator
Run the following command:
DISM /Online /Cleanup-Image /RestoreHealthWait for the process to complete. The scan may take 10–20 minutes depending on system performance.
After the repair finishes, restart your computer.
Method 3: Run System File Checker (SFC)
After repairing the Windows image, run System File Checker to replace damaged system files.
Steps
Open Command Prompt as Administrator again and run:
sfc /scannowSFC scans the system and automatically replaces corrupted files with healthy versions.
Restart your computer once the scan finishes.
Method 4: Reset Windows Update Components
If the update cache becomes corrupted, Windows cannot download or install updates properly. Resetting the update services rebuilds the update system.
Steps
Open Command Prompt as Administrator and run the following commands one by one:
net stop wuauserv
net stop bits
net stop cryptsvc
Now rename the update cache folders:
ren C:\Windows\SoftwareDistribution SoftwareDistribution.old
ren C:\Windows\System32\catroot2 catroot2.old
Restart the services:
net start cryptsvc
net start bits
net start wuauserv
Restart your PC and check Windows Update again.
Method 5: Install the Update Manually
If Windows Update continues to fail, you can install the update manually through the Microsoft Update Catalog.
Steps
- Open Microsoft Update Catalog
- Search for the KB number of the failed update
- Download the correct version for your Windows system
- Run the installer file
Manual installation bypasses Windows Update and often resolves installation errors.
Method 6: Repair Install Windows 11
If none of the above methods solve the problem, perform a Windows repair install.
This process reinstalls Windows while keeping:
- Personal files
- Installed apps
- System settings
Steps
- Open Settings
- Go to System → Recovery
- Select Fix problems using Windows Update
- Click Reinstall now
Windows downloads a fresh system image and repairs the operating system automatically.
Additional Tips to Prevent Windows Update Errors
Follow these best practices to avoid future update failures:
- Keep at least 20 GB of free disk space
- Restart the system before installing major updates
- Avoid interrupting the update process
- Disable third-party antivirus temporarily during installation
- Install updates regularly instead of skipping many cumulative patches
In most cases, running DISM, SFC, and resetting Windows Update components resolves the problem quickly. If the error persists, a manual update installation or repair install restores the system and allows updates to install normally again.

