The KERNEL SECURITY CHECK FAILURE error (stop code 0x00000139) is one of the most persistent Windows 11 BSOD crashes. It appears randomly during gaming, after waking from sleep, right after a Windows update, or even on a clean install. Many users also see ntoskrnl.exe listed in the crash log, which adds to the confusion.
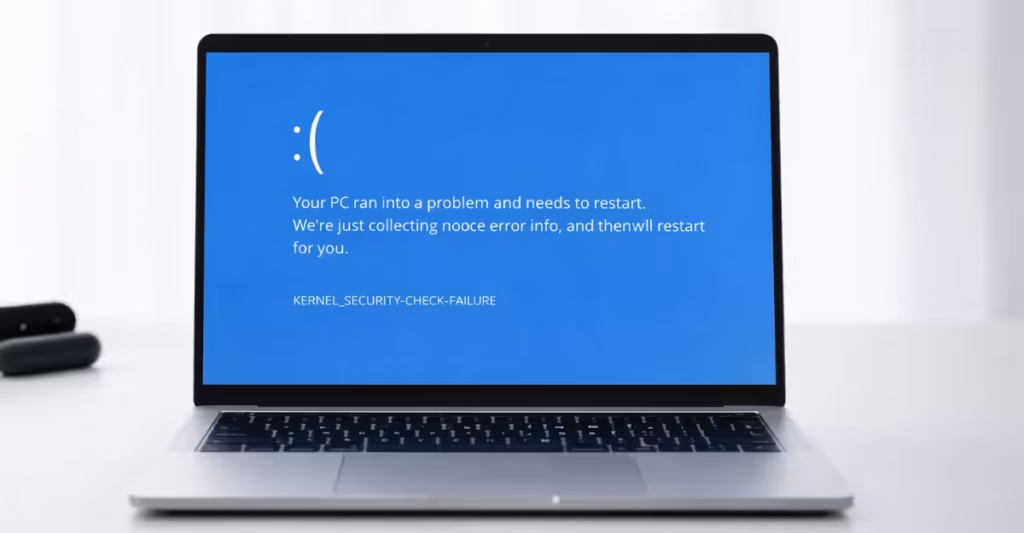
This guide explains exactly why the error occurs, how to read the crash report to find the real cause, and which fixes actually work including the BIOS-level steps that Windows reinstalls cannot touch.
Table of Contents
Why KERNEL_SECURITY_CHECK_FAILURE Appears on Windows 11
Windows 11 triggers stop code 0x00000139 when the kernel detects that a critical data structure has been corrupted. This is a self-protection mechanism, the system crashes on purpose to prevent silent data loss.
The most common causes are:
- A driver writes to memory it does not own
- RAM delivers unstable or incorrect data under load
- An SSD or NVMe controller corrupts data before it reaches Windows
- CPU overclocking or aggressive boost settings destabilize kernel memory
- Third-party software installs a low-level driver that conflicts with Windows 11 security features like VBS or Secure Boot
The error can appear alongside other rotating BSOD codes such as IRQL_NOT_LESS_OR_EQUAL or SYSTEM_SERVICE_EXCEPTION when a faulty driver produces different symptoms on each crash.
Ntoskrnl.exe appears in crash logs because it detects the corruption, not because it caused it. The real culprit is almost always a third-party driver or unstable hardware.
Step 1: Read the Crash Report First (Find the Real Cause)
Before changing anything, identify what Windows already recorded about the crash.
Option A: Use BlueScreenView (Fastest)
- Download BlueScreenView from NirSoft
- Run the tool, it reads minidump files automatically from
C:\Windows\Minidump - Look at the Caused By Driver column
- Note the filename (example:
nvlddmkm.sys= Nvidia driver,aswSP.sys= Avast)
Option B: Check Event Viewer
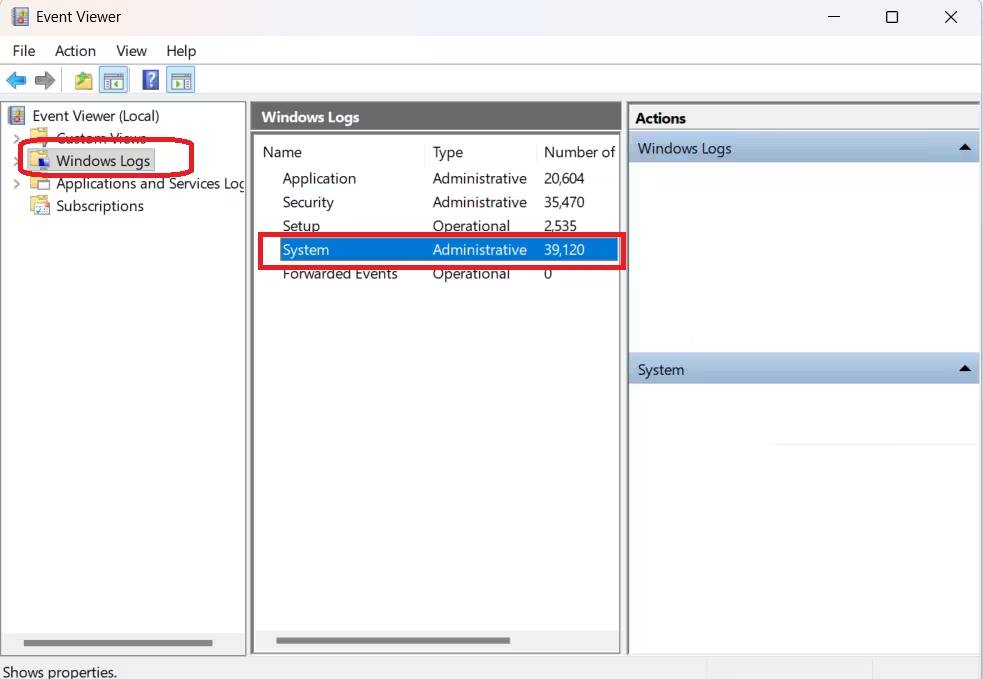
- Press Win + X and select Event Viewer
- Go to Windows Logs > System
- Filter for Critical events near the crash time
- Look for error source names that match a driver or service
The driver name from this step tells you exactly where to focus. If the dump points to a graphics driver, go to Step 3. If it points to an audio or RGB driver, go to Step 4. If the dump is inconclusive, continue from Step 2.
Step 2: Disable XMP or DOCP in BIOS
Unstable RAM is the single most common cause of KERNEL_SECURITY_CHECK_FAILURE on Windows 11. XMP and DOCP profiles push RAM above its rated JEDEC speed and voltage, which can corrupt kernel memory even on high-quality kits.
What to do:
- Restart your PC
- Enter BIOS (usually DEL or F2 at startup)
- Find Memory or Overclocking settings
- Set XMP / DOCP / EXPO to Disabled
- Save and exit
Run the system for 24 to 48 hours. If the crashes stop, RAM instability was the cause. You can try re-enabling XMP at a lower speed profile or increase DRAM voltage slightly for stability.
Step 3: Update or Roll Back Your Graphics Driver
A corrupt or incompatible graphics driver is the second most common cause. This applies to both Nvidia and AMD cards.
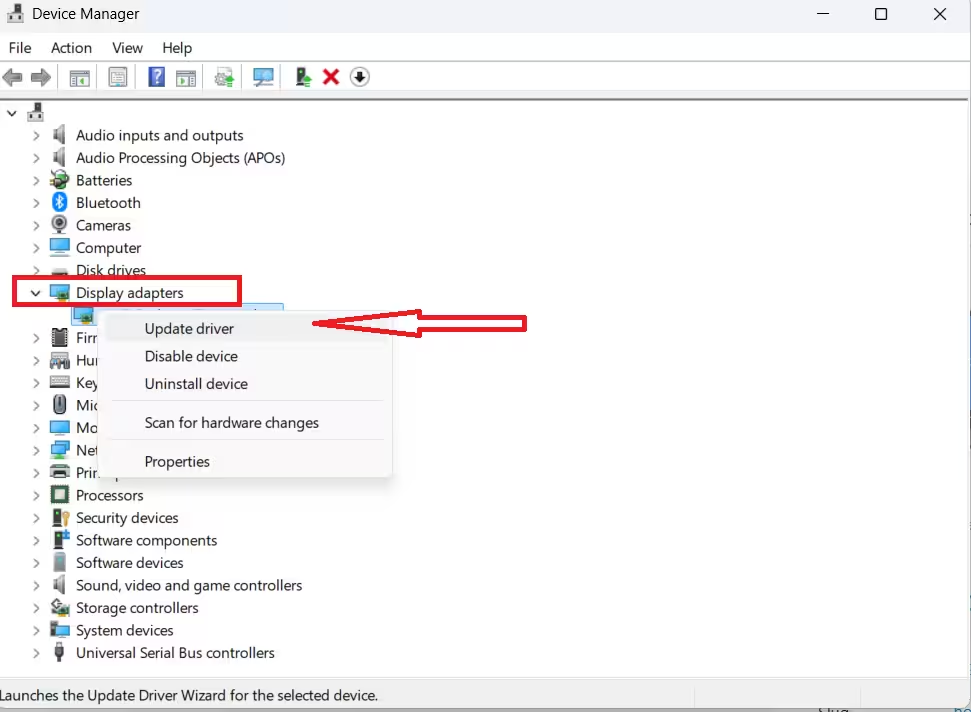
To update:
- Open Device Manager (Win + X)
- Expand Display adapters
- Right-click your GPU and select Update driver
- Choose Search automatically
To roll back if the crash started after a driver update:
- Right-click your GPU in Device Manager
- Select Properties > Driver tab
- Click Roll Back Driver
For a clean reinstall, use DDU (Display Driver Uninstaller) in Safe Mode before installing the new driver. A clean graphics driver install resolves most cases described in the blue screen after installing graphics driver guide.
Step 4: Remove Problem Software With Low-Level Drivers
Some software installs kernel-mode drivers that conflict with Windows 11 security features. These are among the hardest crashes to trace because the software name never appears in the dump.
Temporarily uninstall the following categories:
- RGB control software: Aura Sync, Mystic Light, iCUE, Armoury Crate
- Audio enhancement tools: Nahimic, Sonic Studio, DTS Sound Unbound
- Third-party antivirus: Avast, AVG, Kaspersky, McAfee
- Hardware monitoring tools: HWiNFO64, MSI Afterburner, NZXT CAM
- Virtual machine software: VMware, VirtualBox, Hyper-V (if enabled)
Restart after each removal and test for 30 minutes before uninstalling the next item. This isolates which application is responsible.
Step 5: Use Driver Verifier to Identify the Faulty Driver
Driver Verifier forces every driver to prove it behaves correctly. A faulty driver crashes immediately and reveals its name in the BSOD.
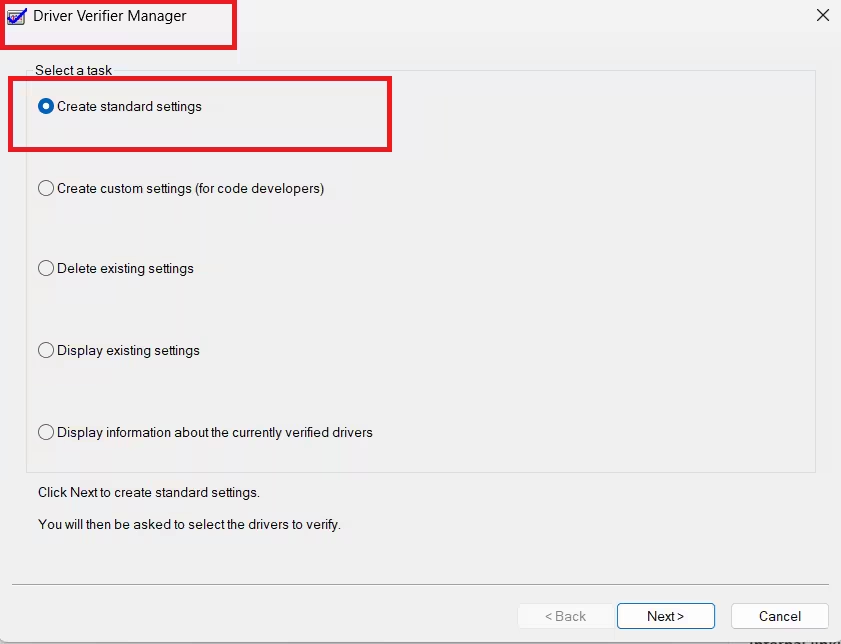
Enable Driver Verifier:
- Press Win + R, type
verifier, and press Enter - Select Create standard settings
- Select Select drivers from a list
- Check only non-Microsoft drivers (uncheck everything with Microsoft in the Provider column)
- Click Finish and restart
What to expect:
- A new BSOD appears within minutes or hours
- The crash screen names the actual faulty driver
- Note the driver filename
To disable Driver Verifier after finding the driver:
- Boot into Safe Mode
- Open Command Prompt as administrator
- Run:
verifier /reset - Restart normally
Once you have the driver name, search for an updated version from the hardware manufacturer’s website.
Step 6: Run SFC and DISM to Repair System Files
Corrupt Windows system files can trigger kernel security violations even without a driver or hardware problem.
Run SFC first:
- Open Command Prompt as administrator
- Run:
sfc /scannow- Wait for the scan to complete, do not close the window
- Restart if SFC reports repaired files
Run DISM if SFC finds unrepairable files:
DISM /Online /Cleanup-Image /RestoreHealthThis pulls replacement files directly from Windows Update. An internet connection is required.
Step 7: Update SSD or NVMe Firmware
Outdated storage firmware can corrupt memory silently before Windows detects it. This step is separate from updating the storage driver in Device Manager.
What to do:
- Identify your SSD model (open Device Manager > Disk drives)
- Visit the manufacturer’s website (Samsung, WD, Seagate, Kingston, Crucial)
- Download and run the official firmware update tool
- Restart after the update completes
This step matters most for NVMe drives on systems running Windows 11 24H2.
Step 8: Run Advanced RAM Testing
Windows Memory Diagnostic misses many real RAM failures. Use MemTest86 for a definitive test.
How to use MemTest86:
- Download MemTest86 and create a bootable USB using their tool
- Restart and boot from the USB
- Let the test run for at least 4 full passes (this takes several hours)
- Any error even one means the RAM is faulty or running at an unsafe speed
If errors appear with XMP disabled, the RAM itself may be failing. Test sticks one at a time to identify which module is bad.
Step 9: Reset CPU Overclocking and Undervolting
PBO, manual overclocks, and CPU undervolting profiles can destabilize kernel memory under load or during boost transitions.
What to reset:
- Enter BIOS
- Load Optimized Defaults or reset CPU settings manually
- Disable PBO (Precision Boost Overdrive) on AMD systems
- Remove any Intel XTU or ThrottleStop undervolting profiles
- Save and exit
Test the system under CPU load using Cinebench or Prime95 for at least 30 minutes.
When Hardware Replacement Is the Only Fix
Consider physical hardware replacement only after all software steps fail.
Hardware is likely faulty if:
- Driver Verifier shows no specific driver
- XMP is disabled and crashes continue
- MemTest86 reports errors after multiple passes
- Firmware updates do not help
Likely faulty components at this stage:
- RAM module (test sticks individually)
- Motherboard memory controller
- NVMe or SSD controller
- GPU (if dump consistently points to a display driver with no software fix)
A related issue that can occur alongside hardware instability is LiveKernelEvent errors causing screen flickering, which often shares the same driver or hardware root cause.
Related BSOD Errors on Windows 11
If the steps above do not resolve the crash, the underlying issue may be producing a different stop code on each restart. These guides cover the most common related errors:
- ntkrnlmp.exe Blue Screen Error in Windows 10 and 11: A kernel-level crash that shares causes with KERNEL_SECURITY_CHECK_FAILURE
- How to Fix ntoskrnl.exe BSOD Errors in Windows 11: Explains what ntoskrnl.exe reports and how to trace the real driver
- BSOD With Different BugCheck Strings in Windows 11: Covers rotating stop codes from a single root cause
- DPC_WATCHDOG_VIOLATION Fix Windows 10: Common on Ryzen systems and often triggered by the same drivers
- How to Fix CRITICAL_SERVICE_FAILED on Windows 11: Appears when a core service driver fails at boot
- How to Fix Blue Screen After Installing Graphics Driver: Covers GPU-specific BSOD crashes step by step
If crashes are producing unexpected shutdowns without a visible stop code, check the system rebooted without cleanly shutting down error guide for Event Viewer diagnosis steps.
For a full set of diagnostic utilities, see Best Windows Troubleshooting Tools for Common Errors.
FAQs
What causes KERNEL SECURITY CHECK FAILURE on Windows 11?
KERNEL_SECURITY_CHECK_FAILURE (stop code 0x00000139) on Windows 11 occurs when the kernel detects that a critical data structure has been corrupted. The most common causes are faulty or outdated drivers, XMP-enabled RAM running at unstable speeds, outdated SSD or NVMe firmware, and CPU overclocking.
Is ntoskrnl.exe responsible for KERNEL_SECURITY_CHECK_FAILURE?
No. Ntoskrnl.exe detects the corruption and triggers the crash to protect the system. A third-party driver or faulty hardware causes the actual memory violation. Use BlueScreenView or Driver Verifier to find the real responsible driver.
Can faulty RAM cause KERNEL_SECURITY_CHECK_FAILURE?
Yes. Unstable RAM is one of the top causes. Even brand-name RAM can crash when running at XMP or DOCP speeds. Disabling XMP in BIOS and running MemTest86 for four or more passes will confirm whether RAM is at fault.
Does reinstalling Windows fix KERNEL_SECURITY_CHECK_FAILURE?
In most cases, no. The error comes from drivers, RAM instability, or firmware issues that survive a Windows reinstall. BIOS-level settings like XMP and CPU overclocking profiles are unaffected by reinstalling the OS.
How do I find the driver causing KERNEL_SECURITY_CHECK_FAILURE?
Use BlueScreenView to read minidump files, it lists the responsible driver by filename. Driver Verifier is the more thorough option: it forces unstable drivers to crash immediately and names them on the blue screen.
Why does KERNEL_SECURITY_CHECK_FAILURE happen randomly?
Kernel memory corruption depends on timing, memory allocation patterns, and system load. A faulty driver or unstable RAM may pass light use but fail under gaming, video encoding, or sleep-wake cycles when memory pressure changes.
Can SSD or NVMe drives cause KERNEL_SECURITY_CHECK_FAILURE?
Yes. Buggy storage firmware can deliver corrupt data to the kernel before Windows can detect it. Updating the drive firmware through the manufacturer’s own tool not Device Manager often resolves unexplained crashes.
Does KERNEL_SECURITY_CHECK_FAILURE appear on Windows 11 24H2?
Yes. Some users on Windows 11 24H2 see this crash after upgrading due to driver compatibility changes introduced in that release. Updating all drivers, especially chipset, storage, and network after a major Windows update reduces this risk.

