Merging partitions in Windows 11 is a common task when you want to increase storage space on your system drive (C:). If you have a C drive and a D drive on the same disk, you can safely merge them so that your C drive has more free space.
- The C: drive contains Windows system files, so you cannot delete it. Instead, the safe method is to merge D: into C:.
- This process deletes everything on D:, so backup all important data before you start.
Why You Need to Merge C and D Drive in Windows 11
- To increase storage space on the system partition (C:).
- To fix low storage warnings on C: drive.
- To simplify disk management if you don’t use the D: drive.
- To improve performance when Windows has more space to handle updates, apps, and temporary files.
Back Up Your Files (Mandatory)
Before making any changes, back up all important files from D:.
- Open Settings → go to Accounts → select Windows backup.
- Choose Manage sync settings to configure which folders sync to OneDrive.
- Select your folders and click Start backup.
This ensures that if anything goes wrong, you can restore your files safely .
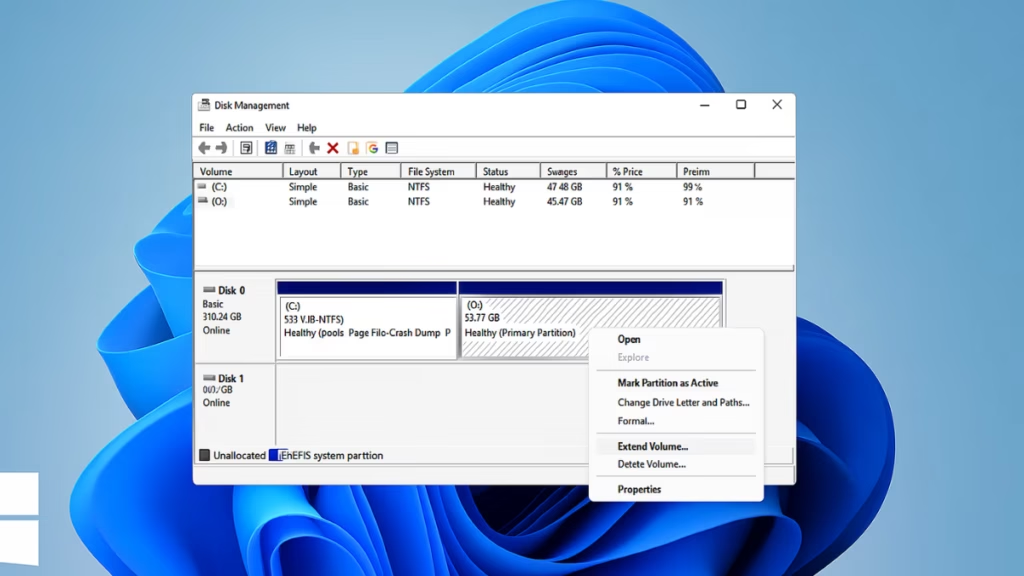
Method 1: Merge Drives Using Disk Management
Windows 11 includes a built-in tool called Disk Management that can merge partitions by deleting one and extending the other.
Steps:
- Open Disk Management
- Press Win + X and select Disk Management.
- Delete D: Drive
- Right-click on the D: partition → choose Delete Volume.
- The space will now show as Unallocated.
- Extend C: Drive
- Right-click on C: drive → select Extend Volume.
- Follow the wizard and add the unallocated space.
- Done
Now your C: drive will now include the previous D: drive space.
Method 2: Merge Drives Using Command Prompt (Diskpart)
If you prefer commands, you can use the Diskpart tool.
- Press Win + S, type cmd, right-click, and select Run as Administrator.
- Enter these commands one by one:
diskpart
list volume
select volume D
delete volume
select volume C
extend
exit- Your C: drive will now take over the deleted D: drive’s space.
Method 3: Merge Drives with Third-Party Tools (No Data Loss)
If Disk Management shows Extend Volume as greyed out, or if you want to merge without losing data, third-party tools are the best choice.
Recommended options include:
- MiniTool Partition Wizard
- EaseUS Partition Master
- AOMEI Partition Assistant
For example, with MiniTool:
- Install and launch the program.
- Select C: drive → click Partition → choose Merge Partition.
- Select D: drive as the target to merge.
- Apply changes.
These tools allow merging even if unallocated space is not adjacent to C: .
When You Cannot Merge C and D Drive
- Keep D: as a storage or backup drive.
- If C: and D: are on different physical disks, merging isn’t possible.
- In that case, you can:
- Move personal files from D: to C:
FAQs: Merge C and D Drive Windows 11
1. Will merging C and D drive delete my files?
Yes, everything on D: will be deleted if you use Disk Management or Diskpart. Always back up before starting.
2. Can I merge drives without losing data?
Yes, but you’ll need a third-party partition manager like EaseUS or AOMEI.
3. Why is Extend Volume greyed out?
This happens if the unallocated space is not directly next to the C: partition. Third-party tools can fix this.
4. Can I merge drives if they are on different disks?
No, merging works only if C and D are on the same physical disk.
Merging C and D drives in Windows 11 is a practical way to expand system storage. The most reliable method is to back up files, delete D: drive, and extend C: using Disk Management. For advanced flexibility and no-data-loss merging, use trusted third-party partition managers.
With a larger C: drive, Windows will run more smoothly, updates won’t fail due to space, and you’ll have one less drive to manage.

