The Into the Fray quest in ARC Raiders is one of the game’s most intense missions, putting players face-to-face with a Leaper — a high-threat ARC that’s as fast as it is deadly. While it’s possible to finish this mission solo, having a coordinated squad can make a big difference. Below is a step-by-step guide to completing Into the Fray, from finding the Leaper to safely extracting its Pulse Unit.

Quest Overview: Where to Start
You’ll receive Into the Fray from Trader Shani in Speranza. The mission includes only two objectives, but both require preparation and strategy:
- Destroy a Leaper
- Obtain a Leaper Pulse Unit
Despite its short task list, this quest is far from easy. Leapers are fast, jump incredible distances, and deal heavy damage with their melee lunges — so positioning and timing matter more than brute firepower.
Recommended Loadout and Preparation
Before heading into battle, make sure you’re equipped for a prolonged fight. The Leaper’s mobility and armor demand both high-damage weapons and good sustain options.
Suggested Loadout:
- Primary Weapon: Ferro (Level 4 or higher)
- Heavy Ammo: 2 stacks (40 rounds total)
- Wolfpack Grenades: 2x
- Support Items: Bandages and Shield Recharges
Tip: Wolfpacks deal consistent explosive damage, making them ideal for breaking the Leaper’s armor and staggering its movement.
Where to Find a Leaper
Leapers tend to appear in high-value loot zones and near extraction points, but one of the most reliable locations is on the Dam Battlegrounds map near the Water Treatment Control POI. Alternatively, if you prefer close-quarters cover, another effective farming area is the Spaceport, specifically near the Arrival Building tunnel entrance.

If the Leaper doesn’t spawn immediately, rotate through nearby areas with ARC patrols or marked high-value regions. It may take a few cycles before one appears.
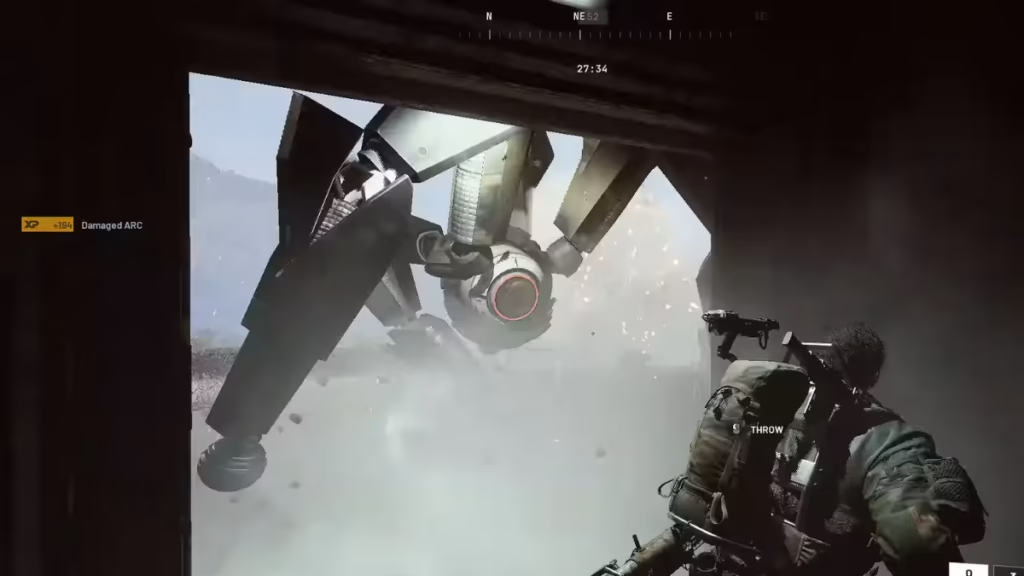
How to Defeat the Leaper
Once a Leaper spots you, it will close the distance fast — faster than most ARCs in the game. The key to surviving this fight is controlling line of sight and targeting its weak points.
Step 1: Lure and Position
If you’re near the Water Treatment Control, use the bunker structures for safety. Leapers can’t enter these enclosed spaces, allowing you to shoot from cover without being crushed.
At the Spaceport, retreat into the Arrival Building tunnel, which has a narrow entry point the Leaper struggles to navigate.
Step 2: Aim for Weak Spots
Focus on the Leaper’s leg joints or its central eye. Breaking the joints will slow its movement, while direct hits to the eye inflict massive damage.
When using the bunker or tunnel method, it’s easier to land precise hits on the eye since you can hold your position safely.
Step 3: Use Wolfpacks and Heavy Ammo
Open the fight with Wolfpack grenades to chip away at its health. Follow up with heavy ammo bursts when the Leaper staggers or exposes its weak points. Repeat this pattern until it collapses.
Step 4: Avoid the Leap Attack
When it jumps toward you, dodge sideways or move into cover immediately. The Leaper’s slam attack deals huge splash damage, especially in open terrain.
Obtaining the Leaper Pulse Unit
Once the Leaper is destroyed, search its remains for the Leaper Pulse Unit. It’s usually found among the mechanical wreckage, though sometimes it blends into the terrain.
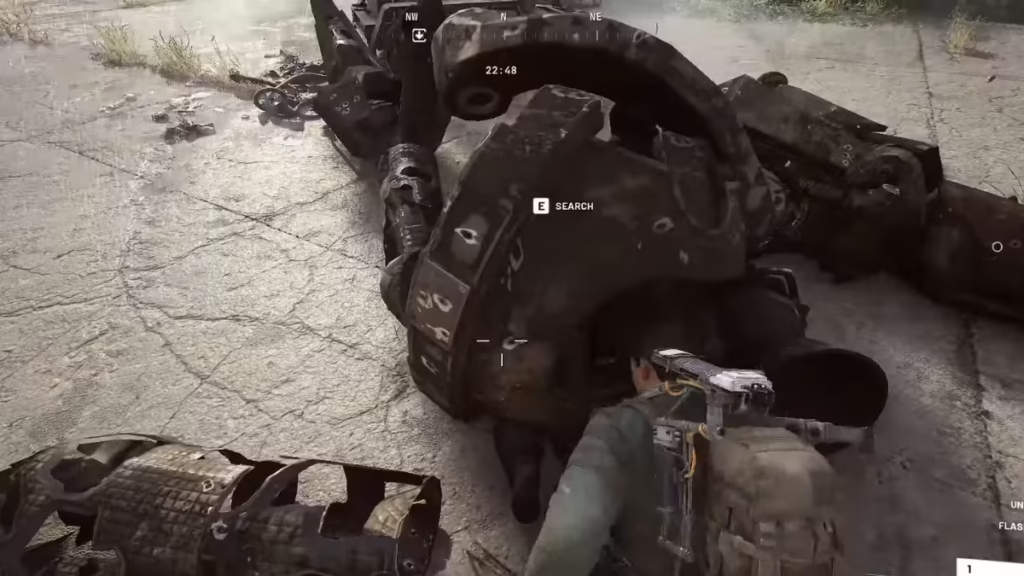
After picking it up, store it in your Safe Pocket — this ensures you keep it even if you’re defeated before extraction. Finally, head to an extraction point (such as the elevator lift near the Water Treatment Control) and return to Speranza to deliver it to Shani.
Rewards for Completing Into the Fray
Completing the Into the Fray quest rewards you with both cosmetics and useful gear. Here’s what you’ll receive upon turning in the Leaper Pulse Unit:
| Reward Item | Type | Quantity |
|---|---|---|
| Radio Renegade | Outfit | 1 |
| Burgerboy | Charm | 1 |
| Vulcano III | Weapon | 1 |
| Shotgun Ammo | Ammunition | 40 |
These rewards mark a satisfying payoff for one of ARC Raiders’ more dangerous solo missions, especially the Vulcano III, which fits perfectly for close-quarters combat.
Pro Tips for Players
- Scout First: Don’t rush into open areas. Watch for ARC patrol routes to avoid aggroing multiple enemies during the fight.
- Use Cover Smartly: Bunkers, tunnels, and buildings are your best allies against the Leaper’s mobility.
- Bring Friends: While solo play is doable, a coordinated squad can take down the Leaper faster and secure extraction more easily.
- Safe Pocket Everything: Always keep mission-critical items in the Safe Pocket before heading back to base.
Into the Fray is a true test of endurance and tactical awareness in ARC Raiders. It rewards patient play and smart positioning more than raw damage. Once you’ve mastered this encounter, you’ll be ready to take on even tougher missions like Our Presence Up There and Out of the Shadows. Play Now!
Related Guides You Might Like:
- ARC Raiders: Spaceport Hidden Bunker Location Guide
- ARC Raiders: How to Find Damaged Heat Sink
- How to Complete The Root of the Matter Quest in ARC Raiders
- How to Complete A Warm Place to Rest Quest in ARC Raiders
- A Balanced Harvest ARC Raiders Guide – Location & Rewards
- Best ARC Raiders FPS Settings & Visibility Guide
- A Reveal in Ruins ARC Raiders – ESR Analyzer Location Guide
- Marked for Death Quest Guide – ARC Raiders Walkthrough
- ARC Raiders All Quests List – Complete Quest Guide
- How to Find Bilguun’s Hideout in ARC Raiders
- All ARC Raiders Workshop Upgrades and Materials Guide
- ARC Raiders Weapon Tier List – The Best Guns to Take Topside
- Great Mullein ARC Raiders – How to Find and Use It

