Secure Boot is a core security requirement for Windows 11. It ensures your PC loads only trusted software during startup and blocks malicious boot-level attacks. If Secure Boot is disabled, Windows 11 may refuse upgrades or show compatibility warnings.

What Is Secure Boot in Windows 11?
Secure Boot is a UEFI security feature. It allows your system to start only with firmware, bootloaders, and drivers that the manufacturer trusts. This protection helps stop rootkits and boot-time malware before Windows loads.
Windows 11 officially requires:
- UEFI firmware
- Secure Boot enabled
- TPM 2.0
Step 1: Check Secure Boot Status in Windows 11
Before changing BIOS settings, confirm whether Secure Boot is already enabled.
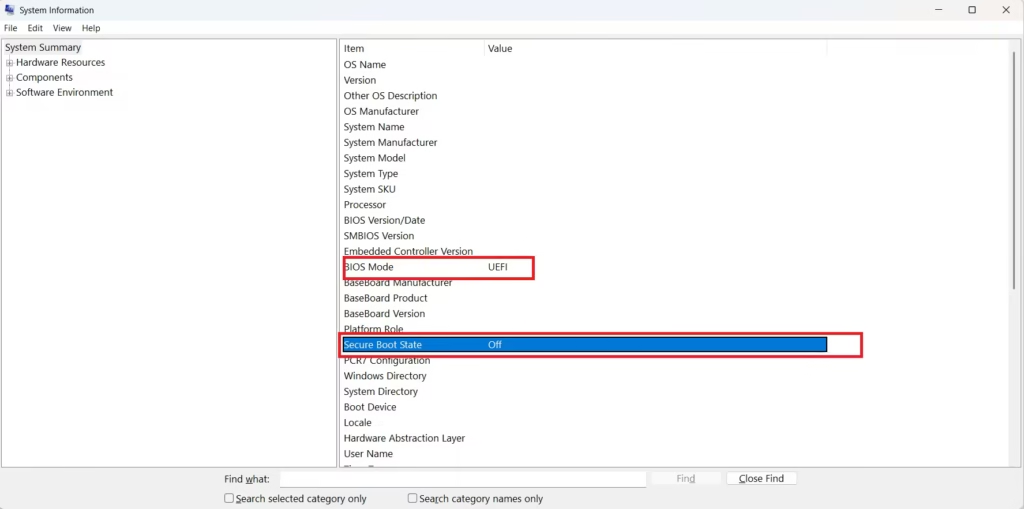
- Press Windows + R
- Type
msinfo32 - Press Enter
Look for these entries:
- BIOS Mode: UEFI
- Secure Boot State: On
If Secure Boot is Off or BIOS Mode shows Legacy, continue with the steps below.
Step 2: Enter UEFI Firmware Settings
You must enable Secure Boot from UEFI (BIOS).
- Open Settings
- Go to System → Recovery
- Click Restart now under Advanced startup
- Your PC will restart automatically
- After restart, select Troubleshoot
- Click Advanced options
- Choose UEFI Firmware Settings
- Click Restart Settings
- Click Restart
Your PC will reboot into the BIOS/UEFI screen.
Step 3: Switch Boot Mode to UEFI (If Required)
Secure Boot works only in UEFI mode.
Inside BIOS:
- Open Boot, Advanced, or Startup settings
- Set:
- Boot Mode: UEFI
- CSM / Legacy Support: Disabled
If Windows was installed using Legacy BIOS, switching to UEFI can prevent Windows from booting. Always back up data before making changes.
Step 4: Enable Secure Boot
Now enable the feature.
- Open the Security, Boot, or Authentication tab
- Locate Secure Boot
- Set it to Enabled
- If Secure Boot Mode appears:
- Select Standard
- If prompted:
- Choose Install Default Secure Boot Keys
Step 5: Save Changes and Restart
- Press F10 or select Save & Exit
- Confirm changes
- Let Windows boot normally
Step 6: Verify Secure Boot Is Enabled
After Windows loads:
- Press Windows + R
- Type
msinfo32 - Confirm:
- Secure Boot State: On
Your system now meets Windows 11 Secure Boot requirements.
Common Secure Boot Problems and Fixes
1. Secure Boot Option Not Visible
- Disable CSM
- Update motherboard BIOS
- Ensure BIOS Mode is UEFI
2. PC Fails to Boot After Enabling Secure Boot
- Windows may use MBR instead of GPT
- Disk conversion to GPT may be required (advanced users)
3. Secure Boot Enabled but Windows 11 Still Shows Unsupported
- Enable TPM 2.0 in BIOS
- Update firmware and chipset drivers
Why Secure Boot Is Important for Windows 11 Security
Secure Boot protects your system before Windows loads. It blocks hidden malware, protects system integrity, and ensures compatibility with Windows 11 updates. Microsoft strongly recommends keeping it enabled at all times.
Secure Boot is not optional for Windows 11. It is a critical security layer that keeps your PC safe and compatible with future updates. Once enabled correctly, you do not need to change it again.
If you want, tell me your laptop brand or motherboard model, and I’ll provide exact BIOS menu paths for your device in comments section.

