Secure Boot is a UEFI firmware feature that blocks unsigned or tampered software from loading before your operating system starts. If you are installing Windows 11 or seeing a Secure Boot warning in PC Health Check, you need to turn it on in your MSI BIOS.
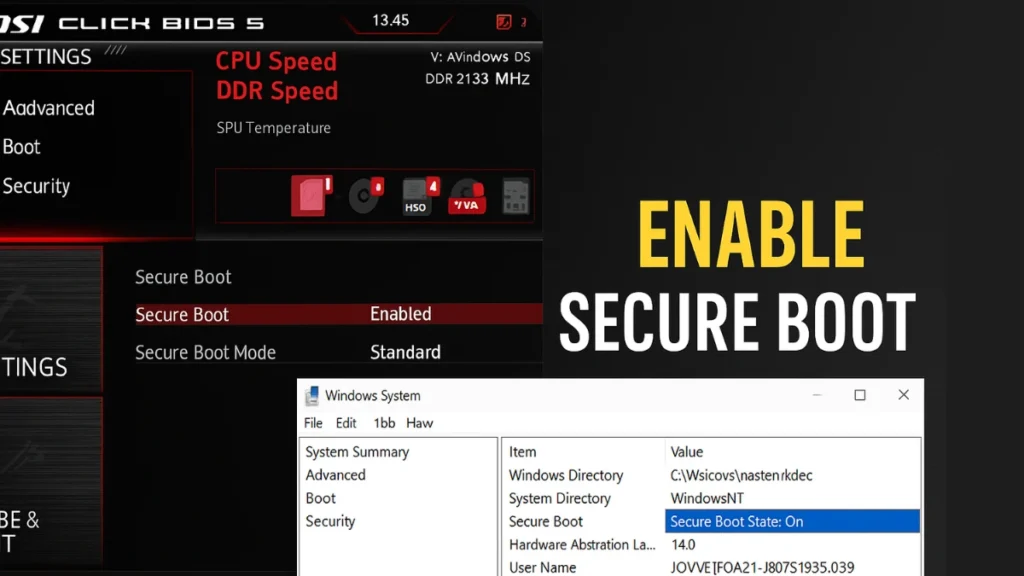
This guide covers every step for MSI boards using Click BIOS 5, including how to fix the most common errors users hit along the way.
Table of Contents
What You Need Before You Start
Before touching your BIOS settings, confirm the following:
- UEFI mode is active: Secure Boot does not work in Legacy (CSM) mode.
- Windows is installed in UEFI mode: If it was installed in Legacy mode, enabling Secure Boot will prevent your PC from booting.
- TPM 2.0 is enabled: Required alongside Secure Boot for Windows 11 (AMD boards use fTPM; Intel boards use PTT).
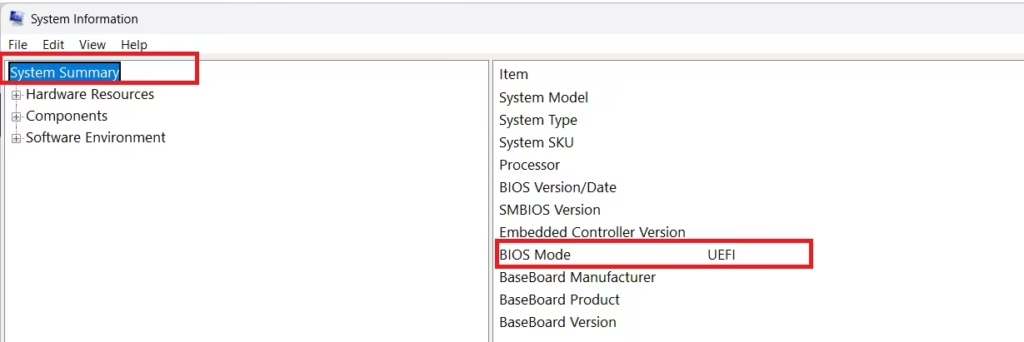
To check if Windows is already installed in UEFI mode: press Windows + R, type msinfo32, and hit Enter. Look for BIOS Mode in the System Summary. If it says UEFI, you are good to proceed. If it says Legacy, do not enable Secure Boot until you convert your installation.
How to Enable Secure Boot in MSI Click BIOS 5
Step 1: Enter the BIOS
Restart your PC. When the MSI logo appears, press the DEL key repeatedly until the BIOS interface loads.
Tip: If your PC boots too fast to catch the logo, go to Settings > Update & Security > Recovery > Advanced Startup > Restart Now in Windows, then select UEFI Firmware Settings.
Step 2: Switch to Advanced Mode
MSI Click BIOS 5 opens in EZ Mode by default. Press F7 to enter Advanced Mode, where the Secure Boot settings are located.
Step 3: Set Boot Mode to UEFI
Navigate to: Settings > Advanced > Windows OS Configuration
Find Boot Mode Select and set it to UEFI.
If it is currently set to Legacy + UEFI or Legacy, change it to UEFI only. This is a required step — Secure Boot will not appear as an option until this is done.
Step 4: Disable CSM
Navigate to: Settings > Advanced > CSM / Legacy Support
Set CSM to Disabled.
CSM (Compatibility Support Module) is a backward-compatibility layer for older hardware and operating systems. It must be turned off because it conflicts directly with Secure Boot. Most modern hardware and all Windows 11 installations do not need it.
Step 5: Open Secure Boot Settings
Navigate to: Settings > Advanced > Secure Boot
Step 6: Enable Secure Boot
Set Secure Boot to Enabled.
You will see a Secure Boot Mode option with two choices:
| Mode | Who It Is For |
|---|---|
| Standard | Most users. Uses manufacturer keys pre-loaded on your MSI board. Recommended for Windows 11. |
| Custom | Advanced users who need to manage their own keys — for example, running unsigned kernels or enterprise environments. |
For the vast majority of users, Standard mode is the correct choice.
Step 7: Save and Restart
Press F10 to save your changes. Confirm when prompted. Your PC will restart.
How to Verify Secure Boot Is On (in Windows)
Once Windows loads, confirm Secure Boot is active:
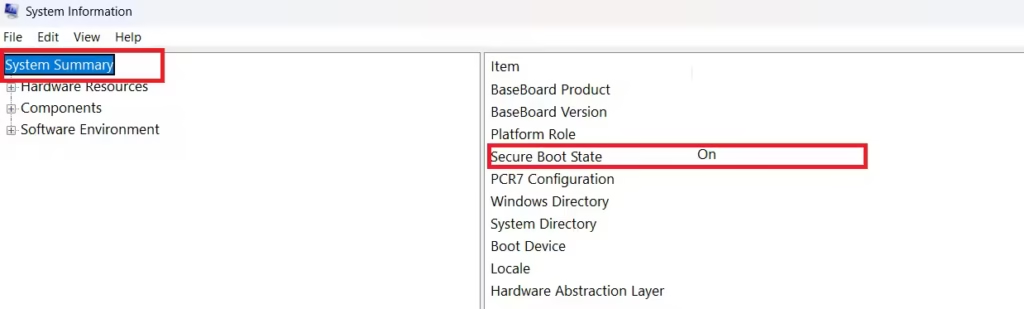
- Press
Windows + R, typemsinfo32, and press Enter - In the System Summary panel on the left, scroll down to find Secure Boot State
- If it reads On — Secure Boot is enabled and working
If it still reads Off after following all the steps above, see the troubleshooting section below.
MSI MAG, MPG, MEG, and PRO: Does the Navigation Path Differ?
MSI Click BIOS 5 is used across several board lines including MAG, MPG, MEG, and PRO series. The navigation path is the same across all of them. The visual theme and layout may look slightly different depending on your board’s firmware version, but the menu structure — Settings > Advanced > Secure Boot — is consistent.
If your board is running an older BIOS version, update the firmware via MSI’s website before trying to enable Secure Boot. Outdated firmware occasionally shows Secure Boot as unavailable even when CSM is disabled.
Why Windows 11 Requires Secure Boot
Microsoft made Secure Boot a hard requirement for Windows 11. If Secure Boot is off:
- Windows 11 installation will be blocked on a clean install
- Future feature updates (like 24H2 and 25H2) may fail silently or get held back
- The PC Health Check app will flag your machine as incompatible
- Certain Windows Security features will show warnings
Enabling Secure Boot alongside TPM 2.0 removes all of these blocks.
Running a Dual-Boot Setup (Linux + Windows)?
If you dual-boot Linux alongside Windows, Secure Boot compatibility depends on your Linux distribution:
- Ubuntu, Fedora, Debian, Linux Mint use Microsoft-signed bootloaders (SHIM) and work fine with Secure Boot enabled in Standard mode.
- Arch Linux, Gentoo, and custom kernels run unsigned kernels that will fail. You need to either sign your kernel manually or use Custom Secure Boot mode with your own keys.
- If Linux stops booting after enabling Secure Boot, switch Secure Boot Mode from Standard to Custom and enroll your distribution’s key via the Key Management option in the same BIOS menu.
Do not disable Secure Boot system-wide just to run Linux. Use a signed kernel or enroll your own key instead.
Common Secure Boot Errors and Fixes
These are the most common Secure Boot issues MSI users run into and exactly how to fix each one.
| Error | Cause | Fix |
|---|---|---|
| Secure Boot option is greyed out | CSM is still enabled, or Boot Mode is not set to UEFI | Set Boot Mode to UEFI under Settings > Advanced > Windows OS Configuration, then disable CSM under CSM/Legacy Support |
| PC won’t boot after enabling Secure Boot | Windows or Linux was installed in Legacy mode — existing boot files are not UEFI-signed | Convert disk from MBR to GPT using MBR2GPT (built into Windows 10/11), or reinstall Windows from a UEFI-bootable USB |
| Secure Boot State still shows “Off” in msinfo32 | Setting was not saved correctly, or BIOS firmware is outdated | Re-enter BIOS, confirm Secure Boot is Enabled, press F10 to save. If the issue persists, update MSI board BIOS to the latest version and retry |
| Linux distribution won’t boot | Kernel or bootloader is unsigned | Switch to a distro with a signed bootloader (Ubuntu, Fedora), or use Custom Secure Boot Mode and enroll your distro key via Key Management in the BIOS |
| “Windows cannot verify the digital signature” error | A driver or system file is unsigned | Boot into Safe Mode, update or remove the problematic driver, then restart normally |
Secure Boot in MSI Click BIOS 5 takes under five minutes to configure if your system is already in UEFI mode. For Windows 11 users, it is not optional — it is a requirement for both installation and continued update support. Set it to Enabled with Standard mode, save with F10, and verify in msinfo32 once Windows loads.
If you hit a specific error not covered above, leave the exact error message in the comments and the board model you are using.
FAQs
Does enabling Secure Boot in MSI Click BIOS 5 delete my data?
No. Secure Boot is a firmware setting that only controls what software loads before Windows starts. It does not touch your files, partitions, or installed applications.
Can I enable Secure Boot without reinstalling Windows?
Yes, as long as Windows was installed in UEFI mode. If it was installed in Legacy mode, you must first convert your disk from MBR to GPT using the built-in MBR2GPT tool before enabling Secure Boot.
Why is the Secure Boot option greyed out in MSI BIOS?
This happens when CSM is still enabled or Boot Mode is not set to UEFI. Go to Settings > Advanced > Windows OS Configuration, set Boot Mode to UEFI, then disable CSM under CSM/Legacy Support. After that, the Secure Boot option becomes clickable.
Is Secure Boot the same as TPM 2.0 in MSI BIOS?
No. Secure Boot controls which software is allowed to load at startup. TPM 2.0 (or fTPM on AMD boards) is a separate hardware security chip required for features like BitLocker and Windows Hello. Windows 11 requires both to be enabled.
Will enabling Secure Boot in MSI Click BIOS 5 affect gaming or PC performance?
No. The Secure Boot check runs in milliseconds during startup and has zero effect on in-game performance, frame rates, RAM speeds, or any other runtime activity.

