The side mission A Traitor Within in Borderlands 4 includes one of the more unusual puzzles you’ll encounter—Willem’s Node puzzle. Unlike the usual firefights, this task requires precision, patience, and the right positioning. If you’ve been stuck staring at glowing prisms, this guide breaks down how to align and shoot Willem’s Nodes step by step.
How to Start Willem’s Node Puzzle in A Traitor Within
You’ll reach Willem’s puzzle during the later portion of A Traitor Within. After defeating waves of Order troops and a Brute Electi, you’ll pull a lever at the console inside the traitor’s bunker. This activates Willem’s holographic interface and begins the node sequence challenge.
Before diving in, make sure you’re equipped with accurate, single-shot weapons such as Assault Rifles, Hand Cannons, or SMGs. Avoid explosives or wide-spread shotguns, as misfires won’t register.
Step 1 – Target the First Red Node
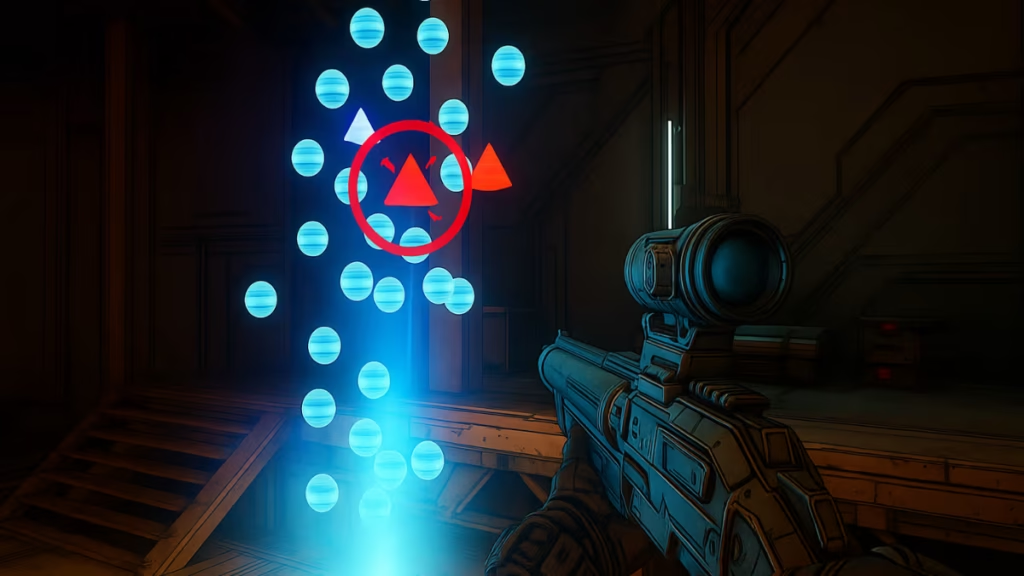
The puzzle begins with a hologram that projects blue prisms and a single red node. Your goal is to line up the red node with the blue prisms behind it. Only when they’re properly aligned will your crosshair highlight red. At this point, shoot the red node to progress.
Don’t worry if you fire too early—incorrect shots won’t break the puzzle, they’ll simply do nothing.
Step 2 – Align the Mid-Sequence Nodes
After clearing the first prism, more nodes will appear. Position yourself carefully:
- Stand near Levaine in the northwest corner of the room and adjust your aim until the holographic triangles overlap.
- When the alignment looks exact, fire at the red prism.
You’ll repeat this process a second time, but this time move to a slightly different angle in front of Levaine to achieve the overlap. Think of it as solving a visual alignment puzzle rather than a timed challenge.
Step 3 – Reach the Higher Platform
The final node isn’t accessible from ground level. To get the right angle:
- Head to the south corner of the cockpit.
- Climb the stacked crates or boxes until you’re on a raised platform.
- From this vantage point, line up your shot and destroy the last red node.
Once you’ve destroyed all the prisms in sequence, the hologram will deactivate.
Step 4 – Collecting the Micro Drive
With the puzzle solved, return to the console and retrieve the micro drive. Hand it over to Levaine to complete the objective. At this point, the A Traitor Within mission wraps up, and you’ll be rewarded with XP, Eridium, money, a shotgun (blue or purple rarity), and the cosmetic ECHO-4 Paintjob: Middle Name “Danger”.
Related Guides You Might Like:
- Borderlands 4 Mob Mentality Side Mission Guide & Rewards
- Borderlands 4: Shadow of the Mountain Walkthrough
- Borderlands 4: His Vile Sanctum Walkthrough & Boss Guide
- Top 10 Legendary Shields in Borderlands 4 (Farming Guide)
- How to Complete TASK Master Quest and Replace Power Core
- Borderlands 4 Class Mod Drops Broken for Most Players
- Borderlands 4 Vault Hunters Guide: Best Classes, Skills, and Builds Explained
- Oddman in Borderlands 4: Should You Punch or Shoot Him?
- How to Level Up in Borderlands 4 – Fast XP Farming & Leveling Guide
- SHiFT User Guide Borderlands 4 – Redeem Codes & Link Accounts
- Borderlands 4 Quick Tips – Beginner Guide to Survive on Kairos
Best Tips for Shooting Willem’s Nodes
- Weapon Choice Matters: Stick with accurate, non-explosive guns. A scoped Assault Rifle is a safe pick.
- Patience Is Key: If your aim doesn’t highlight red, reposition until the prisms overlap cleanly.
- Use Elevation Wisely: Don’t forget the final step requires climbing to a higher spot; staying grounded won’t give you the right shot.
Unlike most Borderlands challenges, which test gunplay or survival, this puzzle slows things down and asks you to pay attention to perspective. It’s a clever breather between chaotic firefights and gives the mission a memorable twist. Completing it also feels rewarding, since it directly ties to uncovering the traitor’s secrets and advancing the Electi storyline. Play Now!

