When Windows 11 crashes with a Blue Screen of Death (BSOD) or a serious app failure, the system creates a dump file. This file captures critical system information at the exact moment of the crash and is one of the most reliable ways to identify what went wrong.

What Is a Dump File in Windows 11 and Why It Matters
A dump file is a snapshot of system memory created during a crash. Windows uses it to record:
- Active drivers and system processes
- Memory state at the time of failure
- Error codes and crash context
Dump files are essential for diagnosing BSOD errors, repeated system crashes, and unexplained restarts. Without them, identifying the root cause becomes guesswork.
Windows 11 Dump File Location (Full, Minidump, and App Crashes)
Windows 11 stores different dump files depending on the crash type.
System Crash Dump (Full or Automatic)
C:\Windows\MEMORY.DMPThis file can be large and contains extensive system data.
Minidump Files (Most Common)
C:\Windows\Minidump\Each crash generates a small file, making it ideal for quick analysis.
Application Crash Dumps
C:\Users\<YourUsername>\AppData\Local\CrashDumps\Used for app-specific failures rather than full system crashes.
If none of these locations exist, dump file creation may be disabled.
How to Enable Dump Files in Windows 11 (If Not Created)
If your system crashes but no dump files appear, follow these steps.
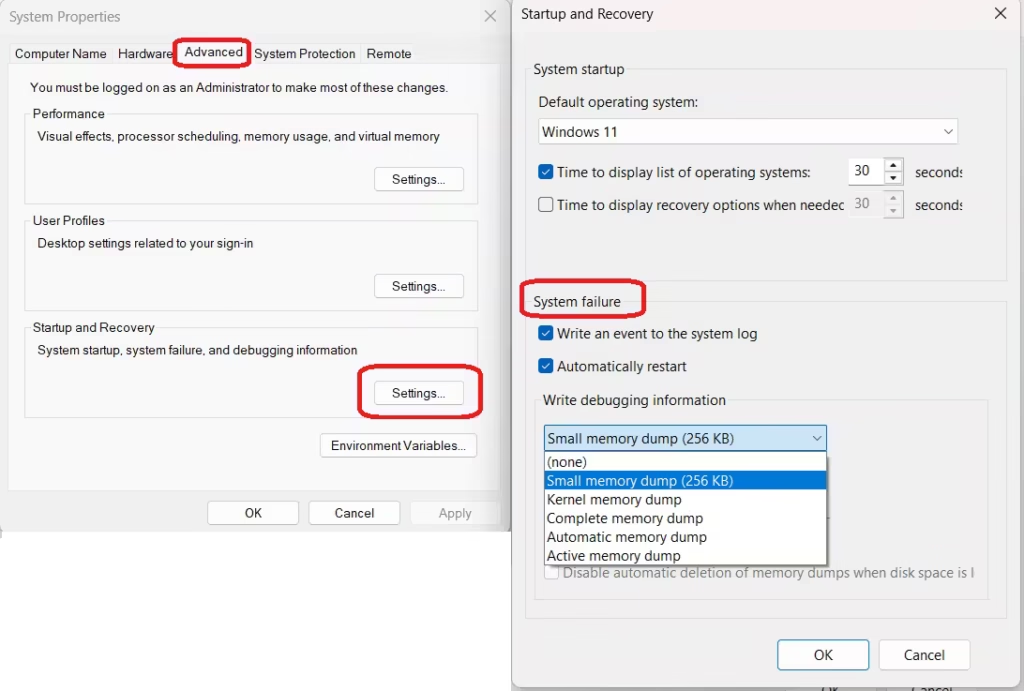
- Press Win + R, type
sysdm.cpl, and press Enter - Open the Advanced tab
- Under Startup and Recovery, click Settings
- In System failure, enable Write debugging information
- Choose a dump type:
- Small memory dump – saved in Minidump folder
- Kernel memory dump – kernel-level data only
- Complete memory dump – full RAM snapshot (requires large page file)
- Confirm the dump file path and click OK
Restart your PC to apply the changes.
Why Windows 11 Is Not Creating Dump Files
If dump files still don’t appear, one of these issues is usually responsible.
Page File Is Disabled or Too Small
Windows requires a page file to write dump data.
- Open System Properties → Advanced → Performance → Virtual memory
- Enable Automatically manage paging file size
Insufficient Disk Space
Ensure at least 20–25% free space on the system drive.
Incorrect Registry Settings
- Open Registry Editor
- Navigate to:
HKEY_LOCAL_MACHINE\SYSTEM\CurrentControlSet\Control\CrashControl- Check
CrashDumpEnabledvalue:- 0 = Disabled
- 1 = Complete
- 2 = Kernel
- 3 = Small
Permission or Disk Errors
System-level write failures can prevent dump creation, especially after forced shutdowns or disk corruption.
How to Analyze Windows 11 Dump Files to Find the Crash Cause
Once dump files exist, analysis helps identify the exact reason for the crash.
Quick Analysis Tools (No Technical Skills)
BlueScreenView
- Scans the Minidump folder
- Highlights the driver or module causing the crash
WhoCrashed
- Generates readable crash reports
- Ideal for beginners troubleshooting BSOD errors
Advanced Crash Analysis Using WinDbg
- Install WinDbg Preview from the Microsoft Store
- Open WinDbg → File → Open Dump File
- Load
MEMORY.DMPor a Minidump file - Run the command:
!analyze -vLook for:
- MODULE_NAME – faulty driver or process
- FAILURE_BUCKET_ID – error classification for deeper research
Can Dump Files Help Fix BSOD Errors Automatically?
Dump files do not fix errors by themselves. Instead, they identify the root cause, such as:
- Faulty drivers
- Memory corruption
- Hardware instability
- System file damage
Deleting dump files before analysis removes valuable diagnostic data and can delay proper fixes.
How to Delete Dump Files Safely in Windows 11
Dump files can take significant disk space. Remove them only after troubleshooting.
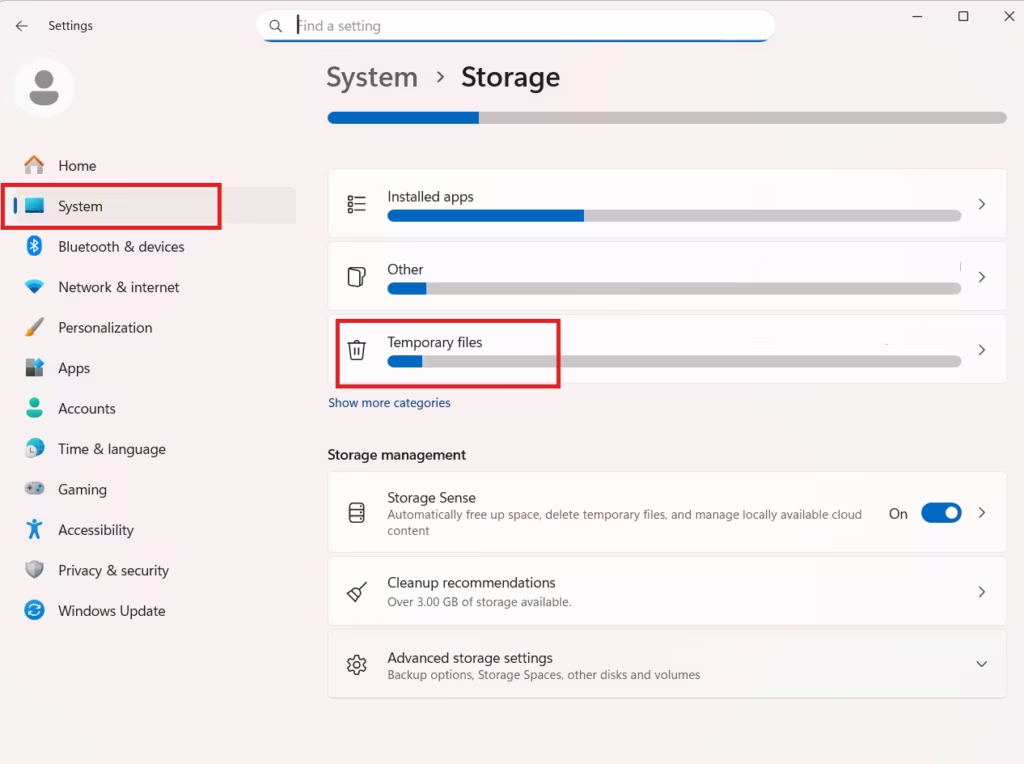
Using Windows Settings
- Open Settings → System → Storage → Temporary files
- Select System error memory dump files
- Click Remove files
Using Disk Cleanup
- Search Disk Cleanup
- Choose drive C:
- Click Clean up system files
- Select System error memory dump files
Using Command Prompt (Admin)
del /f /s /q %systemroot%\memory.dmpRepair System Files to Prevent Future Crashes
Corrupted system files often cause repeated BSOD errors.
System File Checker
sfc /scannowDISM Repair
DISM /Online /Cleanup-Image /RestoreHealthRun these commands in Command Prompt (Admin).
Common BSOD Errors That Dump Files Help Diagnose
- DRIVER_IRQL_NOT_LESS_OR_EQUAL – driver conflict
- MEMORY_MANAGEMENT – faulty RAM or memory corruption
- SYSTEM_SERVICE_EXCEPTION – driver or update failure
- PAGE_FAULT_IN_NONPAGED_AREA – invalid memory access
Dump analysis points directly to the responsible component, saving hours of guesswork.
FAQs Windows 11 Dump File Location and Analysis
What is the dump file location in Windows 11?
In Windows 11, dump files are stored in C:\Windows\MEMORY.DMP for full system crashes and C:\Windows\Minidump\ for smaller BSOD crash files. Application crashes are saved in the user CrashDumps folder.
Why does Windows 11 not create dump files after a BSOD?
Windows 11 may fail to create dump files if the page file is disabled, disk space is low, dump settings are turned off, or the CrashControl registry values are incorrect.
Which dump file should I analyze for BSOD errors?
Minidump files are best for most BSOD analysis because they load quickly and clearly show the faulty driver. Full memory dumps are useful for deep kernel or hardware-level crashes.
How do I enable dump file creation in Windows 11?
You can enable dump files from System Properties → Advanced → Startup and Recovery, then select a dump type under Write debugging information and restart your system.
Can dump files help fix Windows 11 BSOD errors?
Dump files do not fix errors automatically, but they identify the exact driver, module, or system component causing the crash, which helps apply the correct fix.
Is it safe to delete MEMORY.DMP files in Windows 11?
Yes, MEMORY.DMP files can be safely deleted after crash analysis. Deleting them only frees disk space and does not affect system stability.
What tools can analyze Windows 11 dump files?
Windows 11 dump files can be analyzed using BlueScreenView, WhoCrashed, or Microsoft’s WinDbg for advanced crash debugging.
Why is my MEMORY.DMP file very large?
MEMORY.DMP stores system memory data during a crash. Its size depends on your installed RAM and dump type, especially when complete memory dumps are enabled.
Do Windows Updates affect dump file creation?
Yes, failed or interrupted Windows Updates can break dump file creation by disabling services, modifying registry values, or corrupting system files.
Should I keep dump files for future crashes?
Keeping recent dump files is recommended until the issue is fully resolved, as they provide valuable diagnostic history for recurring BSOD errors.

