The Hatch Repairs quest in ARC Raiders is one of the earliest assignments you’ll receive from Shani in Speranza. This mission not only familiarizes you with the world’s surface structures but also grants you your first Raider Hatch Key — an item that allows quick and safe extraction from the field. Here’s a detailed walkthrough covering how to find a Raider Hatch, repair it, and complete the quest efficiently.
Quest Overview
| Detail | Information |
|---|---|
| Quest Name | Hatch Repairs |
| Quest Giver | Shani |
| Objective | Repair leaking hydraulic pipes near a Raider Hatch |
| Recommended Map | Dam Battlegrounds |
| Rewards | Raider Hatch Key, Binoculars, XP |
Before beginning, make sure you’ve completed Celeste’s “A Bad Feeling” expedition, as this unlocks the Hatch Repairs commission. Once you speak with Shani at the Security Room in Speranza, you’ll be briefed on hydraulic leaks caused by tampered Raider hatches.
Step 1: Accept the Quest and Prepare Your Loadout
After accepting the mission from Shani, assemble your loadout. Use the Free Loadout option — it allows quick retries without losing valuable gear if you die on the surface. It’s a safe way to experiment and explore without penalty, especially early in the game.
Step 2: Locate a Raider Hatch on the Map
The Raider Hatches are scattered across several regions, but the Dam Battlegrounds map offers the easiest and safest route for completion.
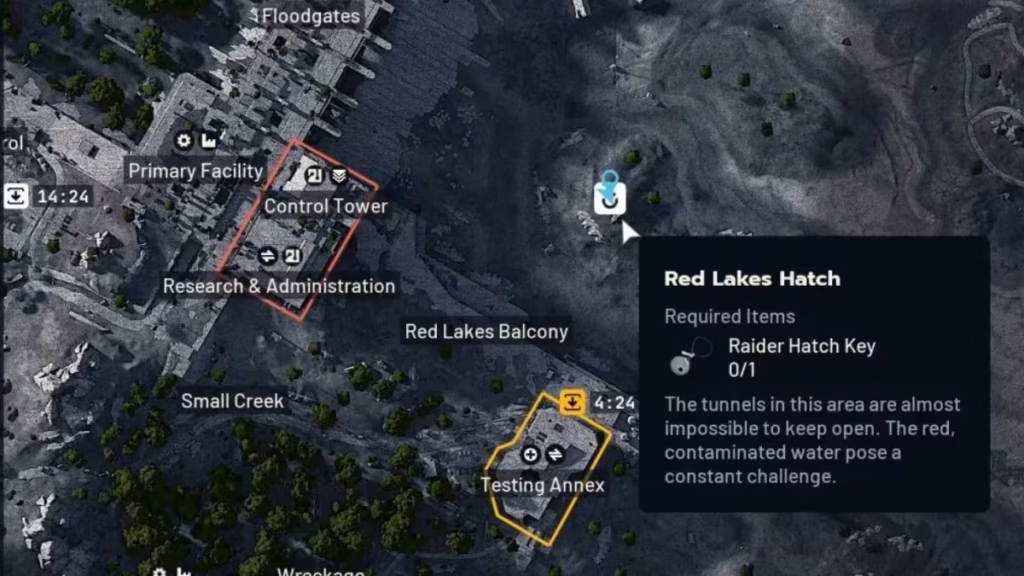
You can find Raider Hatches in these known spots:
- Sunroof Hatch – East of Pale Apartments
- Good Old Baron’s Hatch – North of Water Towers
- Spillway Hatch – North of Red Lakes Balcony
- Pump House Hatch – South of East Broken Bridge
Each hatch is marked by a downward arrow symbol inside a circle on your in-game map. These serve as key points for extraction later in the game, so it’s worth noting their locations for future use.
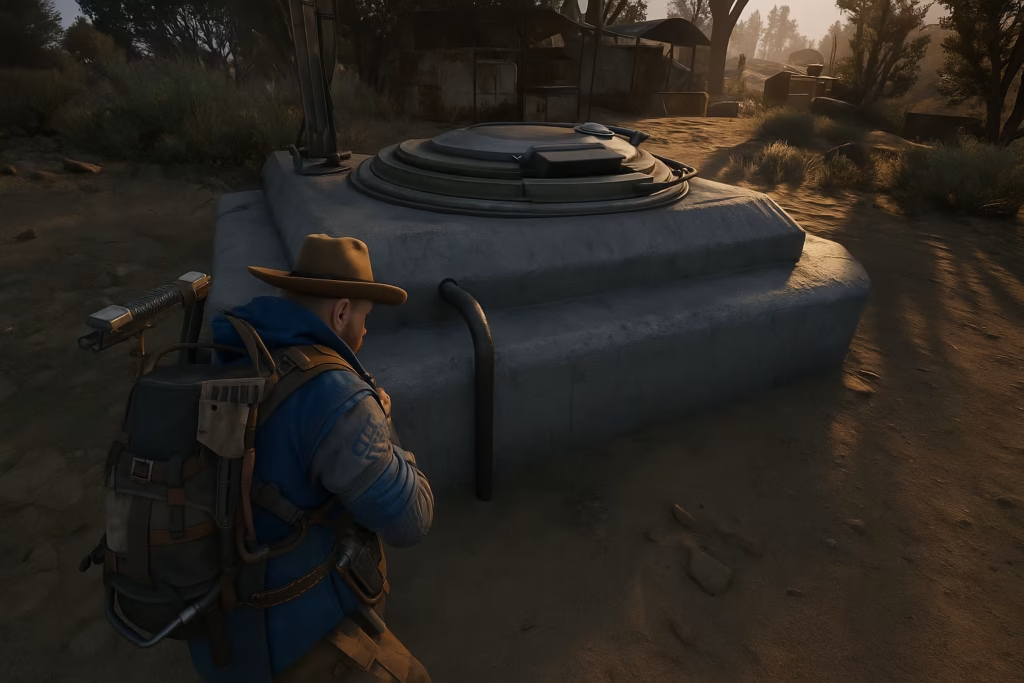
Step 3: Repair the Leaking Hydraulic Pipes
Once you reach a hatch site, search for a pipe emitting steam or fluid, usually accompanied by a yellow interaction marker. Approach and hold the interact button to begin repairs.
During this step:
- Shani will radio in updates as you make progress.
- You’ll notice the objective bar fill up as you repair the leak.
- If the interaction doesn’t register, reposition and try again — only one pipe per hatch can be fixed.
After the pipe is successfully repaired, a short dialogue from Shani will confirm your progress and hint that ARCs have been tampering with these systems.
Step 4: Investigate for the Hatch Key
Stay in the immediate area of the repaired hatch. Your next objective is to search for a Raider Hatch Key nearby.
Look for an ARC debris pile or husk — a metallic structure or junk heap close to the hatch. Interact with it to loot and recover the key. This completes the second part of the mission.
If you can’t find it immediately:
- Circle the hatch within a short radius.
- Scan nearby embankments or partially buried ARC husks — the key location is always close by.
Step 5: Use the Raider Hatch to Extract
After obtaining the Raider Hatch Key, you can immediately use it to extract safely from the map instead of heading to traditional extraction points.
Here’s how it works:
- Interact with the Raider Hatch icon on the map.
- Use the key to open the hatch and begin extraction.
- Once activated, you’ll instantly return to Speranza with your loot intact.
This is one of the most efficient and secure ways to end a mission — especially when the surface is swarming with ARC enemies or rival raiders.
Step 6: Return to Shani and Claim Rewards
Back in Speranza, head to the Security Room and speak with Shani. She’ll hand over your rewards:
- Raider Hatch Key (x1) – allows you to unlock future hatches for instant extraction.
- Binoculars (x1) – a useful gadget for spotting enemies and resources at a distance.
- XP Boost – contributes to faster level progression.
Completing Hatch Repairs also unlocks the “Down to Earth” quest, continuing your main storyline progression in ARC Raiders.
Tips for Efficient Completion
- Best Map: Dam Battlegrounds is optimal because all four Raider Hatches are located relatively close, minimizing travel time.
- Secure Pocket: Always store Raider Hatch Keys in your Secure Pocket to avoid losing them upon death.
- Crafting Option: Once unlocked, you can also craft Hatch Keys at the Workbench’s Utility Station using 50 Plastic Parts and 6 ARC Alloy.
- Alternative Acquisition: Raider Hatch Keys can also drop from rival Raiders or be purchased from Shani for 9000 Coins after Level 12 — but completing this quest gives your first one free.
Raider Hatches are more than just shortcuts. They’re strategic extraction points that let you keep your hard-earned loot without the risk of ambushes common at elevators. Whether you’re scavenging rare ARC components or completing timed missions, having a Hatch Key in your inventory provides a tactical advantage — especially in high-risk zones. Play Now!
Related Guides:
- ARC Raiders: How to Upgrade the Workbench
- Mechanical Components ARC Raiders: How to Find and Use Them
- All Scrappy Upgrade Materials in ARC Raiders and Where to Find Them
- Best ARC Raiders Build for Solo Play: Top Skills, Nodes, and Survival Strategy
- How to Use Fireball Burners in ARC Raiders – Locations, Quests, and Tips
- How to Fix ARC Raiders Error ARMR0002 (Matchmaking Failed) on PC, PS5 & Xbox
- All Field Depot Locations in ARC Raiders – Complete Off the Radar Quest Guide
- How to Get the Server Slam Backpack in ARC Raiders and Claim Your Beta Reward

