If you forgot the root password on your Azure Linux VM, you have four ways to recover access. The right method depends on whether the Azure Linux Agent (waagent) is running on your VM and whether the VM is still booting.
This guide walks you through every method, from the fastest portal reset to the last-resort disk repair approach. Pick the one that matches your situation using the table below.
Table of Contents
Quick Reference: Which Method Should You Use?
| Your Situation | Best Method |
|---|---|
| waagent is healthy and VM is running | Method 1 (Azure Portal) or Method 2 (Azure CLI) |
| VM is running but waagent is unresponsive | Method 3 (Serial Console + Single-User Mode) |
| VM will not boot at all | Method 4 (OS Disk Repair VM) |
Method 1: Reset Root Password on Linux VM via Azure Portal (Fastest, No Downtime)
The Azure Portal method requires no VM downtime and no SSH access. It uses the VMAccess Extension to push the new credentials directly to the VM through the Azure Linux Agent.
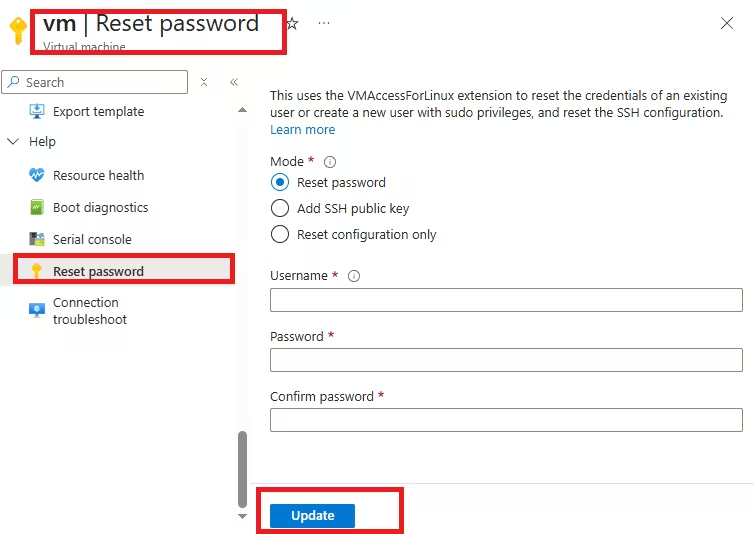
Requirements: The Azure Linux Agent (waagent) must be installed and in a Ready state on the VM.
Steps:
- Open the Azure Portal and go to Virtual Machines.
- Select your VM from the list.
- In the left menu, scroll to Help and click Reset password.
- Select Reset password as the mode.
- Enter your username (for example,
rootor your admin user) and type a new password. - Click Update.
Once the update completes, try to connect to your VM over SSH with the new password.
Tip: If you also need to update your SSH key instead of the password, use the Reset SSH public key mode on the same Reset password screen.
Method 2: Reset Password via the Azure CLI
If you prefer command-line tools, the Azure CLI method produces the same result as the portal reset. Open Azure Cloud Shell or your local terminal and run the following commands:
AZ_RESOURCE_GROUP="YourResourceGroupName"
AZ_VM_NAME="YourVMName"
AZ_ADMIN_USER="adminName"
AZ_MSADMIN_PASS="NewPassword123!"

az vm user update \
  -u $AZ_ADMIN_USER \
  -p $AZ_MSADMIN_PASS \
  -g $AZ_RESOURCE_GROUP \
  -n $AZ_VM_NAME
This command uses the VMAccess Extension under the hood, so the Azure Linux Agent must be healthy and responsive for it to work.
After the command completes, test your SSH connection with the new password.
Method 3: Reset Password via Serial Console and Single-User Mode
The Serial Console connects directly to the VM’s serial port, independent of SSH or the network. This method works even when waagent is unresponsive, because you bypass the guest agent entirely and interact with GRUB directly.
Step 1: Open the Serial Console
- In the Azure Portal, navigate to your VM.
- Under the Help section, click Serial console.
- Wait for the console to connect and display a login prompt or shell.
Step 2: Reboot and Enter GRUB
In the Serial Console, reboot the VM. When the GRUB menu appears, press E to edit the boot entry.
For Ubuntu and Debian:
- Find the line that starts with
linux. - Append
singleto the end of that line. - Press
Ctrl+Xto boot with those settings.
For RHEL, CentOS, and Oracle Linux:
- Find the
linuxorlinux16line. - Append
rd.breakto the end of that line. - Press
Ctrl+Xto boot.
For SUSE SLES:
- Find the
linuxline. - Append
systemd.unit=emergency.targetto the end. - Press
Ctrl+Xto enter the emergency shell.
Step 3: Remount the Filesystem and Set a New Password
Once you land in the single-user or emergency shell, remount the filesystem with read-write permissions and run passwd.
Ubuntu / Debian:
mount -o remount,rw /
passwd root
/usr/sbin/reboot -f
RHEL / CentOS / Oracle Linux:
mount -o remount,rw /sysroot
chroot /sysroot
passwd root
touch /.autorelabel
exit
/usr/sbin/reboot -f
SELinux Note: If SELinux is in enforcing mode, run
touch /.autorelabelbefore rebooting. This triggers a filesystem relabeling on the next boot and prevents SELinux from blocking the password change.
SUSE SLES:
mount -o remount,rw /
passwd root
/usr/sbin/reboot -f
Step 4: Verify SSH Password Authentication is Enabled
After the VM reboots, check that password authentication is active in the SSH config:
egrep "^PasswordAuthentication" /etc/ssh/sshd_configIf the output shows PasswordAuthentication no, open the file with vi or nano and change the value to yes. Then restart the SSH daemon:
systemctl restart sshdNow try to connect over SSH with your new password. Because compromised SSH credentials are one of the most common attack vectors on internet-facing Linux servers (see how the New Linux Botnet “SSHStalker” hijacked nearly 7,000 servers using exactly this kind of exposure), consider disabling password authentication again after recovery and switching to SSH key-based authentication.
Method 4: Reset Password via OS Disk Repair VM (Last Resort)
If the VM will not boot at all and the Serial Console is inaccessible, you need to detach the OS disk, attach it to a healthy repair VM, change the password inside a chroot environment, then reattach the disk.
Step 1: Create the Repair VM
Run the following az vm repair create command to create a repair VM with a copy of the affected VM’s OS disk automatically attached:
AZ_RESOURCE_GROUP="YourResourceGroupName"
AZ_VM_NAME="YourVMName"
AZ_ADMIN_USER="repairUser"
AZ_MSADMIN_PASS="RepairPassword123!"

az vm repair create \
  -g $AZ_RESOURCE_GROUP \
  -n $AZ_VM_NAME \
  --repair-username $AZ_ADMIN_USER \
  --repair-password "$AZ_MSADMIN_PASS" \
  --verbose
Azure automatically attaches the copy of the OS disk to the repair VM once provisioning completes.
Step 2: Change the Password in the chroot Environment
- Log in to the repair VM using the credentials you set above.
- Enter the chroot environment where the affected OS disk is mounted.
- Run the following command to set a new password:
passwd rootOr, for a named admin user:
passwd <username>- Check whether SELinux is in enforcing mode:
cat /etc/sysconfig/selinuxIf it is, run touch /.autorelabel to schedule a relabel on the next boot.
- Verify that
PasswordAuthenticationis set toyesin/etc/ssh/sshd_config. If not, change it with a text editor. - Exit the chroot environment.
Step 3: Restore the Original VM
Run the following command to reattach the OS disk to the original VM:
az vm repair restore \
  -g $AZ_RESOURCE_GROUP \
  -n $AZ_VM_NAME \
  --verbose
Start the VM and test SSH access with the new password.
Supported Linux Distributions for the VMAccess Extension
The portal and CLI methods (Method 1 and Method 2) rely on the VMAccess Extension. Microsoft supports the following Linux distributions and versions:
| Distribution | Supported Versions |
|---|---|
| Ubuntu (LTS) | 18.04+, 20.04+, 22.04+, 24.04+ |
| Red Hat Enterprise Linux | 6.7+, 7.x+, 8.x+, 9.x+, 10.x+ |
| SUSE SLES | 12.x+, 15.x+ |
| Debian | 10+ |
| Oracle Linux | 6.4+, 7.x+, 8.x+ |
| Alma Linux | 8.x+, 9.x+ |
| Rocky Linux | 9.x+ |
| Azure Linux | 2.x |
Frequently Asked Questions
What is the Azure Linux Agent (waagent)?
The Azure Linux Agent is a service that runs inside the VM and allows Azure to communicate with it. The VMAccess Extension that powers Method 1 and Method 2 requires this agent to be installed and in a Ready state.
Can I reset the root password without rebooting the VM?
Yes. Method 1 (Azure Portal) and Method 2 (Azure CLI) reset the password without rebooting the VM, as long as waagent is healthy.
What should I do if PasswordAuthentication is set to no after a portal reset?
The VMAccess Extension automatically sets PasswordAuthentication to yes when it resets a password. If it still shows no, use Method 3 to access the VM through the Serial Console and edit /etc/ssh/sshd_config manually.
Does the repair VM method work for all Linux distributions?
Microsoft has tested the az vm repair commands across the major supported distributions. If you run a network virtual appliance, this method does not apply. Contact your appliance vendor for recovery instructions instead.
How do I prevent getting locked out again?
Set up SSH key-based authentication and keep a second admin account with sudo access as a backup. Avoid using the root account for routine logins

