If you keep running into GPU driver issues after a standard uninstall, leftover driver files are likely the cause. Windows Device Manager removes the visible driver, but it leaves behind registry keys, cached files, and driver store entries that interfere with new installations. Display Driver Uninstaller (DDU) clears all of that so you get a truly clean slate.
This guide walks you through how to use Display Driver Uninstaller correctly on Windows 10 and Windows 11.
What Is Display Driver Uninstaller (DDU)?
Display Driver Uninstaller (DDU) is a free driver removal tool created by Wagnard (Wagnardsoft). It completely removes AMD, Nvidia, and Intel graphics drivers along with all the files Windows normally leaves behind, including registry entries, driver store folders, and cached installer files.
The standard Windows uninstaller misses these leftovers. Over time they can cause driver installation failures, display artifacts, system crashes, and performance drops. DDU wipes everything, so your next driver install lands on a clean system.
DDU supports Windows 7 through Windows 11. It requires .NET Framework 4.5 or higher, with 4.8 recommended.
When Should You Use DDU?
DDU is not a tool for routine driver updates. Use it in these specific situations:
- You are switching GPU brands (for example, moving from AMD to Nvidia or vice versa)
- A driver update failed to install and keeps failing
- Your display shows corruption, artifacts, or flickering after a driver change
- You are troubleshooting crashes tied to the graphics driver
- You want a fresh start after a major Windows update caused display issues
For standard driver updates that install without problems, Windows Device Manager handles the job fine. Reserve DDU for cases where something is actually broken or you are changing hardware.
Before You Start: What to Prepare Before Using DDU
Skipping this prep section is the main reason people run into trouble with DDU.
Download your new GPU drivers first. Before you remove anything, go to your GPU manufacturer’s website and download the correct driver for your card and your Windows version. Save the installer file to your desktop. Once DDU wipes the driver, you will need this file ready to go.
Official driver download pages:
If you use an OEM computer from HP, Dell, or Lenovo, download drivers from your laptop or PC manufacturer’s support page instead. Some OEM systems use custom hardware IDs that only work with OEM-specific drivers.
Create a system restore point: Open the Start menu, search for “Create a restore point,” and open the System Protection tab. If System Protection shows as Off for your C: drive, you need to enable it first before the Create button becomes available:
- Click Configure
- Select Turn on system protection
- Click Apply, then OK
- The Create button is now active
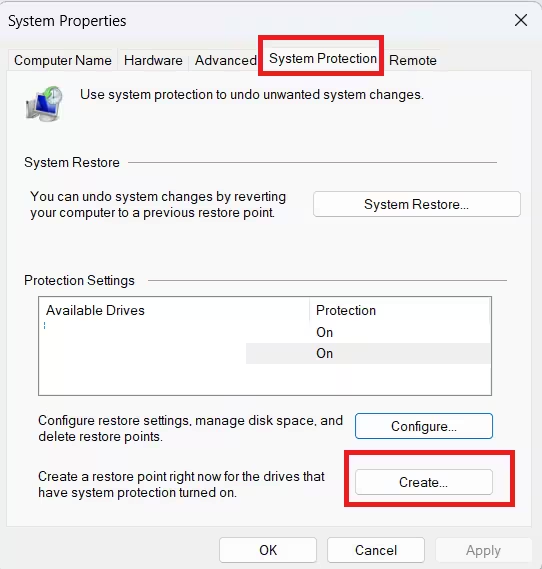
Click Create, name the restore point “Before DDU,” and let Windows finish. This gives you a recovery point if anything goes wrong.
Back up your GPU control panel settings: DDU removes your custom GPU profiles and color settings. If you have Nvidia or AMD control panel tweaks you want to keep, write them down or take screenshots first.
Disconnect from the internet: Windows automatically downloads and reinstalls GPU drivers the moment you connect. Pull your Ethernet cable or turn off Wi-Fi before you run DDU. Do this before you boot into Safe Mode so Windows does not grab a driver mid-cleanup.
How to Use Display Driver Uninstaller (DDU): Step by Step
Step 1: Download DDU
Go to the Wagnardsoft official website and download the latest version of DDU. Always grab it from the official site to avoid outdated or modified versions.
DDU comes as a self-extracting archive. Once you download it, double-click the file and extract it to a folder on your desktop. Do not extract it to a network drive. DDU must run from a local disk.
Step 2: Disconnect from the Internet
If you have not already done this, disconnect now before moving on. Unplug your Ethernet cable or turn off Wi-Fi in your network settings. On a laptop, enabling Airplane Mode works well.
This step prevents Windows Update from automatically pushing a driver to your system while DDU is running or immediately after.
Step 3: Boot into Safe Mode
Running DDU in Safe Mode is strongly recommended. Safe Mode disables background processes and third-party software that can interfere with driver removal. If you skip Safe Mode, DDU works less thoroughly and you may need to run it twice to get a clean result.
To boot into Safe Mode on Windows 10 or Windows 11:
- Press Windows + I to open Settings
- Go to System > Recovery
- Under Advanced startup, click Restart now
- On the blue screen, select Troubleshoot
- Select Advanced options
- Select Startup Settings
- Click Restart
- Press 4 to enable Safe Mode (or 5 for Safe Mode with Networking)
Your PC restarts into Safe Mode. The screen will look lower resolution with black borders. That is normal.
Alternative method using DDU itself:
If you prefer to let DDU handle the Safe Mode reboot, launch DDU normally first. When DDU opens, click Options in the top-left corner, then enable Safe Mode dialog at the bottom of the options window. Close the options, exit DDU, and relaunch it. DDU will prompt you to reboot into Safe Mode automatically.
Important: Only use the DDU Safe Mode dialog option if you have already confirmed that you can enter and exit Safe Mode normally on your system. If you have never used Safe Mode on this machine, test it manually first. Some systems need BIOS configuration to allow Safe Mode.
Step 4: Launch DDU in Safe Mode
Once your PC is in Safe Mode, open the DDU folder on your desktop and run Display Driver Uninstaller.exe.
DDU opens and may warn you that you are not in Safe Mode if it detects you skipped that step. If you followed Step 3, you will not see this warning.
Step 5: Configure DDU Options
Before you click any cleanup button, open the Options panel in the top-left corner of DDU. Review these settings:
- Show offers from our partners: Turn this off.
- Prevent downloads of drivers from Windows Update: Turn this on. This adds a second layer of protection against Windows auto-installing drivers, on top of your internet disconnection.
- Create a restore point: This is optional since you already created one manually, but you can leave it enabled for an extra safety layer.
For most users, checking the C:\NVIDIA or C:\AMD folder removal options is also useful. These folders store leftover unpacked driver installer files that are safe to delete after the driver is gone.
Click Close when done.
Step 6: Select Your Device Type and GPU Brand
On the right side of the DDU interface, you will see two dropdown menus.
- Set Device Type to GPU
- Set Device to your current graphics card brand (Nvidia, AMD, or Intel)
DDU usually detects your installed GPU automatically and fills this in for you. Confirm it matches your actual hardware before proceeding.
Switching GPU brands: If you previously had an AMD card and you are now moving to Nvidia (or the other direction), you need to remove both sets of drivers. First, clean the old brand’s drivers using Clean and do NOT restart, then switch the device dropdown to the new brand and run the cleanup again. After both are gone, use Clean and restart.
Intel integrated GPU drivers do not typically conflict with AMD or Nvidia dedicated GPU drivers. You can usually leave Intel iGPU drivers installed unless they are specifically causing issues.
Step 7: Choose a Cleanup Option and Run
DDU offers four cleanup buttons on the left side of the interface:
| Option | What It Does | When to Use It |
|---|---|---|
| Clean and restart | Removes the selected driver and reboots | Updating drivers on the same GPU |
| Clean and do NOT restart | Removes drivers without rebooting | Cleaning multiple GPU brands in one session |
| Clean and shutdown | Removes drivers and powers off | Physically swapping your GPU for a new card |
| Clean Shader Cache (Only) | Clears shader cache files only | Fixing shader-related visual glitches without a full cleanup |
For most use cases, click Clean and restart.
Your screen may go black for a few seconds during the cleanup process. Do not interrupt DDU while it is running. It will finish and automatically reboot your PC.
Step 8: Install Your New GPU Driver
After the reboot, Windows loads with a generic display driver. The resolution will look low. This is expected.
Open the GPU driver installer you downloaded in Step 1 and run it. Follow the on-screen prompts to complete the installation.
During Nvidia driver installation, you can deselect optional components like GeForce Experience, PhysX, and HDMI HD Audio if you do not need them. For AMD, you can uncheck Radeon Software Adrenalin extras if you only want the core driver.
After the driver installs, restart your PC when prompted, then reconnect to the internet.
DDU Cleanup Options Explained
Here is a quick reference for each cleanup mode so you can choose the right one for your situation:
- Clean and restart works for the vast majority of users. Use it when you are updating drivers on the same GPU you already have installed.
- Clean and do NOT restart comes into play when you have driver files from more than one GPU brand on your system. Clean the first brand, change the dropdown to the second brand, and clean again. Then reboot manually or use Clean and restart on the final pass.
- Clean and shutdown is the right choice when you are physically removing your current GPU and installing a different one. DDU removes the old drivers, powers off the PC, you swap the card, and then you install fresh drivers for the new card on the next boot.
- Clean Shader Cache (Only) handles a narrower problem. Use it when you see visual corruption or stuttering that traces back to corrupted shader cache files rather than the driver itself.
Frequently Asked Questions
Is DDU safe to use?
Yes, DDU is safe when you follow the correct steps. Millions of users run it without problems. The key precautions are using Safe Mode, downloading your new drivers before you start, and not interrupting the process once it begins.
Do I need to use DDU every time I update my GPU driver?
No. Most driver updates install cleanly through the standard Windows update or the GPU manufacturer’s installer. Use DDU only when you encounter problems, switch GPU brands, or troubleshoot persistent driver issues.
Will DDU delete my games or personal files?
No. DDU only removes graphics driver files, registry entries, and related cached files. Your games, game saves, documents, and other programs remain untouched.
What happens if I do not use Safe Mode?
DDU can still run in normal Windows mode, but it is less effective. Background services and running programs can hold driver files open, preventing a full cleanup. If you skip Safe Mode, close all applications before running DDU and plan to run it twice in a row to achieve a similar level of cleanliness.
Do I need to disconnect from the internet every time I use DDU?
Yes. On Windows 10 and Windows 11, Windows Update automatically detects missing drivers and downloads them in the background. If you stay connected, Windows may reinstall a generic driver before you get a chance to install the one you want. Disconnecting prevents this.
Can I use DDU on a laptop?
Yes, but check your laptop manufacturer’s support page for drivers before you start. Many laptops use custom drivers specific to the OEM. Using a generic Nvidia or AMD driver on a laptop that requires an OEM driver can cause display issues.
What is the difference between Clean and restart versus Clean and shutdown?
Clean and restart removes drivers and reboots into Windows so you can install the new driver immediately. Clean and shutdown removes drivers and powers off the machine, which is what you want when you are physically swapping out your GPU before installing the new driver.

