The Windows Subsystem for Linux (WSL) lets you run a full Linux environment directly inside Windows 11 without a virtual machine or dual-boot setup. You can run Linux command-line tools, install packages, and even launch Linux GUI apps alongside your Windows applications.
This guide covers every method to install Linux on Windows 11 using WSL, including the one-command install, installing a specific distro, and installing from the Microsoft Store.
Prerequisites
Before you begin, confirm the following:
- Your PC runs Windows 11 or Windows 10 version 2004 (Build 19041) or higher.
- Virtualization is enabled in your system BIOS/UEFI.
- You have an active internet connection (for online installs).
- You have administrator access on your Windows account.
To check your Windows build, press Win + R, type winver, and press Enter.
Method 1: Install Linux on Windows 11 With WSL Using a Single Command (Recommended)
This is the fastest way to install Linux on Windows 11 using WSL. The wsl --install command handles everything automatically.
Steps
- Press the Start button, search for PowerShell, right-click it, and select Run as administrator.
- Type the following command and press Enter:
wsl --install- Wait for WSL to download and install. The process installs Ubuntu by default.
- Restart your computer when prompted.
- After the restart, Ubuntu launches automatically. A console window opens and extracts files for the first time.
- Create a Linux username when prompted, then set a password for that account.
- Optionally, type
nand press Enter to opt out of telemetry collection.
Your Linux environment is now active and ready to use.
Note: If you run
wsl --installand see WSL help text instead of the installer, WSL is already partially installed. Runwsl --list --onlineto see available distros, then install one usingwsl --install -d <DistroName>.
Method 2: Install WSL with a Specific Linux Distro
By default, WSL installs Ubuntu. If you prefer Debian, Kali Linux, openSUSE, or another distro, follow these steps.
Step 1: View Available Distros
- Open PowerShell as administrator.
- Run the following command to list all available Linux distributions:
wsl --list --onlineYou will see distros like Ubuntu, Debian, Kali Linux, openSUSE-42, OracleLinux, and SUSE Linux Enterprise Server.
Step 2: Install Your Chosen Distro
- Run the install command and replace
DISTRO-NAMEwith the exact name from the list:
wsl --install -d DISTRO-NAMEExample to install Debian:
wsl --install -d Debian- Restart your computer to complete the installation.
- After the restart, open the distro from the Start menu and complete the initial setup by creating a username and password.
Method 3: Install WSL from the Microsoft Store
You can also install WSL and a Linux distro directly from the Microsoft Store. This method is useful when you want finer control over the WSL version and distro independently.
Step 1: Enable Required Windows Features
- Press the Start button and search for Turn Windows features on or off.
- Click the top result to open Windows Features.
- Check Virtual Machine Platform.
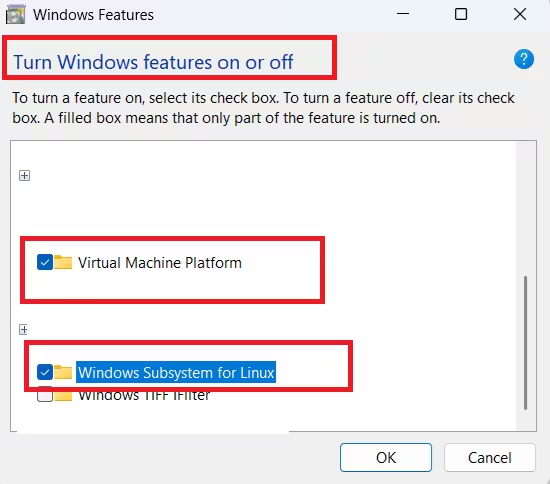
- Check Windows Subsystem for Linux.
- Click OK and then click Restart to apply the changes.
Step 2: Install the WSL App
- Open the Microsoft Store.
- Search for Windows Subsystem for Linux.
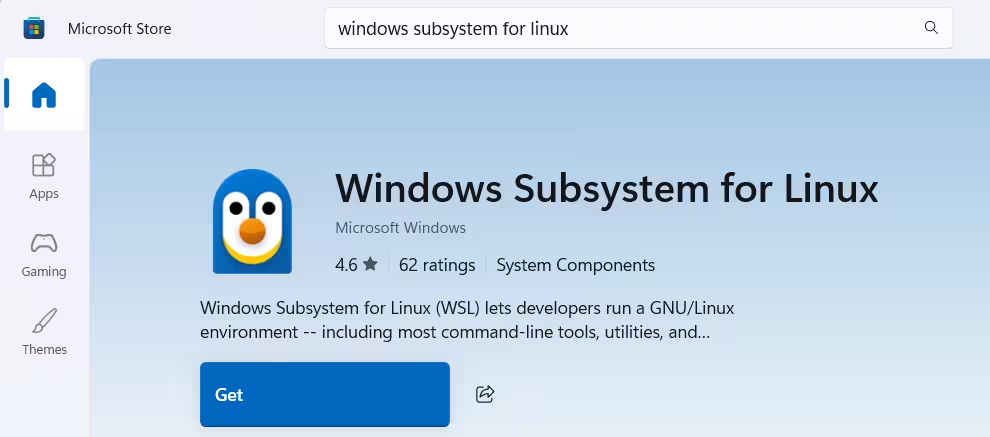
- Click the Install button.
- Click Open Microsoft Store if prompted, then click Install again.
Step 3: Install a Linux Distro from the Store
- Open the Microsoft Store.
- Search for a Linux distro such as Ubuntu, Debian, or Kali Linux.
- Click Get on your chosen distro.
- Click Open once the download finishes.
- Follow the on-screen setup to create a username and password.
WSL is now installed on Windows 11 along with your chosen Linux distribution. This method also enables support for Linux GUI apps.
How to Update the WSL Kernel
Keeping the WSL kernel updated ensures better performance and compatibility.
- Open Command Prompt or PowerShell as administrator.
- Run the update command:
wsl --update- Confirm the installed WSL version:
wsl --version- Check the default distribution and WSL version status:
wsl --statusHow to Check WSL Version and Manage Distributions
List All Installed Distributions
wsl --list --verboseThis shows each installed distro and whether it runs on WSL 1 or WSL 2.
Upgrade a Distro from WSL 1 to WSL 2
New installations use WSL 2 by default. To upgrade an older distro, run:
wsl --set-version <DistroName> 2Replace <DistroName> with the actual name, for example:
wsl --set-version Ubuntu 2Set WSL 2 as the Default Version
wsl --set-default-version 2Change the Default Linux Distribution
wsl --set-default <DistroName>How to Launch Your Linux Distribution
After installation, you have several ways to open your Linux environment:
- Windows Terminal (Recommended): Open Windows Terminal and select your distro from the dropdown tab menu. This option supports multiple tabs and side-by-side panes.
- Start Menu: Search for your distro name (for example, “Ubuntu”) and click it to launch in its own console window.
- PowerShell: Type the distro name directly, for example
ubuntu, and press Enter. - Default distro in PowerShell: Type
wsland press Enter to launch the default distribution inside your current PowerShell session.
How to Install WSL Offline
If your PC does not have internet access, follow these steps to install WSL offline.
- On a connected PC, download the latest WSL MSI package from the WSL GitHub releases page.
- Transfer the MSI file to your offline PC.
- Open PowerShell as administrator and run this command to enable the Virtual Machine Platform:
dism.exe /online /enable-feature /featurename:VirtualMachinePlatform /all /norestart- Restart your computer.
- Install a Linux distro using a
.wslfile. Download the distro file fromDistributionInfo.jsonfor your chosen distribution.
Troubleshooting Common WSL Install Issues
WSL Install Hangs at 0%
Run the following command to download the distribution package before installing:
wsl --install --web-download -d <DistroName>
Error Code 14107 or 0x8004032d
These errors mean that required Windows features are not enabled. To fix them:
- Open Settings and navigate to System > Optional features.
- Click More Windows features.
- Check Virtual Machine Platform and Windows Subsystem for Linux.
- Click OK and restart your PC.
- Run the WSL install command again.
Virtualization Not Enabled
If WSL fails to install or start, virtualization may be disabled in your BIOS. Restart your PC, enter BIOS/UEFI settings (usually by pressing F2, DEL, or F10 at boot), and enable Intel VT-x or AMD-V under the CPU or Advanced settings.

