Windows 11 pushes users toward Microsoft accounts during setup, but a local account still works for anyone who wants to skip cloud sync and sign in with just a username and password on that one device.
What Is a Local Account on Windows 11
A local account stores your login credentials only on the device itself instead of linking them to a Microsoft account online.
You won’t get OneDrive sync, Microsoft Store purchases tied to your identity, or settings syncing across devices with this account type. Everything else, including apps, files, and desktop customization, works normally.
Windows 11 offers several ways to create a local account, from the Settings app to Command Prompt and PowerShell. Pick the method that matches your setup stage and comfort level with each tool.
Method 1: Create a Local Account During Initial Setup
New PCs and fresh Windows 11 installs default to asking for a Microsoft account, but you can bypass this screen entirely.
- On the “Sign in with Microsoft” screen, leave the email field empty
- Turn off Wi-Fi or select I don’t have internet if that option appears
- Choose Continue with limited setup when Windows offers it
- Enter a username and create a password to finish the account
Windows only shows the offline setup path when it can’t detect an internet connection, so disconnecting first matters. Windows 11 Home forces this Wi-Fi disconnect trick since it has no built-in skip button, while Windows 11 Pro shows a direct Domain join instead link on the sign-in screen that leads to local account creation without touching your network settings.
If you’re setting up a new PC from scratch and want to skip the Microsoft account requirement entirely during installation, tools like Rufus can create custom install media that bypasses the online account screen altogether. This works at the OS installation stage, before Windows even reaches the first setup screen.
Method 2: Add a Local Account on an Existing Windows 11 PC
This method works for anyone already running Windows 11 who wants to add a second account without a Microsoft sign-in.
- Press
Win + Ito open Settings - Go to Accounts and select Other users
- Click Add account
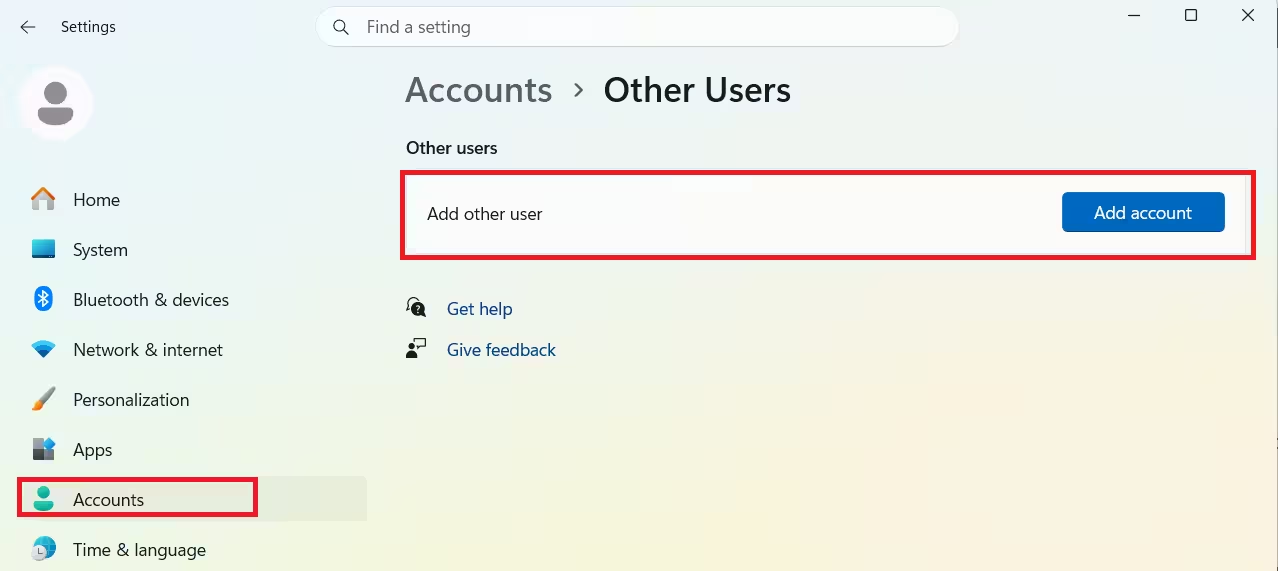
- Select I don’t have this person’s sign-in information on the next screen
- Choose Add a user without a Microsoft account
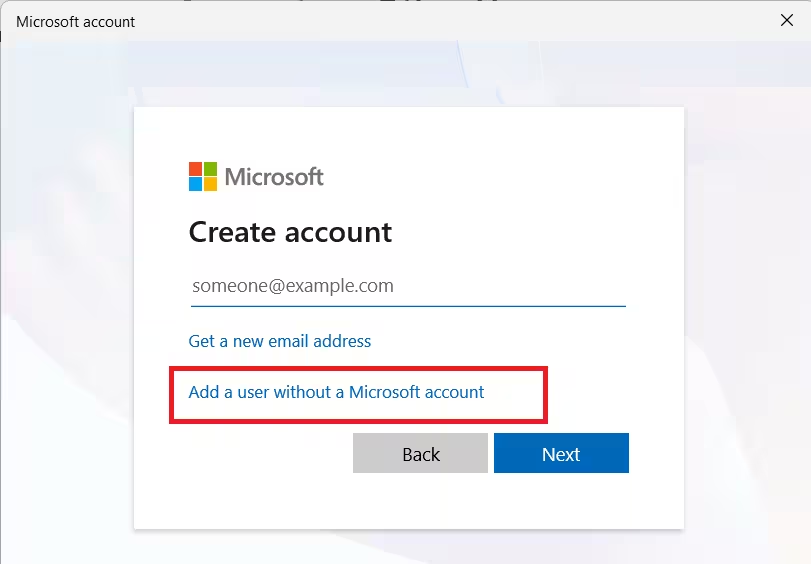
- Fill in a username, password, and three security questions
- Click Next to complete the setup
The security questions replace the password recovery email that Microsoft accounts normally use, so pick answers you’ll remember.
To make the new account an administrator, select it under Other users, click Change account type, choose Administrator from the dropdown, then click OK.
Method 3: Create a Local Account from Computer Management
Computer Management skips the security questions entirely and lets you create several accounts back to back without returning to a menu each time.
This method requires Windows 11 Pro, Enterprise, or Education. Windows 11 Home doesn’t include the Local Users and Groups snap-in, so System Tools won’t show that option on Home. If you’re on Home, use Method 2 or Method 4 instead.
- Open Start, search for Computer Management, and open it
- Navigate to System Tools > Local Users and Groups > Users
- Right-click Users and choose New User
- Enter a username and password, then confirm the password
- Clear User must change password at next logon if you don’t want that requirement
- Click Create, then Close
New accounts here start as standard users. To grant admin rights, right-click the account, select Properties, open the Member Of tab, click Add, type Administrators, click Check Names, then OK and Apply.
Method 4: Create a Local Account from netplwiz
netplwiz is the legacy User Accounts panel, and some admins prefer it because the whole flow fits in one small window.
- Open Start, search for netplwiz, and open it
- Click Add
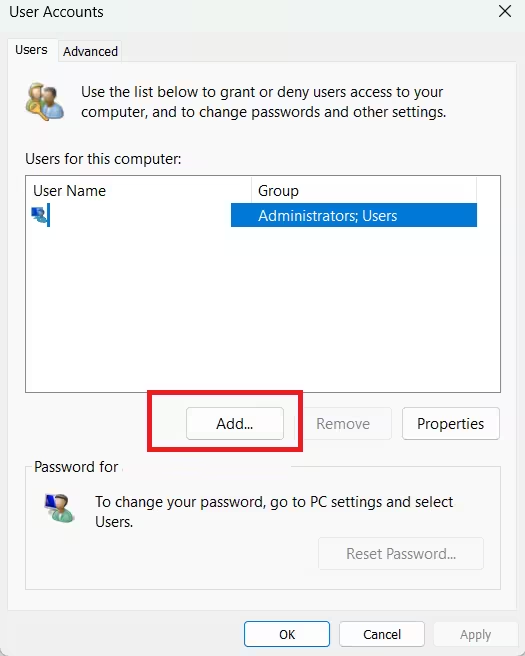
- Select Sign in without a Microsoft account
- Click Local account
- Enter a username, password, and a password hint
- Click Next, then Finish
The password hint here works differently from the security questions in the Settings app method, since it shows a one-line clue on the sign-in screen instead of asking recovery questions.
To set the account as administrator, select it, click Properties, open Group Membership, choose Administrator, then click Apply and OK.
Method 5: Create a Local Account from Command Prompt
Command Prompt creates an account in a single line, which makes it useful for anyone scripting a setup or working without the GUI.
- Open Start, search for Command Prompt, right-click it, and choose Run as administrator
- Run this command, replacing the placeholders with your own values:
net user USER-NAME PASSWORD /add- To make the account an administrator, run:
net localgroup administrators USER-ACCOUNT /addReplace USER-ACCOUNT with the exact username you created in the first command. Sign out to see the new account on the lock screen.
Method 6: Create a Local Account from PowerShell
PowerShell offers more control over account details like full name and description compared to Command Prompt.
- Open Start, search for PowerShell, right-click it, and choose Run as administrator
- Run this command to store the password securely:
$Password = Read-Host -AsSecureString- Type the password when prompted and press Enter
- Create the account with:
New-LocalUser "NEW-ACCOUNT-NAME" -Password $Password -FullName "USER-FULL-NAME" -Description "DESCRIPTION"- Add the account to a group with:
Add-LocalGroupMember -Group "Administrators" -Member "NEW-ACCOUNT-NAME"Use Users instead of Administrators in the last command if you want the account to stay a standard user rather than gain full system access.
Method 7: Convert an Existing Microsoft Account to Local
Anyone currently signed in with a Microsoft account can switch to a local account without losing files or installed apps.
- Open Settings > Accounts > Your info
- Select Sign in with a local account instead
- Enter your current Microsoft account password to verify identity
- Set a new username and password for the local account
- Sign out and sign back in to apply the change
Files, installed programs, and most settings carry over during the conversion. Apps that require active Microsoft account verification, such as certain Store titles, may stop working after the switch.require active Microsoft account verification, such as certain Store titles, may stop working after the switch.
Frequently Asked Questions
Can I use OneDrive with a local account?
No. OneDrive requires a Microsoft account for sync, so switching to local disables that feature until you sign back into a Microsoft account.
Does a local account still get Windows updates?
Yes. Windows Update runs independently of account type and continues to install updates normally on local accounts.
Can I switch back to a Microsoft account later?
Yes. Go to Settings > Accounts > Your info and select Sign in with a Microsoft account instead, then follow the prompts.
Will I lose my files if I switch account types?
No. Converting between local and Microsoft accounts keeps your files, apps, and most settings intact since the conversion changes the sign-in method, not the user profile itself.
Which method creates a local account fastest?
Command Prompt and PowerShell create accounts in one command each, making them faster than the GUI methods once you know the exact syntax.

