Churches play a critical role in the roguelike experience of Elden Ring: Nightreign. Set in the shifting land of Limveld, this standalone game expands on Elden Ring’s world by introducing survival mechanics that rely heavily on strategic exploration. Among the most valuable locations you can visit are churches—sacred ruins scattered across the map that grant healing, potential upgrades, and occasionally, rare items or NPCs.
Understanding where these churches might appear, what they offer, and how to plan your route around them can determine whether you survive through the third night or fall to the Nightlords.
Why Churches Matter in Nightreign
Before diving into specific locations, it’s important to understand the purpose and impact of visiting churches in this version of the game:
- Flask Upgrade: Interacting with the altar inside a church grants you one additional charge to your Flask of Crimson Tears—your main healing item. This benefit is limited to once per church, per expedition.
- Sacred Tear Drops: Some churches may also contain a Sacred Tear, which enhances the healing potency of each Flask use, not just the number of charges.
- Safe Zones: Churches are typically enemy-free, allowing a moment to regroup and plan your next move.
- Merchants and Loot: Some churches house item boxes or NPC vendors, indicated on the map with unique icons.
- Map Clarity: Church icons resemble gold-spired ruins on the map. When hovering over them, you may also see small sub-icons indicating a Flask refill or a Merchant, helping you decide whether it’s worth detouring.
How Many Churches Can Spawn?
Each expedition in Limveld spawns three to four churches randomly across predetermined map points. While their exact locations rotate between runs, the overall list of potential spawn points remains consistent. This means that over time, players can memorize common patterns and optimize their routes accordingly.
Interaction Mechanics
Each church contains an altar—interacting with it is essential to gaining the flask charge. In co-op play, each player must interact individually to receive the benefit.
- You cannot return to the same church on subsequent days to gain more flask charges.
- These bonuses stack alongside charges earned from defeating the Day 2 boss, allowing well-prepared players to enter Day 3 with a full healing stockpile.
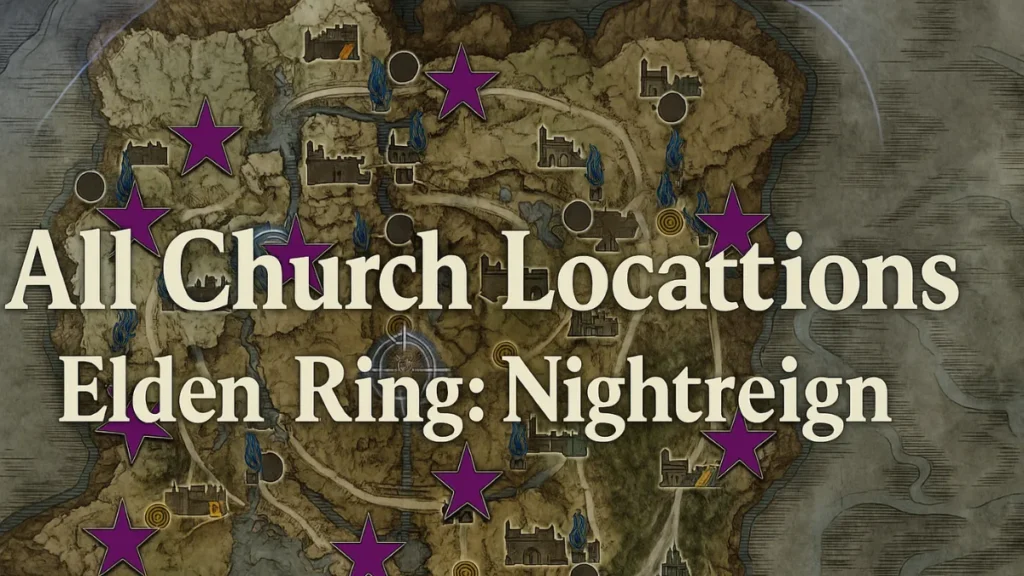
All Known Church Spawn Points
Churches in Limveld appear across a variety of well-established zones. While each expedition only includes three or four of them, they are always selected from the same set of known locations.
- Northwest Ruins Church
- Southwestern Valley Church
- Central Highground Church
- Eastern Plateau Church
- Northern Mountain Ridge
- Southern Gorge Church
- Volcano Crater Church (event-based)
- South-Central Plateau
- East Hill Shrine
- Northern Snow Route
- Eastern Lower Flatlands
Note: The game currently features 11 total potential church spawn points, chosen randomly per run.
1. Northwest Ruins Church
- Landmark Proximity: Near one of the isolated ruin clusters.
- Best Use: Early route planning; easy to reach before major encounters.
- Loot Potential: Medium—can include chests with utility items.
2. Southwestern Valley Church
- Landmark Proximity: Nestled below a steep Spiritstream-accessible cliff.
- Best Use: Refill before pushing east into midgame forts.
- Loot Potential: Occasionally has a merchant.
3. Central Highground Church
- Landmark Proximity: Close to Castle or Main Encampment.
- Best Use: Safe fallback spot after intense field boss battles.
- Loot Potential: High, particularly during NPC event runs.
4. Eastern Plateau Church
- Landmark Proximity: Often appears near Fort or Sorcerer’s Rise.
- Best Use: Heal before attempting puzzle areas or boss towers.
- Loot Potential: High—may include Sacred Tears or buff relics.
5. Northern Mountain Ridge
- Note: Only appears when the Shifting Earth event is not active.
- Best Use: Optional, but worthwhile for late-Day 1 exploration.
- Loot Potential: Randomized, with a chance for early-game talismans.
6. Southern Gorge Church
- Landmark Proximity: Hidden near tunnel entrances or Spectral Hawk trees.
- Best Use: Post-tunnel healing point before returning to surface objectives.
- Loot Potential: Often includes enemy-free loot chests.
7. Volcano Crater Church
- Event Triggered: Guaranteed spawn during Volcano (Crater) event.
- Landmark Proximity: Always in upper middle portion of map.
- Best Use: High-value late-Day 2 stop before boss prep.
- Loot Potential: Excellent—often includes item boxes and NPC vendors.
Special Church Variants
Great Church
- Description: Large cathedral-like structure, resembling the Cathedral of Manus Celes.
- Unique Feature: A floor hole leads to an underground loot area.
- Best Use: Holy-aligned gear farming.
- Loot Example: Warming Stones (supportive healing item), Holy-element weapons.
Tips for Efficient Church Routing
To maximize the value of church visits during a Nightreign run, follow these principles:
- Start your expedition by scanning the map and marking all church locations.
- Look for the gold-spired icons that represent churches—hovering over them reveals additional sub-icons for healing and merchants.
- Build your route to prioritize early church visits before heavy encounters.
- Coordinate with teammates in multiplayer so everyone benefits from altar interactions.
- During Day 2, balance time between church visits and rune farming—churches won’t give XP.
- Plan for Day 3: If you missed churches early, try to compensate by defeating the Day 2 boss for a guaranteed flask charge increase.
Items Found at Churches
Here’s a quick look at the types of items you might encounter in or around churches:
| Item | Type | Description & Use |
|---|---|---|
| Flask of Crimson Tears (Charge) | Consumable Upgrade | Increases your healing uses per run. Most vital upgrade from churches. |
| Sacred Tear | Consumable | Occasionally found here; enhances the healing amount of each flask use. |
| Crimson Seed Talisman | Talisman | Boosts the healing effect of your flasks. Rare drop, but synergizes well with church benefits. |
| Random Relics | Passive Buffs | Can include heal-over-time effects or flask efficiency boosts. |
| Merchant Stock | NPC Items | Varies by run, but can include crafting ingredients or even rare gear. |
Final Thoughts
Churches in Elden Ring: Nightreign offer far more than just a place to catch your breath—they are strategic outposts that can make or break your expedition. Whether you’re navigating solo or fighting through with a team, prioritizing these sacred sites will give you the sustain and strength needed to face the Nightlords head-on.
Prepare wisely, check your map early, and remember to watch for the gold-spired church icons; they may hold the difference between survival and defeat. Play Now
Read More:
Cookie Run Kingdom Boss Rush Guide: Meta Teams, Hidden Synergies & How to Beat All Stages
Sonic Saves Robloxia Guide: How to Beat All Levels, Unlock Secrets, and Complete 6 Runs
How to Fix Minecraft getsockopt Error (Quick Solutions)
How to Fix “An Error Occurred in e4mc” in Minecraft: Full Troubleshooting Guide

