Task View lets you see all open windows, switch apps, and manage virtual desktops in one place. When the Task View button disappears, the Win + Tab shortcut stops responding, or the overview opens to a blank screen, your multitasking workflow breaks fast. This guide walks through the exact fixes that restore Task View on Windows 11, starting with the quickest ones.
Why Task View Is Not Working in Windows 11
A few specific issues cause Task View to stop opening:
- The Task View button is turned off in Taskbar settings.
- Windows Explorer crashed or hung in the background.
- A registry value or Group Policy hides the Task View button.
- Too many open virtual desktops consume all available resources.
- Corrupted system files broke the virtual desktop feature.
- An outdated build or buggy update changed taskbar behavior.
- A faulty graphics driver blocks the Task View animation.
- A third-party taskbar customization tool conflicts with Windows shell settings.
- The keyboard itself fails to register the Win + Tab combination.
Work through the fixes below in order. The early steps solve most cases in under a minute.
1. Turn On the Task View Button
If the button vanished from your taskbar, Windows likely toggled it off after an update.
- Right click an empty area of the taskbar.
- Select Taskbar settings.
- Turn the Task view switch to On.
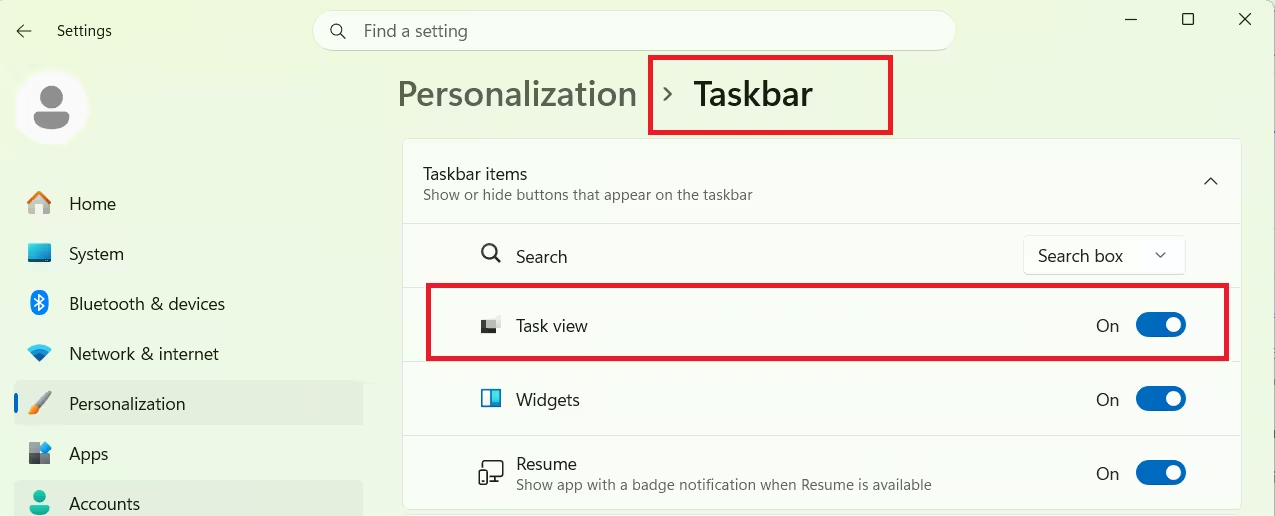
The button returns to the taskbar immediately, next to Search. Click it to confirm the overview opens. If the switch is already on but Task View still fails, move to the next fix.
2. Restart Windows Explorer
Task View runs on top of the Windows Explorer process. When that process stalls, the button and the Win + Tab shortcut both stop responding.
- Press Ctrl + Shift + Esc to open Task Manager.
- Find Windows Explorer in the Processes list.
- Right click it and choose Restart.
The taskbar flickers and reloads. Test Task View again right after the restart. This clears most temporary glitches without a full reboot.
3. Close Too Many Virtual Desktops with a Hotkey
Windows 11 lets you stack hundreds of virtual desktops without warning. When too many pile up, they consume enough resources to lock Task View completely. The Win + Tab shortcut stops responding, and the button does nothing. Closing the excess desktops frees those resources immediately.
Press Win + Ctrl + F4 to close the currently active virtual desktop. Repeat this shortcut until you are down to one or two desktops. Test Task View after each press to see when it starts responding again.
If you have dozens of desktops open, use the PowerShell method below instead of pressing the shortcut repeatedly.
4. Close All Virtual Desktops at Once with PowerShell
When the manual hotkey approach is too slow, a PowerShell script closes all open virtual desktops in one run. This is the fastest fix when accumulated desktops are the root cause.
- Open Notepad.
- Paste the script below into Notepad:
Function CloseVirtualDesktopInWin11
{
$KeyShortcut = Add-Type -MemberDefinition @"
[DllImport("user32.dll")]
static extern void keybd_event(byte bVk, byte bScan, uint dwFlags, UIntPtr dwExtraInfo);
public static void CloseVirtualDesktopInWin11()
{
keybd_event((byte)0x5B, 0, 0, UIntPtr.Zero);
keybd_event((byte)0x11, 0, 0, UIntPtr.Zero);
keybd_event((byte)0x73, 0, 0, UIntPtr.Zero);
keybd_event((byte)0x5B, 0, (uint)0x2, UIntPtr.Zero);
keybd_event((byte)0x11, 0, (uint)0x2, UIntPtr.Zero);
keybd_event((byte)0x73, 0, (uint)0x2, UIntPtr.Zero);
}
"@ -Name CloseVirtualDesktop -UsingNamespace System.Threading -PassThru
$KeyShortcut::CloseVirtualDesktopInWin11()
}
Function CloseAllVirtualDesktopInWin11() {
$maxNumber=1..800
foreach ($n in $maxNumber)
{
CloseVirtualDesktopInWin11
}
}
CloseAllVirtualDesktopInWin11- Save the file as CloseAllVirtualDesktops.ps1 (choose All Files in the Save as type dropdown so Notepad does not add .txt).
- Right click the saved file and select Run with PowerShell.
The script runs in a few seconds and closes up to 800 virtual desktops. Restart your PC if Task View does not respond immediately after.
5. Enable Task View Through the Registry
A wrong registry value can hide the button even when the Taskbar setting looks correct. Back up the registry before you edit it.
- Press Win + R, type
regedit, and press Enter. - Go to this path:
HKEY_CURRENT_USER\Software\Microsoft\Windows\CurrentVersion\Explorer\Advanced- Find the ShowTaskViewButton value on the right.
- Double click it and set the value data to
1. - Click OK, then restart Windows Explorer or sign out and back in.
A value of 1 shows the button, and 0 hides it. If the value is missing, right click the empty space, create a new DWORD (32-bit) Value, name it ShowTaskViewButton, and set it to 1.
6. Re-enable the Task View Button via Group Policy
If the Task View toggle in Taskbar settings is greyed out or disabled, a Group Policy setting is blocking it. The registry fix above will not override a Group Policy rule. You need to correct it at the policy level directly.
- Press Win + R, type
gpedit.msc, and press Enter. - Navigate to:
Computer Configuration > Administrative Templates > Start Menu and Taskbar- Find the policy named Hide the TaskView button and double click it.
- Set it to Not Configured.
- Click Apply, then OK.
- Restart your PC.
Setting the policy to Not Configured removes the forced restriction and hands control back to the Taskbar settings toggle. If your Windows 11 edition does not include Group Policy Editor, use the registry fix in the previous section instead.
7. Run SFC and DISM Scans
Corrupted system files often break virtual desktops and the Task View overview. Two built in tools repair those files.
- Press Win + S, type
cmd, and select Run as administrator. - Run the DISM command first and wait for it to finish:
DISM /Online /Cleanup-Image /RestoreHealth- Then run the System File Checker:
sfc /scannowLet both scans complete fully. DISM repairs the underlying component store, and SFC replaces damaged files. Restart your PC after both finish, then test Task View.
8. Update Windows 11
Microsoft has fixed several taskbar and Task View bugs through cumulative updates. An outdated build keeps you stuck with the broken behavior.
- Open Settings with Win + I.
- Go to Windows Update.
- Click Check for updates and install everything offered.
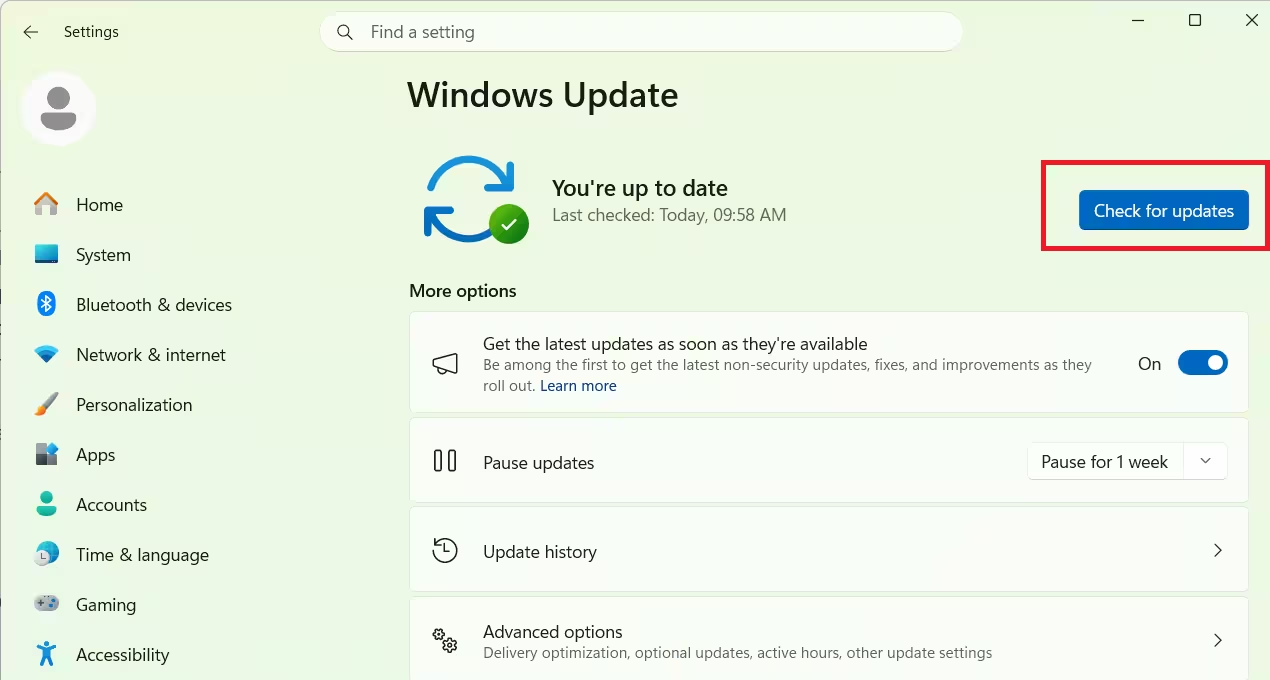
- Restart when prompted.
After the restart, open Task View to confirm the update fixed it.
9. Update or Roll Back Your Graphics Driver
Task View uses GPU acceleration for its animation. A broken graphics driver can make the overview open to a black or frozen screen.
- Press Win + X and select Device Manager.
- Expand Display adapters.
- Right click your graphics card and choose Update driver, then Search automatically for drivers.
If Task View broke right after a driver update, roll it back instead:
- Right click the graphics card and select Properties.
- Open the Driver tab.
- Click Roll Back Driver and follow the prompts.
Restart your PC after either action.
10. Re-register Windows 11 Apps
A damaged app package can take down system features that share the same shell, including Task View. Re-registering the packages rebuilds them.
- Press Win + S, type
powershell, and select Run as administrator. - Paste this command and press Enter:
Get-AppxPackage -AllUsers | Foreach {Add-AppxPackage -DisableDevelopmentMode -Register "$($_.InstallLocation)\AppXManifest.xml"}- Wait for the process to finish. Some red text may appear for packages that cannot reinstall, and that is normal.
- Restart your PC.
11. Check Multitasking and Virtual Desktop Settings
If Task View opens but virtual desktops act strangely, the multitasking settings need a look.
- Open Settings and go to System.
- Select Multitasking.
- Expand the Snap windows and Desktops sections.
- Set the desktop options to show your windows on all desktops if you want a consistent view across them.
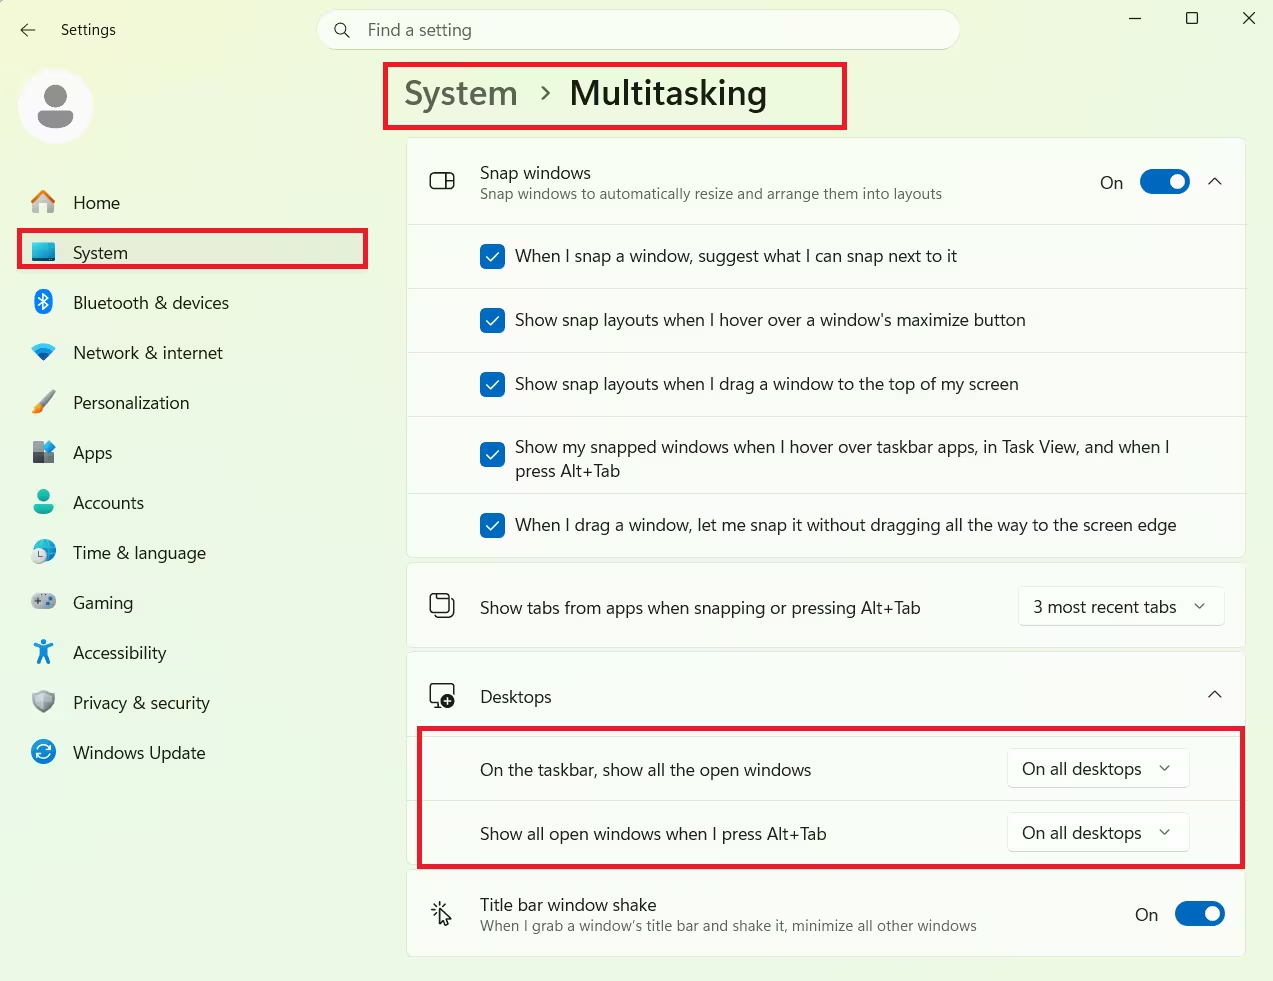
This does not fix a missing button, but it solves the case where Task View shows the wrong windows or empty desktops.
12. Uninstall Third-Party Taskbar Customization Tools
Tools like StartAllBack, ExplorerPatcher, and TaskbarX modify the Windows shell to change how the taskbar looks and behaves. These tools hook deep into Explorer and can conflict with Task View, causing the button to vanish or the shortcut to stop working entirely.
- Press Win + I to open Settings.
- Go to Apps, then Installed apps.
- Search for any taskbar or shell customization tool you have installed.
- Click the three dot menu next to it and select Uninstall.
- Restart your PC.
Test Task View after the restart. If it works, the third-party tool was the conflict. Check whether the tool’s developer has released an update that fixes compatibility with your current Windows 11 build before reinstalling it.
Create a New User Account
When every fix above fails, your user profile may be corrupted. A fresh local account confirms whether the profile is the problem.
- Open Settings and go to Accounts.
- Select Other users.
- Click Add account and follow the steps to create a local account.
- Sign in to the new account and test Task View.
If Task View works in the new account, the issue lives in your old profile. Move your files to the new account and use it going forward.
Frequently Asked Questions
Why is the Win + Tab shortcut not opening Task View?
The shortcut depends on the same Explorer process and registry value as the button. Restart Windows Explorer and confirm ShowTaskViewButton is set to 1. Also test the keys on a different keyboard to rule out hardware.
Does turning off Task View save resources?
The feature uses very little memory when idle. Keep it on unless you have a specific reason to hide the button.
Will these fixes delete my open windows or desktops?
Restarting Explorer and signing out close your current session, so save your work first. The fixes do not remove your files.

