If you cannot convert your MBR disk into GPT due to the "Unrecognized partition found, index 1 disk layout validation failed" error, this article will help. This error usually occurs when the disk contains a corrupted or improperly configured partition that prevents the MBR2GPT tool from validating the disk. As a result, the conversion process fails.
![Unrecognized partition found, index 1 disk layout validation failed [Fixed]](https://img.fdaytalk.com/wp-content/uploads/2026/06/Unrecognized-partition-found-1024x576.avif)
The most common cause is a disk that has more than three primary partitions or one or more logical partitions inside an Extended partition. MBR2GPT requires three or fewer primary partitions so it has room to add the EFI system partition that GPT needs. When your disk exceeds that limit, the tool stops at index 1 and reports the validation failure. A corrupted or non-standard partition type ID on that partition can also trigger the same error.
What Causes "Unrecognized Partition Found Index 1 Disk Layout Validation Failed"?
Two main situations trigger this validation failure:
- The disk has more than three primary partitions. MBR disks allow up to four primary partitions, but MBR2GPT needs one free slot to create the EFI system partition. A fourth primary partition leaves no room.
- The disk contains logical partitions inside an Extended partition. MBR2GPT does not support logical partitions and flags them as unrecognized.
- A partition carries a non-standard or corrupted type ID that MBR2GPT cannot classify, often left by an OEM or a third-party partitioning tool.
Back up all data on non-C partitions before you try any fix below.
Run MBR2GPT validation and read the log
Before you change anything, find out exactly which partition fails. Open Command Prompt as administrator and run the validation:
mbr2gpt /validate /disk:0 /allowfullosWhen the command fails, MBR2GPT writes details to a log file. Open the log to confirm the partition index and its type:
notepad %windir%\setupact.logScroll to the bottom of the log and look for the line that mentions the unrecognized partition and its index. The log often lists the partition type GUID or the MBR type ID, which tells you whether the partition is a recovery partition, an OEM partition, or something a third-party tool created. Note that value before you continue.
Delete logical partitions using Disk Management
This is the most direct fix when the error comes from logical partitions or too many primary partitions. Open Disk Management by pressing Windows + X and selecting Disk Management.
Look at your disk layout. Logical partitions appear in blue inside a dark green Extended partition bar. You need to remove all logical partitions before you can run the conversion.
Follow these steps:
- Right-click on a logical partition and select Delete Volume. Click Yes to confirm.
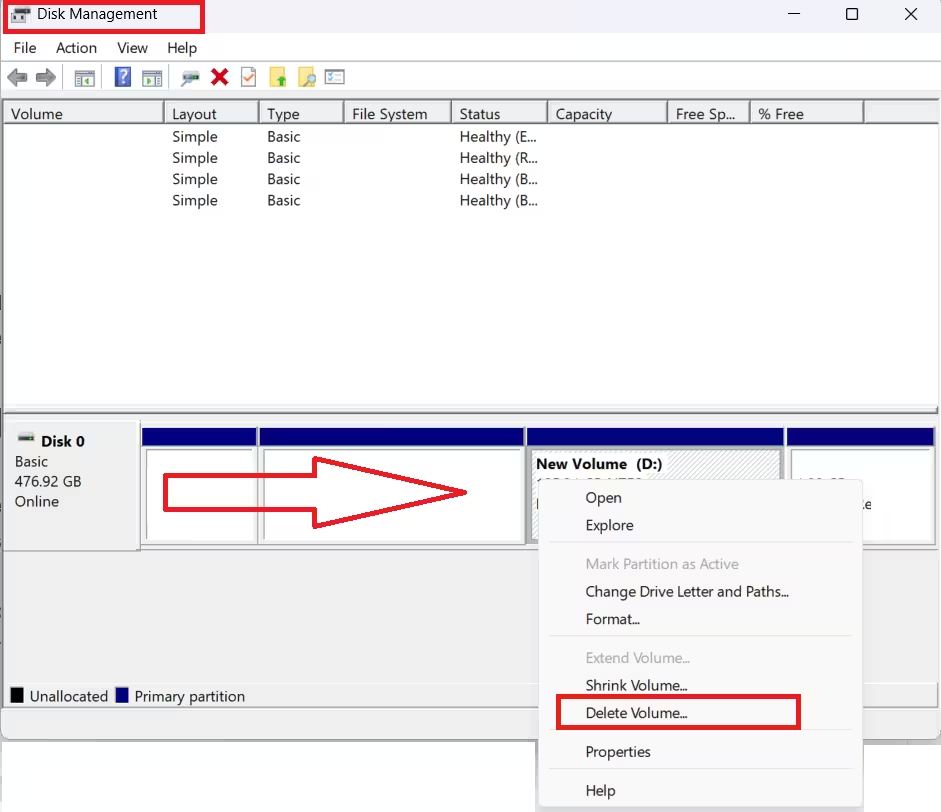
- Repeat this for every logical partition. A green Free space bar replaces each deleted partition.
- Once all logical partitions are gone, right-click the remaining green Free space and select Delete Partition. Click Yes.
- This leaves a single Unallocated block in place of the entire Extended partition.
Now open Command Prompt as administrator and run the validation again:
mbr2gpt /validate /disk:0 /allowfullosIf it passes, run the conversion:
mbr2gpt /convert /disk:0 /allowfullosIf the error still appears after removing all logical partitions, delete the other non-C partitions one by one and rerun the validation after each deletion until it passes.
Use a third-party tool (no partition deletion needed)
If the manual deletion method feels risky or you want to keep all your current partitions intact, a third-party tool is the easiest path. AOMEI Partition Assistant can convert MBR to GPT without requiring you to delete any partitions or lose any data.
- Download and install AOMEI Partition Assistant on your PC.
- Launch the tool and let it scan your disks.
- Right-click the disk you want to convert and select Convert to GPT.
- Confirm the disk on the next screen and click OK.
- Click Apply to start the conversion and do not interrupt the process.
- Restart your PC once the conversion finishes.
After the conversion, go into your firmware settings and switch from Legacy BIOS or CSM mode to UEFI, then enable Secure Boot. You can then recreate any partitions you need on the unallocated space.
Inspect and fix a non-standard partition type using DiskPart
If your partition count is already three or fewer and the error persists, a non-standard partition type ID is likely the cause. Use DiskPart to find and fix it. Open Command Prompt as administrator and run:
diskpart
list disk
select disk 0
list partition
DiskPart shows every partition with its type and size. Compare this layout against the index from the log. MBR2GPT counts partitions starting at index 0, so index 1 is the second partition that DiskPart displays. A partition labeled as "Unknown" or carrying an unusual type is almost always the one that breaks the conversion.
To see the exact type ID of a partition, select it and check its detail:
select partition 2
detail partition
The detail view reveals the partition type. A standard primary data partition uses type 07, a recovery partition uses type 27, and the Windows system partition uses a known ID. A value outside these ranges is what MBR2GPT cannot read.
Fix the unrecognized partition type
Once you find the partition with the odd type ID, you have two safe options.
If the partition is a small leftover recovery or OEM partition that you no longer need, delete it. Confirm first that it does not hold your active Windows recovery environment. Inside DiskPart, select the partition and remove it:
select partition 2
delete partition override
The override switch lets DiskPart remove a protected partition. Run the MBR2GPT validation again after this step.
If the partition holds data you want to keep, change its type ID instead of deleting it. Set it to a standard primary partition type so MBR2GPT can classify it:
select partition 2
set id=07
After you set the new ID, exit DiskPart and run the validation command one more time.
Recreate a clean recovery partition
A broken or non-standard recovery partition is one of the most frequent triggers for this error. First, disable the Windows recovery environment so it releases the current partition:
reagentc /disableNext, delete the problem recovery partition inside DiskPart using the delete partition override command shown earlier. Then enable the recovery environment again so Windows builds a fresh, properly typed recovery partition:
reagentc /enableThis rebuild gives MBR2GPT a recognized partition layout. Run the validation once more, and if it reports success, complete the conversion:
mbr2gpt /convert /disk:0 /allowfullosVerify the conversion
After the conversion finishes, confirm that Windows now sees a GPT disk. Open DiskPart, select the disk, and check its detail:
diskpart
select disk 0
detail disk
Look for a line that confirms the GPT layout. You also need to switch your firmware from Legacy BIOS to UEFI mode in your motherboard settings, because a GPT system disk boots through UEFI. Reboot, enter your firmware setup, enable UEFI, and save the change. Windows then boots from the converted GPT disk.