The error “VPN connection failed due to unsuccessful domain name resolution” means your VPN client sent a hostname to connect to, but Windows could not translate that hostname into an IP address. Without a valid IP, the connection never starts.
Windows users see this most often with Cisco AnyConnect Secure Mobility Client, but it can appear with any VPN software. The fixes below apply across VPN clients unless a step calls out AnyConnect specifically.
Work through each fix in order. Most users resolve the error within the first two steps.
What Causes the VPN Connection Failed Due to Unsuccessful Domain Name Resolution Error
The error points to one of these problems:
- Your network adapter uses a custom public DNS (Google 8.8.8.8, Cloudflare 1.1.1.1, OpenDNS) that conflicts with your VPN server’s DNS requirements
- Your DNS cache holds stale or corrupted records from a previous session
- A third-party firewall or antivirus blocks your VPN’s DNS lookup requests
- A proxy server or a second VPN client running in the background interferes with network routing
- The Cisco AnyConnect XML profile file (
anyconnect.xml) is corrupted - AT&T’s DNS Error Assist feature intercepts failed DNS queries and redirects them, breaking VPN resolution
- Corrupted Windows system files prevent the networking stack from functioning correctly
Fix 1: Set DNS to Obtain Automatically
Custom public DNS servers are the most common cause. Cisco AnyConnect and many corporate VPNs require Windows to use the ISP-assigned DNS rather than a manually configured server. Switching back to automatic DNS resolves the conflict.
- Press Win + R, type
ncpa.cpl, and press Enter. - Right-click your active network adapter (Wi-Fi or Ethernet) and select Properties.
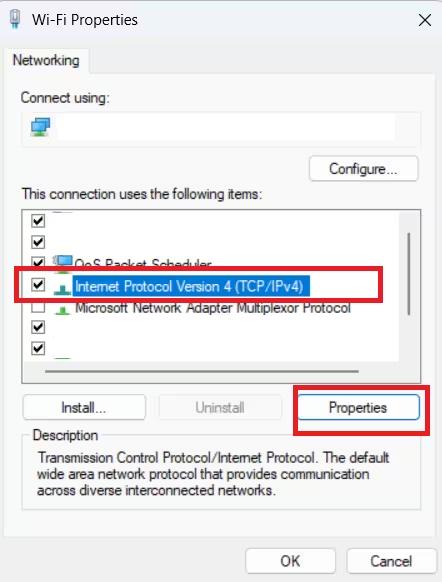
- In the Networking tab, select Internet Protocol Version 4 (TCP/IPv4) and click Properties.
- Select Obtain DNS server address automatically.
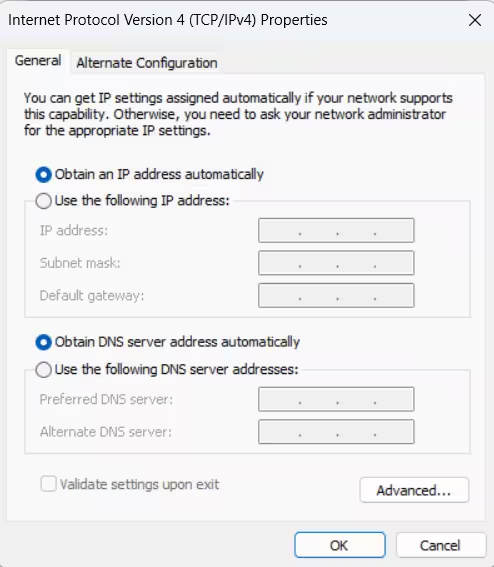
- Click OK to save, then close all windows.
- Restart your PC and try the VPN connection again.
This single change fixes the error for most users. If you still see the error, continue to the next fix.
Note: If your IT department assigned specific DNS servers for your workplace, check with them before changing this setting.
Fix 2: Flush DNS Cache and Reset the Network Stack
Your DNS cache stores hostname-to-IP mappings from previous sessions. When those records go stale or corrupted, Windows serves the wrong IP to your VPN client instead of resolving it fresh.
- Press Win + S, type
cmd, right-click Command Prompt, and select Run as administrator. - Run each command below one at a time, pressing Enter after each:
ipconfig /flushdns
ipconfig /registerdns
netsh int ip reset
netsh winsock reset- Restart your PC after all four commands complete.
- Try connecting to your VPN again.
The netsh winsock reset command resets the Windows Sockets API to its default state. This handles deeper network stack corruption that a DNS flush alone cannot clear.
Fix 3: Disable or Remove Your Third-Party Firewall
Third-party security suites frequently block VPN DNS requests. Norton and Comodo Antivirus are known causes of this specific error. These programs flag VPN hostname resolution traffic as suspicious and cut the connection before it reaches the server.
Test by disabling the firewall first:
- Find your antivirus or firewall icon in the system tray (bottom-right corner of the taskbar).
- Right-click it and look for Disable, Pause Protection, or Turn Off Firewall.
- Disable it for 15 minutes, restart your PC, and test the VPN.
If the VPN connects successfully with the firewall off, that software causes the error.
Uninstall the firewall to confirm and fix it permanently:
- Press Win + R, type
appwiz.cpl, and press Enter. - Find your firewall or antivirus in the installed programs list.
- Right-click it and select Uninstall.
- Follow the uninstall prompts and restart your PC.
Note: Some firewalls enforce network rules even when you disable real-time protection. A full uninstall is the only reliable test in those cases.
Fix 4: Disable Proxy Server or Conflicting VPN Client
A proxy server or a second VPN client running alongside your primary VPN client often causes domain name resolution failures. Both reroute network traffic in ways that break DNS requests.
Turn off the proxy server:
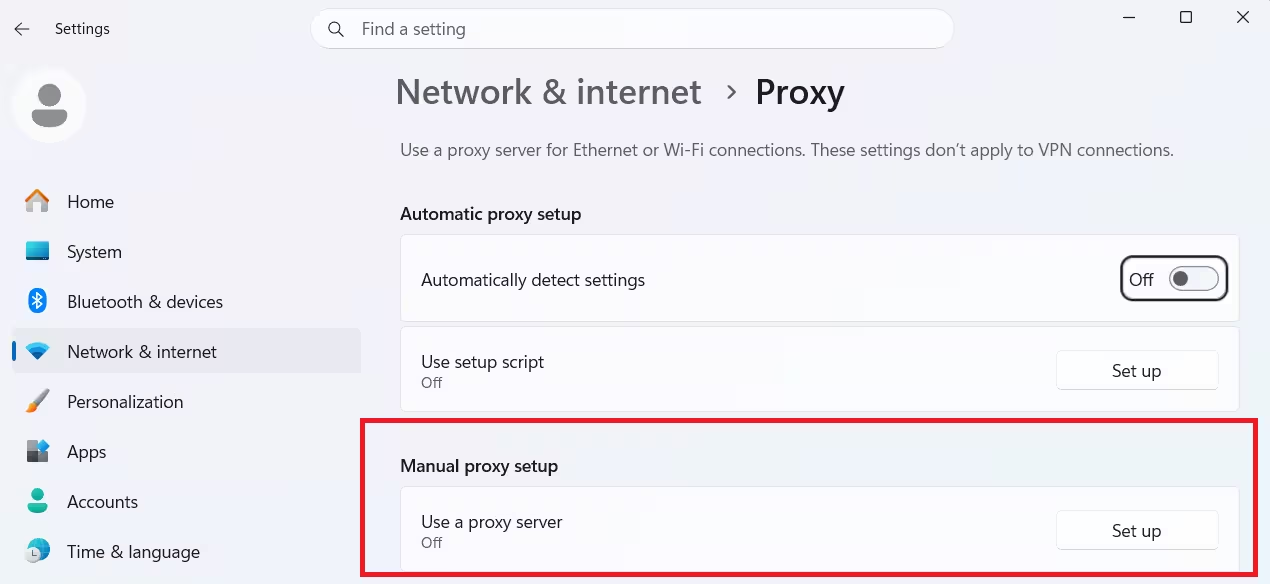
- Press Win + R, type
ms-settings:network-proxy, and press Enter. - Under Manual proxy setup, turn off Use a proxy server.
- Click Save and restart your PC.
Remove a conflicting VPN client (Windows built-in VPN):
- Press Win + R, type
ms-settings:network-vpn, and press Enter. - Click your VPN connection in the list and select Remove.
Disconnect a standalone VPN app:
If you run a standalone VPN app such as ExpressVPN, NordVPN, or Mullvad alongside Cisco AnyConnect, fully disconnect and close that app before launching AnyConnect. Running two VPN clients simultaneously causes routing conflicts that produce this error.
Fix 5: Reinstall the VPN Client
A corrupted VPN client installation replaces a clean reinstall. Damaged program files and a broken anyconnect.xml profile file both trigger this error in Cisco AnyConnect. Reinstalling resets both.
For Cisco AnyConnect:
- Press Win + R, type
appwiz.cpl, and press Enter. - Find Cisco AnyConnect Secure Mobility Client in the list.
- Right-click it and select Uninstall. Follow all removal prompts.
- Restart your PC to clear leftover files.
- Download the latest AnyConnect installer from your organization’s IT portal or from Cisco’s official download page (a Cisco account is required).
- Right-click the installer and select Run as administrator.
- Complete the installation and try your VPN connection again.
For other VPN clients, follow the same steps using your VPN provider’s official download page.
Fix 6: Connect to a Different VPN Region (Cisco AnyConnect Only)
This fix targets a corrupted anyconnect.xml profile file. When the XML profile corrupts, AnyConnect cannot resolve the VPN headend hostname. Connecting to a different VPN region forces AnyConnect to download a fresh profile file.
- Open Cisco AnyConnect Secure Mobility Client.
- Enter a different region or VPN headend address provided by your IT administrator.
- Connect to that alternate region.
- Once connected, switch back to your original server address.
Connecting to the alternate region generates a new anyconnect.xml file that replaces the corrupted one. Use this fix when a clean reinstall alone does not solve the error.
Note: You need your IT administrator to provide an alternate headend address. Standard users do not have access to this information by default.
Fix 7: Disable DNS Error Assist (AT&T Networks Only)
AT&T’s DNS Error Assist intercepts failed DNS lookups and redirects them to an AT&T search page instead of returning a standard DNS failure. This redirection prevents your VPN client from detecting that the hostname lookup failed and attempting the next resolution step. The result is the domain name resolution error.
If you connect from an AT&T network, opt out of DNS Error Assist through your AT&T account:
- Open a browser and go to att.com.
- Click My AT&T in the top-right corner and sign in with your account credentials.
- Click View Profile.
- Go to Communication Preferences, then Privacy Settings.
- Find DNS Error Assist and select the opt-out option to disable it.
- Restart your PC and try connecting with your VPN client again.
Fix 8: Repair Install or Clean Install Windows
If none of the fixes above work, corrupted Windows system files are preventing the networking stack from resolving hostnames correctly. A repair install or clean install resets the OS components responsible for DNS and network connectivity.
Repair install (recommended, keeps your files and apps):
A repair install replaces corrupted system files while keeping your personal data, installed programs, and settings. You need Windows installation media to run it. Download the Media Creation Tool from Microsoft’s official site to create bootable installation media, then boot from it and choose the Upgrade this PC now option rather than a clean install.
Clean install (faster, erases everything):
A clean install wipes the drive and installs a fresh copy of Windows. This removes all files, apps, and settings. Back up everything to an external drive before proceeding. Use this option only if the repair install fails or if your system is too unstable to run the repair process.
For most users dealing with this VPN error, a repair install is the right starting point.

