Installing a custom font on Windows takes less than a minute once you know the right method. Whether you need a font for Microsoft Word, Photoshop, Canva, or a design project, Windows 11 and Windows 10 both support installation without any third-party software.
This guide covers five methods to install fonts on Windows 11 and Windows 10, plus how to fix fonts that fail to install or do not appear in apps after installation.
What You Need Before Installing Fonts
Before installing any font, confirm you have the correct file format.
Windows supports these font formats:
- .TTF (TrueType Font)
- .OTF (OpenType Font)
- .TTC (TrueType Collection)
If the font arrives in a ZIP folder, extract it first before installing.
Most font packs include multiple files for each weight and style — Regular, Bold, Italic, Bold Italic. Install all files in the family to get full formatting support in apps like Word and Photoshop. Missing weight files cause apps to simulate bold or italic by distorting the font rather than using the proper version.
Where to Download Fonts Safely
Download fonts only from trusted sources to avoid malware bundled inside fake font installers.
Reliable font sources:
- Google Fonts (fonts.google.com): Free, open-source, commercial use allowed
- Font Squirrel (fontsquirrel.com): Free for commercial use, manually vetted
- DaFont (dafont.com): Large library, mostly free for personal use
- Adobe Fonts: Included with Creative Cloud subscriptions
Always check the license file included in the font download before using it in commercial projects. Many free fonts permit personal use only.
Method 1: Install Fonts Using Double-Click (Fastest Way)
This method works best when installing one or two font files.

Steps:
- Open the folder where the font file is saved.
- Double-click the .ttf or .otf file.
- A font preview window opens.
- Click the Install button at the top.
Windows installs the font instantly. You can start using it in apps like Word, Photoshop, or browser editors.
Tip: If the font pack includes multiple weight files (Regular, Bold, SemiBold, Light), repeat for each file or use Method 2 to install the entire family at once.
Method 2: Install Fonts Using Right-Click Menu
This method saves time when installing multiple fonts.
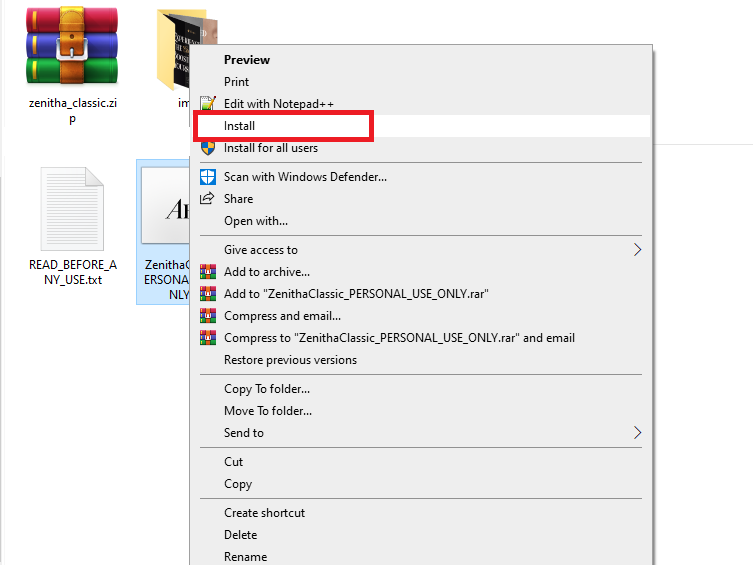
Steps:
- Select all font files you want to install (hold Ctrl and click each file, or press Ctrl + A to select all).
- Right-click the selection.
- Select Install or Install for all users.
Choose Install for all users if multiple accounts use the computer. This option requires administrator permission and places the font in the system-wide Fonts folder. The standard Install option installs fonts for your user account only.
Method 3: Install Fonts from Windows Settings
Windows 10 and Windows 11 allow font installation directly from Settings.

Steps:
- Press Windows + I to open Settings.
- Go to Personalization → Fonts.
- Drag and drop the font file into the Add fonts section.
Windows installs the font automatically and displays it in the installed fonts list.
Method 4: Install Fonts from Microsoft Store (Windows 11)
Windows 11 includes a direct link to the Microsoft Store font library inside the Fonts settings page. This method requires no external downloads.
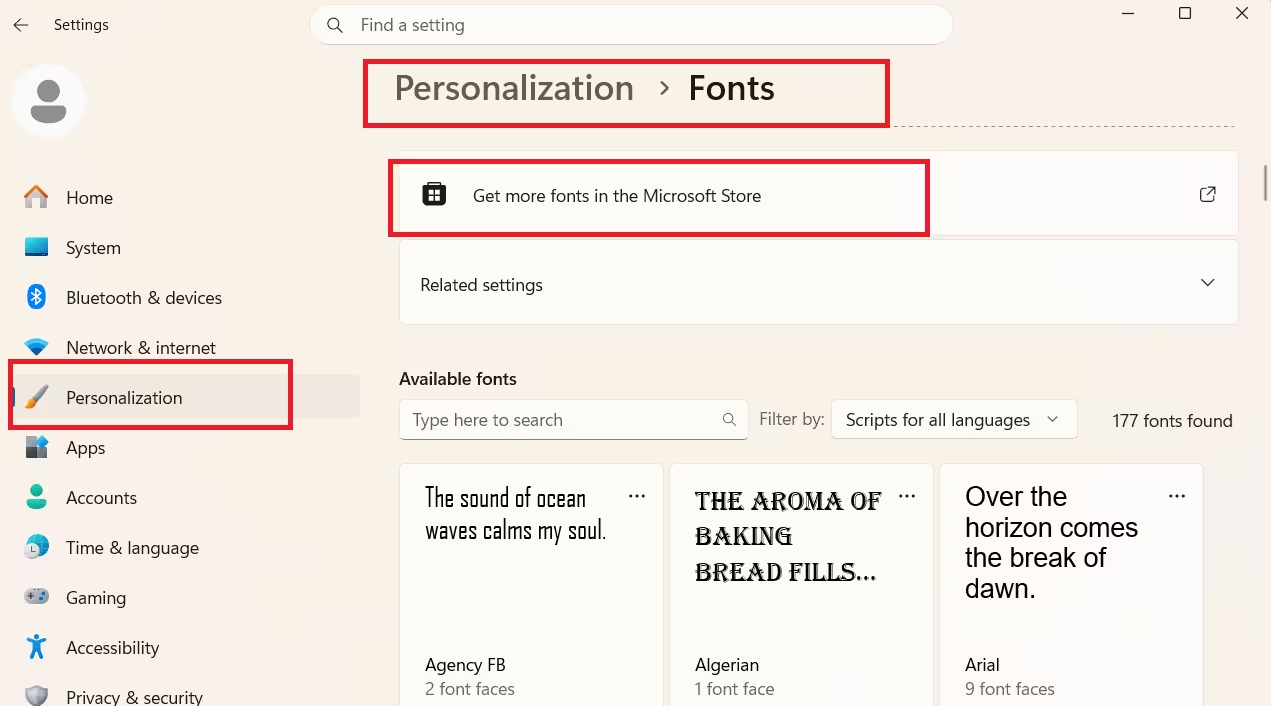
Steps:
- Press Windows + I to open Settings.
- Go to Personalization → Fonts.
- Click Get more fonts in Microsoft Store.
- Browse or search for a font.
- Click Get to download and install it.
Fonts installed from the Microsoft Store update automatically and do not require manual file management. This is the safest installation method on Windows 11.
Method 5: Install Fonts Using the Fonts Folder
This method gives direct access to Windows’ font directory.

Steps:
- Press Windows + R to open Run.
- Type:
fonts - Press Enter.
- Drag and drop the font file into the Fonts window.
Windows registers the font immediately.
How to Install Fonts from ZIP Files
Many font downloads arrive as compressed ZIP folders.
Steps:
- Right-click the ZIP file.
- Click Extract All.
- Open the extracted folder.
- Install the font using any method above.
Always install the actual .ttf or .otf file — not the ZIP file. Dragging a ZIP directly into the Fonts folder does not work.
How to Confirm the Font Installed Successfully
After installing the font:
- Open any app that supports fonts (Word, Notepad, Photoshop).
- Open the font dropdown list.
- Search for the font name.
If the font appears in the list, the installation worked correctly. If it does not appear, close the app completely and reopen it — most apps only load the font list at startup.
Fix: Font Not Showing After Installation
Step 1: Restart the application. Close and reopen Word, Photoshop, or any other app. Most apps load the font list once at startup and do not detect new fonts until restarted.
Step 2: Restart Windows. A full restart forces Windows to refresh the font cache and rebuild the available font list system-wide.
Step 3: Clear the font cache manually if restarting does not help:
- Press Windows + R, type
services.msc, and press Enter. - Find Windows Font Cache Service in the list.
- Right-click it and select Stop.
- Open File Explorer and navigate to:
C:\Windows\ServiceProfiles\LocalService\AppData\Local\FontCache - Delete all files inside this folder. Do not delete the folder itself.
- Restart your PC.
Windows rebuilds the font cache automatically on next startup. Corrupted cache files are a common cause of fonts installing correctly but failing to appear in apps.
Fix: Font Installation Failed or Shows Error
If Windows refuses to install a font:
- Download the font again: Corrupted files often fail installation silently.
- Use a trusted source: Avoid downloading fonts from unknown file-sharing sites.
- Run with administrator privileges: Right-click the font file and select Install for all users.
- Remove duplicate font names: If a font with the same name already exists, uninstall it first before installing the new version.
Installing fonts on Windows takes only a few seconds using the built-in tools. Whether you use double-click install, Settings, the Microsoft Store, or the Fonts folder, Windows handles font registration automatically.
If a font fails to appear after installation, clearing the font cache manually is the most reliable fix.
FAQs
Why is my installed font not showing in Word or Photoshop?
Highest intent troubleshooting query. Users land here after the install “works” but the font is invisible. Covers the cache fix angle too.
How do I install fonts on Windows 11?
Matches the primary keyword directly. Keeps the article answering its own title inside the FAQ block, which helps featured snippet eligibility.
How do I install fonts from a ZIP file?
Most font downloads are ZIP files. This is a predictable friction point almost every user hits and a standalone search query in its own right.
Can I install multiple fonts at once on Windows?
High practical value. Font packs always contain 10+ files and users don’t want to double-click each one. Short, clear answer.
How do I uninstall a font in Windows?
Natural follow-up intent. Users who install fonts also remove them. Adds topical completeness without bloating the article.

