Windows 11 installs updates automatically to patch security flaws and add new features, but the process often interrupts your work at the worst possible moment. You can pause updates for a set period through Settings, block them permanently using Services, Group Policy, Task Scheduler, or the Registry, or simply throttle them by setting your connection as metered.
This guide walks through every method, from a quick temporary pause to a full permanent block, and explains the risks that come with turning updates off for good.
Why Windows 11 Updates Install Automatically
Microsoft pushes updates automatically to close security holes before attackers can exploit them.
Each update falls into one of four categories. Security updates patch known vulnerabilities. Feature updates add new functionality and interface changes. Driver updates improve how your hardware communicates with Windows. Cumulative updates bundle several fixes into a single package so your system stays current with everything released before it.
Automatic delivery removes the need for manual checks, but it also means updates can trigger restarts or downloads at inconvenient times. Microsoft addresses this partly through Active Hours and scheduled restarts, though many users still prefer direct control over the process.
Pause Windows 11 Updates Temporarily
Pausing is the safest way to stop updates for a short period without losing future security patches.
- Open Settings from the Start menu.
- Select Windows Update.
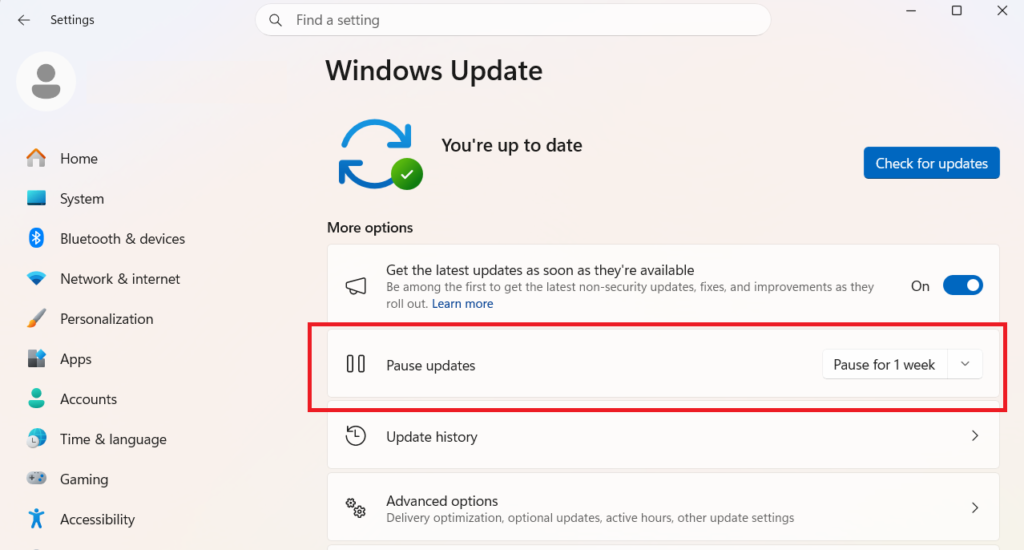
- Click the Pause updates option and choose how many days to pause, up to 35 days.
Updates resume automatically once the pause period ends. If you need more time, return to the same screen and extend the pause before it expires. Newer builds let you keep repeating this pause indefinitely, effectively giving you manual control without disabling the update service outright.
Disable Windows 11 Updates Using Windows Services
Turning off the Windows Update service stops updates from installing until you manually re-enable it.
- Press
Win + R, typeservices.msc, and hit Enter. - Find Windows Update in the list, right-click it, and select Properties.
- Set Startup type to Disabled, click Stop, then click Apply and OK.

- Restart your computer.
This method blocks updates completely rather than pausing them, so keep track of how long the service stays disabled.
Disable Windows 11 Updates Using Group Policy Editor
Group Policy Editor gives Windows 11 Pro and Enterprise users a permanent way to block automatic updates.
- Press
Win + R, typegpedit.msc, and press Enter. - Navigate to Computer Configuration > Administrative Templates > Windows Components > Windows Update > Manage End User Experience.
- Double-click Configure Automatic Updates.
- Select Disabled, click Apply, then OK.
- Restart your computer.
Windows 11 Home does not include Group Policy Editor, so Home users need the Registry method instead.
Disable Windows 11 Updates Using Registry Editor
The Registry method works on both Windows 11 Home and Pro, but back up the Registry first since incorrect edits can cause system problems.
Back up the Registry:
- Press
Win + R, typeregedit, and press Enter. - Click File > Export.
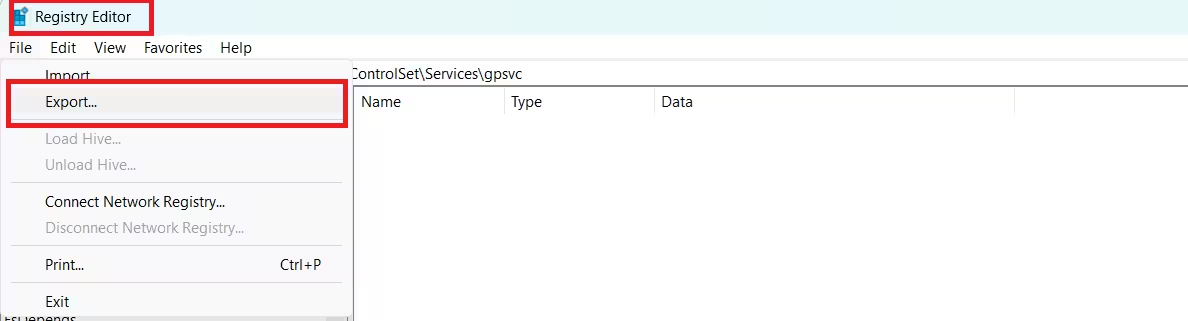
- Choose a save location, set Export range to All, name the file, and click Save.
Disable updates:
- Open Registry Editor and navigate to
HKEY_LOCAL_MACHINE\SOFTWARE\Policies\Microsoft\Windows. - Right-click the Windows key, select New > Key, and name it
WindowsUpdate.
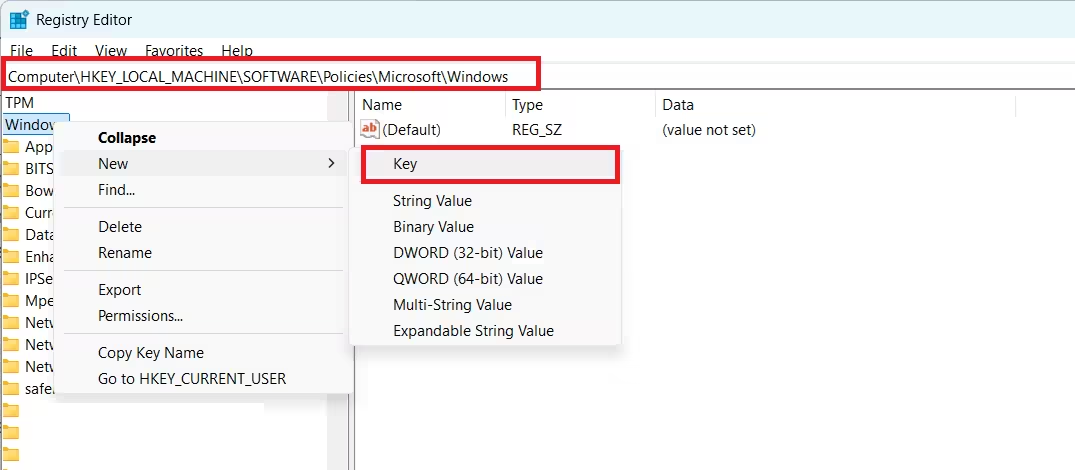
- Right-click the new
WindowsUpdatekey, select New > Key, and name itAU. - Right-click the
AUkey, select New > DWORD (32-bit) Value, and name itNoAutoUpdate. - Double-click
NoAutoUpdateand set its value to1. - Restart your computer.
To reverse this later, delete the NoAutoUpdate value or set it back to 0, then restart.
Disable Windows 11 Updates Using Task Scheduler
Windows Update relies on scheduled tasks to trigger its background checks, and disabling those tasks adds another layer of blocking on top of the Services method.
- Press
Win + R, typetaskschd.msc, and press Enter. - Navigate to Task Scheduler Library > Microsoft > Windows > WindowsUpdate.
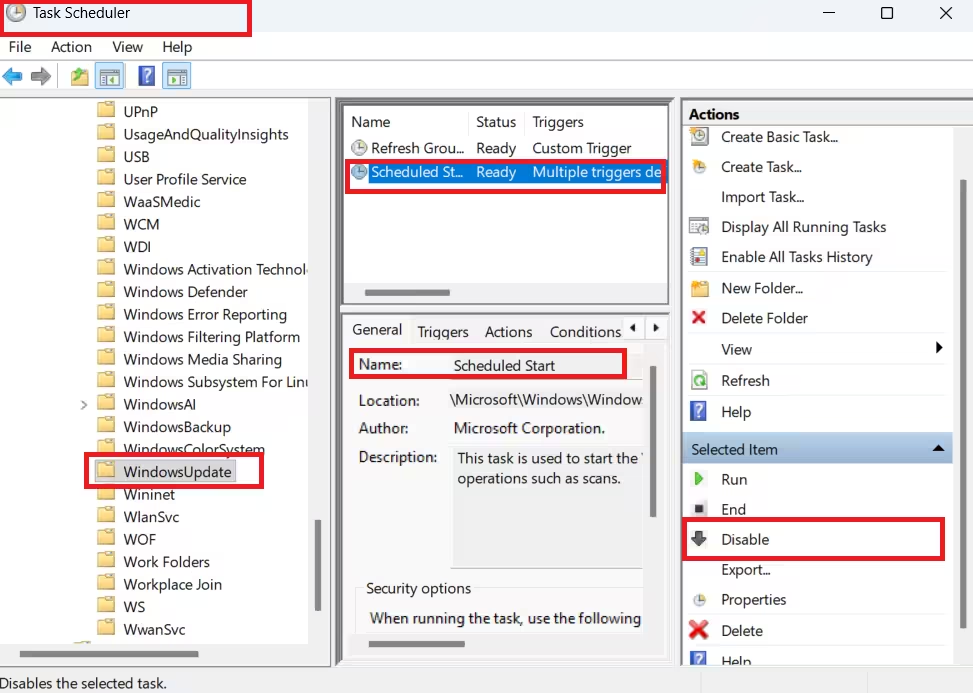
- Right-click each task in the list, including Scheduled Start, and select Disable.
This stops the scheduler from waking the Windows Update service on its own, which is useful if updates keep resuming even after you disable the service directly.
Block a Specific Update Without Disabling All Updates
If only one update or driver is causing problems, you can hide that single update instead of turning off updates entirely.
- Download the Show or hide updates troubleshooter (
wushowhide.diagcab) from the Microsoft Download Center. - Double-click the file and click Next.
- Select Hide updates.
- Choose the update or driver you want to block.
- Click Next, then Close.
The blocked update stays hidden until Microsoft releases a newer version of it, at which point it downloads again automatically.
Set Your Connection as Metered to Limit Update Downloads
Marking your network connection as metered tells Windows to restrict background data usage, which delays most update downloads without touching any settings, services, or the Registry.
- Open Settings and go to Network & Internet.
- Select your active connection, either Wi-Fi or Ethernet.
- Turn on Metered connection.

This does not block every update. Critical security patches can still download over a metered connection, so treat this as a lightweight throttle rather than a full block.
Manage Windows 11 Updates Across Multiple Devices with Action1
Action1 lets you control update deployment remotely across many endpoints instead of configuring each device individually.
- Log in or sign up on the Action1 platform.
- Install agents on the devices you want to manage, up to 200 endpoints at no cost.
- Choose between the Deploy Updates or Update Ring feature depending on your needs.
- Configure the deployment settings and select the checkbox that controls automatic updates.
- Target the endpoints you want to manage and disable default Windows updates on them.
- Schedule the automation so it applies your settings and turns off automatic updates the next time it runs.
This approach suits IT admins managing several machines rather than a single home PC.
Risks of Disabling Windows 11 Updates Long-Term
Turning off updates permanently removes the protection layer Microsoft designs them to provide.
Missed security patches leave known vulnerabilities open, including zero-day flaws that attackers can exploit before a fix even exists. Software compatibility issues follow soon after, since newer applications are built to run on a current OS version and may crash or misbehave on an outdated one. Hardware drivers stop arriving too, which can cause new peripherals to malfunction or fail to work at all. Some manufacturers also tie warranty and support terms to keeping your system updated, so a permanently disabled update service could affect your eligibility for free repairs.
Home users with limited technical experience, businesses handling regulated data, and any device connected to the internet regularly should avoid disabling updates altogether. Delaying updates through a pause is a safer middle ground than shutting them off completely.
How to Re-enable Windows 11 Updates
Reversing any of the disable methods restores normal update behavior.
Windows Services: Open services.msc, find Windows Update, set Startup type back to Automatic, click Start, then Apply and OK.
Group Policy: Open gpedit.msc, go to Computer Configuration > Administrative Templates > Windows Components > Windows Update > Manage End User Experience, open Configure Automatic Updates, select Enabled (or Not Configured), then Apply and OK.
Registry: Open regedit, navigate to HKEY_LOCAL_MACHINE\SOFTWARE\Policies\Microsoft\Windows, delete the WindowsUpdate key or change NoAutoUpdate back to 0, then restart.
Windows Update Troubleshooter: Open Settings, go to Troubleshoot > Other troubleshooters, find Windows Update, and click Run to fix issues preventing updates from resuming.
Frequently Asked Questions
Can I disable automatic updates permanently on Windows 11?
Yes. Use Group Policy Editor on Pro and Enterprise editions, or the Registry method on both Home and Pro, by setting the NoAutoUpdate DWORD value to 1.
How long can I pause updates on Windows 11?
Up to 35 days at a time. You can keep extending the pause before it expires, but you need to renew it manually each time.
How do I stop a specific update from installing?
Use Microsoft’s Show or Hide Updates troubleshooter (wushowhide.diagcab) to block individual updates or drivers.
Will disabling Windows Update affect security?
Yes. Your device stops receiving security patches, which increases exposure to malware, ransomware, and other cyberattacks. If you disable updates long-term, check for and install critical patches manually every few months.
Can I disable updates on Windows 11 Home without Group Policy?
Yes. Home edition users can use Registry Editor to create the WindowsUpdate and AU keys and set NoAutoUpdate to 1, since Group Policy Editor is not available on Home.
Is there a risk of breaking Windows if I modify the Registry?
Yes. An incorrect edit can cause system issues, so back up the Registry or create a [restore point](https://www.fdaytalk.com/point-in-time-restore/) before making any changes.
Related Windows Update Guides
- Windows 10 Security Updates Extended to 2027: How to Stay Protected for Free
- How to Fix Windows 11 Updates Not Downloading or Installing After KB5077181
- Windows Update Install Remove Loop: How to Stop Reinstalling Updates and Fix It
Windows 11 Guides

