Microsoft’s April 2026 Patch Tuesday update KB5083769 is pushing some Windows 11 24H2 and 25H2 systems into a boot loop after installation. The PC restarts, crashes into a Blue Screen of Death, and then cycles back to the same recovery screen repeatedly. If your system is stuck in this loop right now, or if you want to remove the update before it traps your PC, this guide covers every recovery option in order.
Microsoft released KB5083769 on April 13, 2026. Users started reporting boot failures on the Microsoft Learn Q&A forums within days of the rollout. The failure pattern across reports is consistent.
The update installs without errors. The system then restarts as usual. After that restart, some machines show distorted or pixelated visuals on screen before crashing into a Blue Screen of Death. Windows then loads the recovery environment and presents repair options, but selecting any of them sends the system back to the same crash screen. The loop continues from there.
The problem does not tie to one specific hardware configuration. Reports include HP Pavilion desktops running a Ryzen 5 2600 and GTX 1080 Ti, and Dell desktops where the same failure hit multiple machines in the same office. That spread makes it harder for Microsoft to isolate the root cause quickly.
Two additional issues were shown up alongside the boot loop:
- BitLocker recovery prompts: The update triggers BitLocker recovery on some systems after the first restart. Windows asks for a 48-digit recovery key before it lets you into the system. Without that key, you cannot proceed.
- Extra restarts during installation: Some users see four or more restarts before the update finishes installing, which is unusual for a standard cumulative update.
Microsoft has not released an emergency fix yet. Recovery requires working through the Windows Recovery Environment manually.
Before You Start: Locate Your BitLocker Recovery Key
If the update triggered a BitLocker recovery screen, you need your recovery key before any other step works. Find it now from another device.
- Microsoft account: Visit account.microsoft.com/devices/recoverykey and sign in with the same account linked to your PC.
- Work or school account: Contact your IT administrator or check your organisation’s Azure Active Directory portal.
- Saved file or printed copy: Check wherever you stored the key when BitLocker first activated on this device.
Enter the recovery key when prompted. Once Windows unlocks the drive, move on to the recovery steps below.
How to Enter the Windows Recovery Environment
All three recovery methods below start from the Windows Recovery Environment (WinRE). To get there from the boot loop:
- When the Blue Screen of Death appears, wait for the system to restart automatically.
- As soon as the PC begins to restart, hold the Power button for 10 seconds to force a shutdown.
- Power the PC back on.
- Repeat the forced shutdown and restart two more times.
- On the third boot attempt, Windows automatically loads the recovery environment instead of trying to boot normally.
- On the recovery screen, select Advanced options to access the repair tools.
Fix 1: System Restore (Try This First)
System Restore rolls Windows back to a snapshot taken before the update installed. It does not affect your personal files.
- From Advanced options, select System Restore.
- Click Next on the System Restore intro screen.
- Select a restore point dated before April 13, 2026. Look for one labeled as automatic or created before the update.
- Click Next, then Finish to confirm.
- Let the restore process complete. Your PC restarts automatically.
- After the restart, check whether Windows boots normally.
If no restore points exist, or if the restore fails, move to Fix 2.
Fix 2: Startup Repair
Startup Repair scans for damaged boot files and attempts to fix them automatically.
- From Advanced options, select Startup Repair.
- Select your Windows account if prompted and enter your password.
- Let the repair tool run. This can take several minutes.
- When it finishes, restart the PC and check whether it boots normally.
If Startup Repair reports that it cannot fix the problem, move to Fix 3.
Fix 3: Reset the PC (Last Resort)
Resetting reinstalls Windows while giving you the option to keep your personal files. Use this only after Fix 1 and Fix 2 both fail.
- From Advanced options, select Troubleshoot.
- Select Reset this PC.
- Choose Keep my files to preserve your documents, photos, and downloads. Avoid Remove everything unless you have a full backup.
- Choose Cloud download if your internet connection is stable, or Local reinstall if it is not.
- Follow the on-screen steps to complete the reset.
- After the reset, Windows reinstalls cleanly without KB5083769.
How to Remove KB5083769 Update from PC
If you want to remove the KB5083769 update from your PC for any reason, follow the steps below.
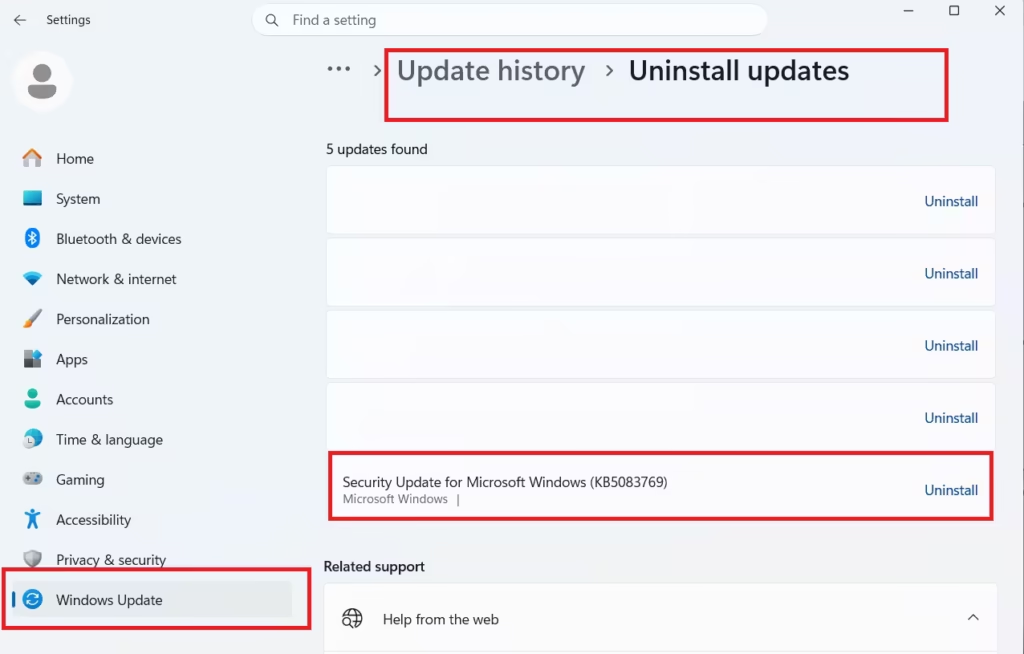
- Open Settings > Windows Update > Update history.
- Look for KB5083769 in the list.
- Scroll down and click Uninstall updates.
- Find KB5083769, select it, and click Uninstall.
- Restart the PC when prompted.
- After the restart, go back to Settings > Windows Update.
- Click Pause updates and set it to pause for 5 weeks to prevent Windows from automatically reinstalling the update.
Microsoft has not issued an official acknowledgment of the boot loop problem yet, but forum moderators on Microsoft Learn are actively tracking the reports. The company confirmed a separate BitLocker recovery issue from the same update. No out-of-band emergency patch is available. Microsoft’s current guidance points users toward the Windows Recovery Environment steps listed above.
Have you recovered from this issue? Share what worked for you in the comments.

