Antigravity IDE is Google’s AI-powered development environment built on VS Code. When it refuses to open, crashes on launch, shows a blank login screen, or loses your extensions after an update, the cause is usually a corrupted user data folder, a dependency conflict, or a specific Antigravity 2.0 deployment bug that overwrites the IDE executable.
This guide covers every confirmed fix, including the Antigravity 2.0 hijack issue that wiped settings for thousands of users after the May 2025 update.
Why Antigravity IDE Stops Working on Windows 11
These are the most common causes:
- Antigravity 2.0 overwrote the IDE executable in the same folder
- A corrupted conversation file crashes the IDE on every launch
- The Sign in with Google OAuth token handoff fails due to profile issues
- Missing or outdated runtimes (.NET, Python, Node.js, Visual C++)
- Antivirus tools falsely flag AI model libraries or Python executables
- Outdated GPU drivers conflict with AI acceleration features
- Insufficient folder permissions block the IDE from loading executables
- Background apps (Docker, WSL, VS Code extensions) interfere at startup
- Corrupted cache or configuration files prevent the workspace from loading
Fix 1: Perform a Clean Install
A clean reinstall removes all corrupted files and broken registry traces. It also lets you install with the correct permission scope, which fixes OAuth token failures on first launch.
- Uninstall Antigravity IDE from Settings > Apps > Installed apps.
- Press Win + R, type
%APPDATA%, and delete any Antigravity folder you find. - Navigate to
C:\Users\<YourUsername>\and delete the.antigravityfolder. - Download the latest installer from the official Antigravity website.
- Run the installer and choose Just Me when prompted (not All Users).
- Launch the IDE and check whether the issue is resolved.
The “Just Me” option installs to your local AppData path, which avoids the admin permission conflicts that block the OAuth login flow.
Fix 2: Fix the Antigravity 2.0 Hijack Bug
After the Antigravity 2.0 update in May 2025, many users found that the standard Antigravity app completely took over the IDE launcher. The reason is an Electron framework conflict: the 2.0 installer dropped its app.asar file into the same directory as the IDE, causing the new file to override the original IDE executable on every launch.
Step 1: Restore the IDE launcher
Open PowerShell and run:
cd "$env:LOCALAPPDATA\Programs\Antigravity\resources"
Rename-Item app.asar app.asar.bak
This renames the 2.0 app.asar file so the IDE executable takes priority again. Relaunch Antigravity IDE to confirm it opens correctly.
To switch back to Antigravity 2.0 at any time, run:
cd "$env:LOCALAPPDATA\Programs\Antigravity\resources"
Rename-Item app.asar.bak app.asar
Step 2: Restore your missing settings and extensions
After the 2.0 update, the IDE uses a new product name (“Antigravity IDE” instead of “Antigravity”), which splits the configuration folders into two separate locations. Your previous settings are still on disk; they are just in the old location.
Restore settings and keymaps:
- Open File Explorer and go to
C:\Users\<YourUsername>\AppData\Roaming. - Copy the contents of the Antigravity folder.
- Paste them into the Antigravity IDE folder (create it if it does not exist).
Restore extensions:
- Go to
C:\Users\<YourUsername>\. - Copy the contents of the
.antigravityfolder. - Paste and overwrite the contents of the
.antigravity-idefolder.
If Windows blocks the copy due to path length limits, open Command Prompt as Administrator and create a symlink instead:
rmdir /S /Q "C:\Users\<YourUsername>\.antigravity-ide\extensions"
mklink /J "C:\Users\<YourUsername>\.antigravity-ide\extensions" "C:\Users\<YourUsername>\.antigravity\extensions"
Fix 3: Fix the “Sign in with Google” Button Not Working
If the Sign in with Google button does nothing when you click it, the OAuth token handoff between the browser and the IDE is broken in your current Windows profile. The fix bypasses this by using a clean profile for the initial login.
- Create a new local Windows user account via Settings > Accounts > Other users.
- Log in to the new account and set Google Chrome as the default browser.
- Install Antigravity IDE to
C:\ProgramData\Antigravity(a shared system path). - Open the IDE, sign in successfully, and let it finish setup.
- Log back into your main Windows account. The IDE now functions correctly from the shared install path.
Fix 4: Restore the Missing Interface (Wrong Version Installed)
If you launch Antigravity IDE but see no code workspace or the interface looks stripped down, you likely have the wrong version installed. Google ships two separate apps: the standard Antigravity app for non-developers and Antigravity IDE for developers. Installing both without the correct order causes them to conflict.
- Uninstall all existing Antigravity installations from Settings > Apps.
- Go to
antigravity.googleand download the version labeled Antigravity IDE. - Install the IDE version first and let it complete setup fully.
- Only after the IDE is running can you install the standard Antigravity app alongside it.
- Launch Antigravity IDE. Your full code workspace should appear.
Fix 5: Isolate a Corrupted Conversation File
A single corrupted conversation file can crash the entire IDE on every launch. You do not need to delete all your conversations; you only need to quarantine files one at a time until the IDE starts.
- Close Antigravity IDE completely. Check Task Manager to confirm it is not running in the background.
- Open File Explorer and paste this path into the address bar:
%USERPROFILE%\.gemini\antigravity\conversations- Create a new folder named
_quarantineinside that directory. - Move the most recent conversation folder into
_quarantine. - Relaunch the IDE. If it opens, that conversation was the cause.
- If the IDE still crashes, close it and move the next most recent conversation folder into
_quarantine. Repeat until the IDE opens. - Delete the corrupted conversation permanently once you identify it.
Fix 6: Run Antigravity IDE as Administrator
Antigravity may need elevated permissions to access GPU resources, load AI models, or write to extension directories.
- Right-click the Antigravity IDE shortcut or executable.
- Select Run as administrator.
- Click Yes on the UAC prompt.
If the IDE opens only in admin mode, fix the underlying folder permissions using Fix 11 below so you do not have to run it elevated every time.
Fix 7: Update Required Dependencies
Antigravity IDE depends on several external runtimes. If any are missing or outdated, the IDE fails to launch.
Install or update each of the following:
- .NET Desktop Runtime from
dotnet.microsoft.com/download - Python 3.x from
python.org - Node.js LTS from
nodejs.org - Microsoft Visual C++ Redistributables (both x64 and x86 versions from Microsoft)
After installing or updating each runtime, restart your PC and relaunch the IDE.
Fix 8: Update Your GPU Drivers
Antigravity uses your GPU to accelerate AI model inference. Outdated GPU drivers cause crashes, freezes, or silent startup failures.
- NVIDIA: Open GeForce Experience, go to Drivers, and install available updates. Or download directly from NVIDIA’s website.
- AMD: Open AMD Adrenalin Software and check for driver updates.
- Intel: Use the Intel Driver and Support Assistant to find and install the latest version.
Restart your PC after updating drivers before relaunching the IDE.
Fix 9: Add Antigravity to Antivirus Exclusions
Antivirus tools from vendors like Avast, Bitdefender, McAfee, and Kaspersky commonly flag AI runtime libraries and Python executables as false positives. This blocks the IDE from loading its core components.
- Temporarily disable real-time protection in your antivirus software.
- Launch Antigravity IDE to confirm whether the antivirus was the cause.
- If the IDE starts, add these folders to your antivirus exclusion list:
C:\Program Files\AntigravityAI%LOCALAPPDATA%\Antigravity
- Re-enable real-time protection.
Fix 10: Delete Corrupted Cache and Config Files
A damaged configuration or cache folder causes the IDE to freeze during loading or fail to reach the workspace screen.
- Press Win + R and type
%LOCALAPPDATA%\Antigravity, then press Enter. - Delete the Cache and Temp folders inside that directory.
- Delete the Config folder only if the IDE still does not open after clearing Cache and Temp.
- Relaunch Antigravity IDE.
Fix 11: Fix Folder Permissions
If your Windows account lacks the correct access rights to the Antigravity installation folder, the IDE cannot load its executables.
- Navigate to
C:\Program Files\AntigravityAIin File Explorer. - Right-click the folder and select Properties.
- Go to the Security tab.
- Check that your user account has Read and execute, Modify, and Write permissions.
- If any are missing, click Edit and add them for your account.
Fix 12: Disable Conflicting Background Apps with a Clean Boot
Apps like Docker Desktop, JetBrains Toolbox, WSL background processes, and Node.js file watchers can interfere with Antigravity at startup. A clean boot isolates the conflict.
- Press Win + R, type
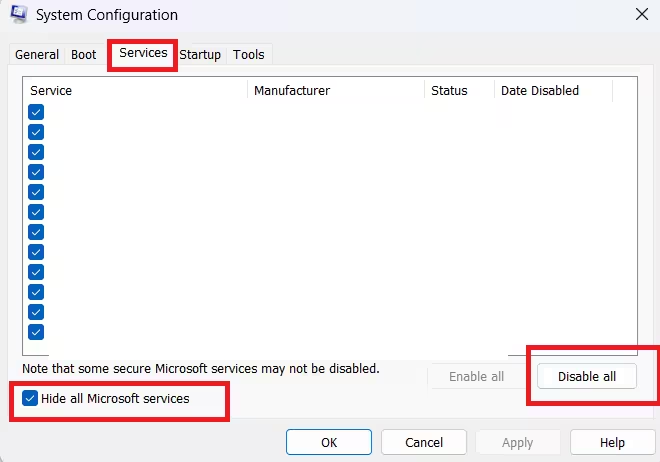
msconfig, and press Enter. - Go to the Services tab, check Hide all Microsoft services, then click Disable all.
- Open Task Manager, go to the Startup apps tab, and disable all entries.
- Restart your PC and try launching Antigravity IDE.
If the IDE opens, re-enable services and startup apps in small batches to identify the specific conflict. Once you find it, disable only that app permanently.
Antigravity IDE Not Working on Windows 11: FAQs
Does Antigravity work on Windows 11?
Yes. Antigravity IDE fully supports Windows 11 (64-bit) and Windows 10. Some users report stability issues when the IDE runs Linux commands through WSL; using the dedicated Antigravity IDE version (not the standard Antigravity app) provides the best performance on Windows.
How do I reset Antigravity IDE on Windows?
Close the IDE completely and end any Antigravity processes in Task Manager. Then delete the following folders: %APPDATA%\Google\Antigravity, %LOCALAPPDATA%\Antigravity, %USERPROFILE%\.antigravity, and %APPDATA%\Antigravity. Reinstall the IDE from the official website. This resets all settings and cache without affecting your code projects.
Why did Antigravity IDE lose all my extensions after the 2.0 update?
The 2.0 update changed the product name from “Antigravity” to “Antigravity IDE,” which caused VS Code to generate new empty configuration folders. Your extensions still exist in the old .antigravity folder. Follow Fix 2 above to copy them into the new .antigravity-ide folder.

