Windows 11 installs drivers automatically through Windows Update, and this often replaces a working driver with a newer one that causes crashes, black screens, or device conflicts. This guide covers five ways to turn off automatic driver installation, using Settings, Group Policy, the Registry Editor, and two targeted methods for blocking a single problem device.
Warning: Back up the registry or create a system restore point before making any of the changes below, since registry edits can cause startup issues if a wrong value is entered.
Roll Back a Broken Driver First
If a bad driver is already installed, roll it back before applying any of the methods below, since blocking future installs does not undo one already in place.
- Open Device Manager and expand the category for the affected device.
- Right-click the device and select Properties.
- Go to the Driver tab and click Roll Back Driver.
- If the button is greyed out, no previous driver is available to restore, so uninstall the current driver instead and install the manufacturer’s version manually.
- Select a reason for rolling back, follow the prompts, and restart the computer.
Once the driver is back to a working state, use one of the methods below to stop Windows from reinstalling the same problem driver again.
Method 1: Disable Driver Updates from Device Installation Settings
This is the quickest method and works for most users without touching system policies.
- Press
Win + R, typesysdm.cpl, and press Enter. - Go to the Hardware tab and click Device Installation Settings.
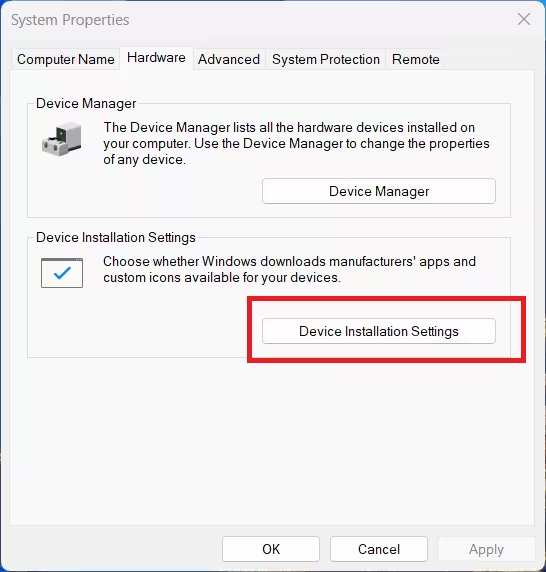
- Select No (your device might not work as expected).
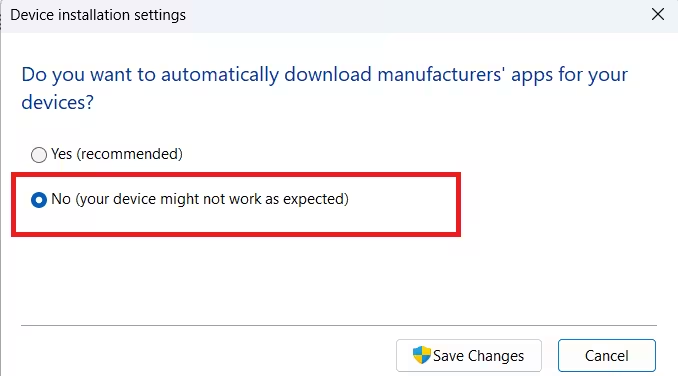
- Click Save Changes.
This stops Windows from automatically fetching driver packages and metadata from Windows Update, though it does not block updates delivered through the general cumulative update channel.
Method 2: Use Group Policy Editor to Block Driver Updates
Group Policy gives more granular control and works on Windows 11 Pro and Enterprise editions.
- Press
Win + R, typegpedit.msc, and press Enter. - Navigate to
Computer Configuration > Administrative Templates > Windows Components > Windows Update > Manage updates offered from Windows Update. - Open Do not include drivers with Windows Updates.
- Set it to Enabled, then click Apply and OK.
- Restart the computer for the policy to take effect.
This policy specifically excludes driver packages from the standard Windows Update queue while leaving security and feature updates untouched.
Method 3: Block Automatic Drivers via Registry Editor
Use this method on Windows 11 Home, where gpedit.msc is not available by default.
- Press
Win + R, typeregedit, and press Enter. - Navigate to
HKEY_LOCAL_MACHINE\SOFTWARE\Policies\Microsoft\Windows\WindowsUpdate. - If the
WindowsUpdatekey does not exist, right-click Windows, select New > Key, and name itWindowsUpdate. - Inside
WindowsUpdate, right-click and select New > DWORD (32-bit) Value, name itExcludeWUDriversInQualityUpdate. - Double-click the new value and set it to
1. - Navigate to
HKEY_LOCAL_MACHINE\SOFTWARE\Microsoft\Windows\CurrentVersion\DriverSearching. - Create a DWORD value named
SearchOrderConfigand set it to0. - Close Registry Editor and restart the computer.
This registry key mirrors the Group Policy setting from Method 2, which makes it the correct fallback on editions that lack the Group Policy Editor. The SearchOrderConfig value stops Windows from including its own driver search step during quality updates, which closes a gap that the first key alone sometimes leaves open.
If only one device is causing problems and the rest of the system updates fine, block that device specifically instead of disabling drivers system-wide, using either of the two methods below.
Method 4: Block a Specific Driver by Hardware ID
Use this method when only one device, such as a GPU or network adapter, keeps getting a bad driver forced back on while the rest of the system updates fine.
- Open Device Manager, right-click the affected device, and select Properties.
- Go to the Details tab, choose Hardware Ids from the dropdown, and copy the top value.
- Open Registry Editor and navigate to
HKEY_LOCAL_MACHINE\SOFTWARE\Policies\Microsoft\Windows\WindowsUpdate. - Right-click WindowsUpdate, select New > Key, and name it
ExcludeWUDriversInQualityUpdate. - Inside that key, right-click and select New > Multi-String Value.
- Name the value using the Hardware ID with underscores in place of backslashes, then set its data to the original Hardware ID.
- Close Registry Editor and restart the computer.
This targets only the flagged Hardware ID, which leaves Windows free to keep delivering drivers for every other device on the system.
Method 5: Block a Device Using Device Installation Restrictions
This is an alternative to Method 4, not an additional step on top of it, so use one or the other rather than both. It relies on Group Policy and gives a more reliable device level block on Windows 11 Pro, Enterprise, or Education.
- Open Device Manager, right-click the affected device, and select Properties.
- Go to the Details tab, choose Hardware Ids from the dropdown, and copy the top value.
- Press
Win + R, typegpedit.msc, and press Enter. - Navigate to
Computer Configuration > Administrative Templates > System > Device Installation > Device Installation Restrictions. - Open Prevent installation of devices that match any of these device IDs.
- Set it to Enabled, click Show, and paste the Hardware ID copied in step 2.
- Click OK, then Apply, then OK.
- Restart the computer.
This policy blocks installation for the specific Hardware ID at the device level, which stops Windows from reinstalling the driver even after a fresh device enumeration, such as when the device is unplugged and reconnected.
If a Driver Still Gets Reinstalled
If you have applied one of the methods above and the driver still comes back, check these before assuming the block did not work, since the cause is often outside Windows Update entirely.
- OEM utilities such as Dell Command Update, HP Support Assistant, or Lenovo Vantage can reinstall drivers on their own schedule regardless of the settings above, so pause or uninstall these tools if present.
- Run
gpupdate /forceafter applying a Group Policy change to confirm the policy took effect immediately instead of waiting for the next refresh cycle. - Check Settings > Windows Update > Update history for recent entries mentioning the device or driver name to confirm whether Windows Update or a separate tool installed it.
Frequently Asked Questions
Will disabling automatic driver installs stop Windows security updates?
No. All five methods target driver packages specifically and do not affect cumulative security or feature updates.
Can I re-enable automatic driver installs later?
Yes. Reverse the same setting, policy, or registry value used to disable it.
Which method should Windows 11 Home users use?
Method 1 or Method 3, since Group Policy Editor is not available on Windows 11 Home by default.
What if only my graphics driver keeps reinstalling?
Use Method 4 to block that specific Hardware ID rather than disabling drivers system-wide, since GPU driver downgrades after Windows Update are a known issue for AMD, NVIDIA, and Intel devices.
Do I need to undo these changes to reinstall a driver later?
Yes. Delete the relevant registry key or value, or switch the Group Policy setting back to Not Configured, then restart before installing a new driver manually.
Why does the driver keep coming back even after I applied these fixes?
This usually means an OEM utility such as Dell Command Update or HP Support Assistant is reinstalling the driver in the background, independent of Windows Update.
What if I only see this issue after plugging in a USB device?
Use Method 5, since Device Installation Restrictions blocks a specific Hardware ID at the moment a device is detected, which covers repeated plug and unplug scenarios that Windows Update level fixes do not.
