Hyper-V is Microsoft’s built-in virtualization platform that lets you create and run virtual machines directly on Windows 11. You can use it to test another operating system, run Linux, set up a development lab, or create an isolated environment without installing any third-party tool.
To enable Hyper-V on Windows 11, your PC must meet the hardware requirements, virtualization must be turned on in BIOS or UEFI, and your Windows edition must be Pro, Enterprise, or Education. Windows 11 Home does not include the full Hyper-V role by default.
This guide covers four methods to enable Hyper-V on Windows 11, how to verify the setup, how to fix common issues, and when to use VirtualBox instead.
What Is Hyper-V on Windows 11?
Hyper-V is a virtualization feature built into Windows that allows your PC to act as a host machine for virtual computers. Each virtual machine runs a separate operating system while your main Windows 11 installation continues to work normally.
You can use Hyper-V to run a Windows 10 test machine, try Linux, build a development lab, or experiment with system settings without touching your main PC. Each virtual machine runs in an isolated environment, which makes Hyper-V useful for developers, IT admins, students, and power users.
Hyper-V Requirements on Windows 11
Before you enable Hyper-V on Windows 11, check whether your PC supports it. Hyper-V will not install or run properly if virtualization is disabled in firmware or if your Windows edition does not support it.
| Requirement | Details |
|---|---|
| Windows edition | Windows 11 Pro, Enterprise, or Education |
| Processor | 64-bit CPU with SLAT support |
| Virtualization | Enabled in BIOS or UEFI |
| Memory | At least 4 GB RAM |
| Firmware support | Hardware-assisted virtualization enabled |
Hyper-V hardware requirements include a 64-bit processor with Second Level Address Translation, VM Monitor Mode extensions, and virtualization support enabled in firmware.
Check If Virtualization Is Enabled
Before enabling Hyper-V, check whether virtualization is already active on your PC. This saves time and avoids errors later.
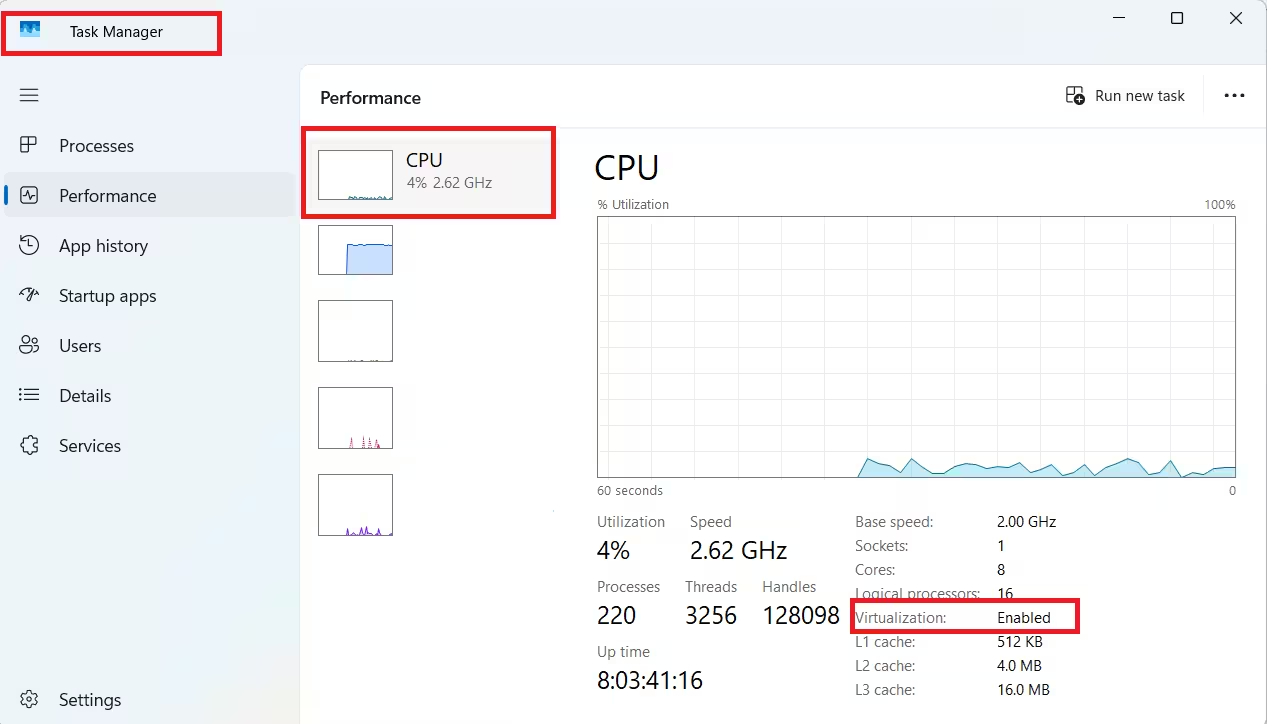
Check via Task Manager:
- Press Ctrl + Shift + Esc to open Task Manager.
- Click Performance.
- Select CPU.
- Look for Virtualization on the right side.
If it shows Enabled, you can proceed with the Hyper-V setup. If it shows Disabled, you must enable virtualization from BIOS or UEFI first.
Check via System Information:
- Press Windows + S.
- Search for System Information and open it.
- Scroll to the bottom of the System Summary page.
- Look for the Hyper-V requirement lines.
If you see the message “A hypervisor has been detected”, the Windows hypervisor is already active on your system.
Enable Virtualization in BIOS or UEFI
If virtualization is disabled, you need to turn it on from your PC’s firmware settings. The option name varies depending on your device manufacturer.
| Processor / Device | BIOS or UEFI Option |
|---|---|
| Intel PC | Intel Virtualization Technology, Intel VT-x |
| AMD PC | SVM Mode, AMD-V |
| Some laptops | Virtualization Technology |
| Some business PCs | VT-d or Virtualization for Direct I/O |
To access UEFI from Windows 11:
- Open Settings.
- Go to System.
- Click Recovery.
- Under Advanced startup, click Restart now.
- Select Troubleshoot.
- Click Advanced options.
- Select UEFI Firmware Settings.
- Click Restart.
- Find and enable the virtualization option in your firmware menu.
- Save changes and restart.
On Dell computers, enable Virtualization and VT-d under the Advanced > Virtualization tab. On HP computers, check the Configuration tab or the System Security tab under the Security menu for the Virtualization Technology (VTx) option. For desktop motherboards from ASUS, Gigabyte, ASRock, or EVGA, check your device documentation for the exact menu path.
Method 1: Enable Hyper-V on Windows 11 from Windows Features
This is the most straightforward method for Windows 11 Pro users. It works through the classic Windows Features window and does not require any commands.
- Press Windows + R.
- Type
optionalfeaturesand press Enter. - In the Windows Features window, find Hyper-V.
- Expand it and check both options:
- Hyper-V Management Tools
- Hyper-V Platform
- Click OK.
- Wait for Windows to install the required files.
- Click Restart now.
After your PC restarts, search for Hyper-V Manager in the Start menu to confirm the installation.
Method 2: Enable Hyper-V on Windows 11 Using PowerShell
PowerShell offers a faster path if you prefer a command-line approach or if Windows Features does not open correctly.
- Right-click the Start button.
- Select Terminal (Admin) or Windows PowerShell (Admin).
- Run this command:
Enable-WindowsOptionalFeature -Online -FeatureName Microsoft-Hyper-V -All- Press Enter.
- Type Y if Windows asks you to restart.
After your PC restarts, Hyper-V will be available from the Start menu.
Method 3: Enable Hyper-V on Windows 11 Using Command Prompt
You can also use the Deployment Image Servicing and Management (DISM) tool in Command Prompt. This method is useful for troubleshooting scenarios or scripted deployments.
- Click Start and search for Command Prompt.
- Right-click it and select Run as administrator.
- Run this command:
DISM /Online /Enable-Feature /All /FeatureName:Microsoft-Hyper-V- Press Enter.
- Restart your PC when prompted.
After the restart, Hyper-V should appear in the Start menu.
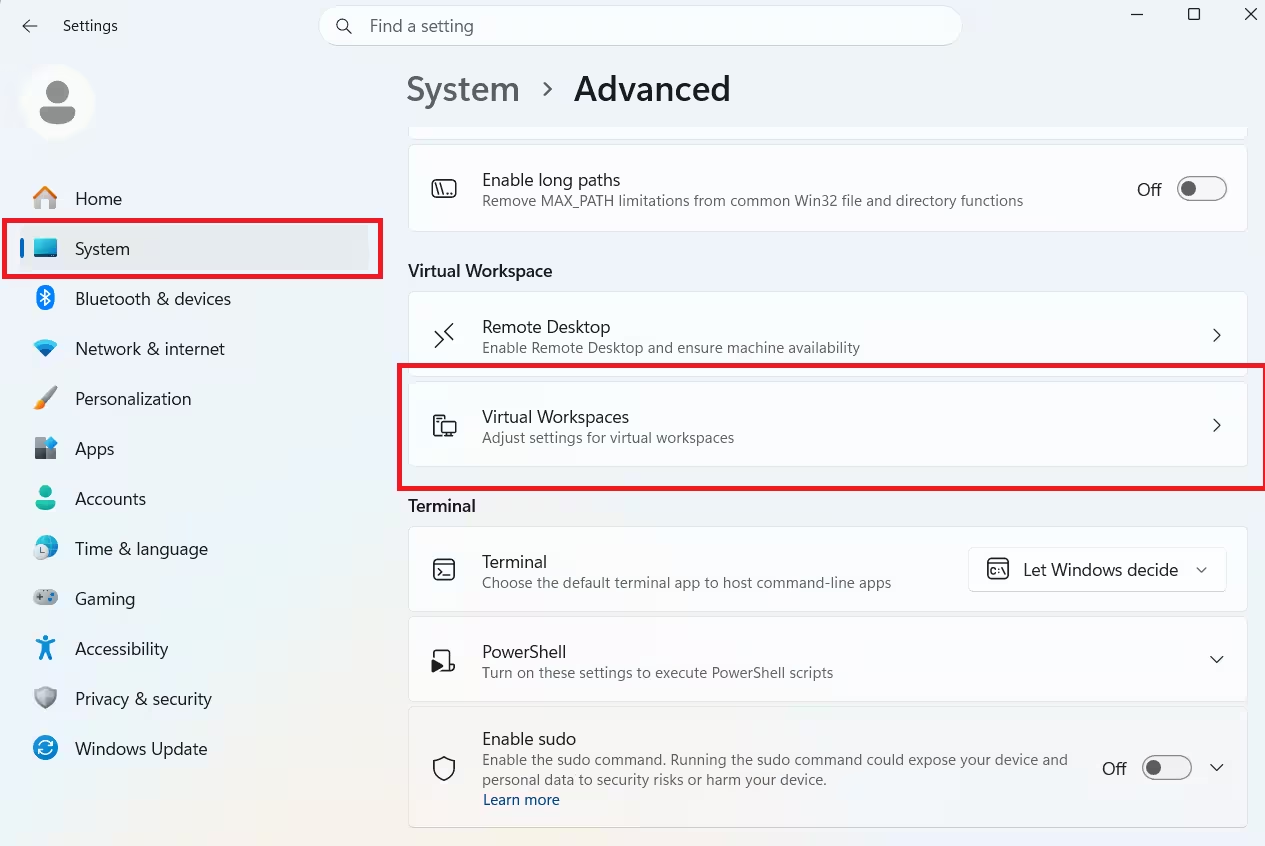
Method 4: Enable Hyper-V from Windows 11 Settings (Virtual Workspaces)
Newer Windows 11 builds include a Virtual Workspaces page inside the Settings app. This page provides a simpler way to manage virtualization features without using the older Windows Features window.
This option is available starting with the December 2025 Security Update for Windows 11 25H2.
- Open Settings.
- Go to System.
- Click Advanced.
- Open Virtual Workspaces.
- Turn on these components:
- Hyper-V Hypervisor
- Hyper-V Services
- Hyper-V GUI Management Tools
- Hyper-V Module for Windows PowerShell
- Click Restart now.
If you do not see Virtual Workspaces in Settings, use the Windows Features, PowerShell, or Command Prompt method instead.
How to Open Hyper-V Manager After Enabling It
Once you enable Hyper-V on Windows 11, open Hyper-V Manager from the Start menu to start creating virtual machines.
- Click Start.
- Search for Hyper-V Manager and open it.
- Select your PC name from the left panel.
- Click New > Virtual Machine from the right panel.
From here, you can create a new virtual machine, assign memory, set up a virtual hard disk, and install an operating system from an ISO file.
Before creating your first VM, check the global settings. Click Hyper-V Settings under the Actions pane. Two settings matter most:
- Virtual Hard Disks: This is where VHD files are saved. These files can grow large, so point them to a drive with enough free space.
- Virtual Machines: This is where configuration files are stored. Keep this in the same location as your VHDs.
Setting Up Virtual Network Switches
Hyper-V uses virtual network switches to control how VMs connect to your network. Open Virtual Switch Manager from the Actions pane to configure networking.
Hyper-V always creates a default internal switch with NAT enabled. You can also create three types of switches:
- Private switch: Allows communication only between VMs on that switch. The host and external network cannot reach the VM.
- Internal switch: Allows communication between VMs and the host. It can also use the host’s internet connection through NAT.
- External switch: Requires its own physical network adapter. It separates the VM and host networks completely.
Choose the switch type based on whether your VM needs internet access, isolated testing, or full network exposure.
How to Create a Virtual Machine in Hyper-V
After enabling Hyper-V and configuring your network and storage settings, you can create a VM. You will need an ISO file of the operating system you want to install.
- In Hyper-V Manager, click Action > New > Virtual Machine.
- Click Next on the first screen.
- Enter a name for the VM and choose a storage location if needed. Click Next.
- Select Generation 2 for modern operating systems like Windows 11 or Windows Server 2022. Select Generation 1 for older or 32-bit systems.
- Assign startup memory. Check Dynamic Memory to let the VM use only the RAM it needs at any moment. Click Next.
- Select the virtual network switch for the VM. Click Next.
- Create a new VHDX disk. The file is dynamic and only uses the storage it actually needs, not its full capacity. Click Next.
- Select your ISO file to install the operating system. Click Next, then Finish.
To start the VM, right-click it in Hyper-V Manager and click Connect, then click the green power button or go to Action > Start.
Because Hyper-V is a Microsoft product, you do not need to install extra drivers for Windows VMs after installation. Windows already includes the required Hyper-V integration components.
How to Manage Virtual Machines in Hyper-V
The Hyper-V Manager Virtual Machines pane lists all your created VMs. Right-click any VM to start, suspend, shut down, pause, or reset it.
One important Hyper-V feature is Checkpoints, which are snapshots of a VM at a specific point in time. You can create a checkpoint before making risky changes and revert to it if something goes wrong.
To create or manage a checkpoint:
- Right-click the VM and select Checkpoint to create a new snapshot.
- Select Revert to restore an earlier state.
How to Check If Hyper-V Is Working
After enabling Hyper-V, confirm it is active using System Information.
- Press Windows + S.
- Search for System Information and open it.
- Scroll to the bottom of the System Summary page.
If you see this message:
A hypervisor has been detected. Features required for Hyper-V will not be displayed.The Windows hypervisor is running correctly. You can also confirm the installation by opening Hyper-V Manager from the Start menu. If it opens and shows your computer name in the left panel, Hyper-V is installed and ready.
Can You Enable Hyper-V on Windows 11 Home?
Windows 11 Home does not officially include the full Hyper-V feature. Microsoft supports Hyper-V only on Windows 11 Pro, Enterprise, and Education.
Some guides offer a script-based workaround to install Hyper-V components on Windows 11 Home. That method modifies Windows packages manually and is not officially supported. It can create problems after Windows updates or cause unexpected behavior.
For Windows 11 Home users, the safer options are:
- Upgrade to Windows 11 Pro
- Use VirtualBox
- Use VMware Workstation
- Use Windows Subsystem for Linux if your goal is Linux command-line work
If you test any unsupported workaround, create a full system backup first.
How to Disable Hyper-V on Windows 11
If Hyper-V causes conflicts with another virtualization app or you no longer need it, you can disable Hyper-V on Windows 11 through any of the same methods used to enable it.
Disabling Hyper-V does not delete your virtual machine files. You just cannot run those VMs until you re-enable Hyper-V.
Disable Hyper-V from Windows Features
- Press Windows + R, type
optionalfeatures, and press Enter. - Uncheck Hyper-V.
- Click OK.
- Restart your PC.
Disable Hyper-V Using PowerShell
Open PowerShell as administrator and run:
Disable-WindowsOptionalFeature -Online -FeatureName Microsoft-Hyper-V-AllRestart your PC after the command finishes.
Disable Hyper-V Using Command Prompt
Open Command Prompt as administrator and run:
DISM /Online /Disable-Feature:Microsoft-Hyper-VThen restart your PC.
Hyper-V Option Missing in Windows Features
If Hyper-V does not appear in Windows Features, work through these checks before trying anything else.
Check Your Windows Edition
Open Settings > System > About and confirm your Windows edition. If it says Windows 11 Home, Hyper-V will not appear as an officially supported feature.
Enable Virtualization in BIOS or UEFI
If virtualization is disabled in firmware, some virtualization components may not appear or work correctly. Enable Intel VT-x, AMD-V, or SVM Mode from your UEFI settings.
Run Windows Repair Commands
If you use Windows 11 Pro but Hyper-V still does not appear, open Terminal as administrator and run:
sfc /scannowThen run:
DISM /Online /Cleanup-Image /RestoreHealthRestart your PC and check Windows Features again.
Use PowerShell Instead
If the graphical option is missing or broken, enable Hyper-V directly from PowerShell:
Enable-WindowsOptionalFeature -Online -FeatureName Microsoft-Hyper-V -AllIf Hyper-V still fails to enable after these steps, check whether the Hypervisor Error BSOD is appearing. That crash indicates a deeper issue with the virtualization layer that needs to be resolved first.
Does Hyper-V Slow Down Windows 11?
Enabling Hyper-V alone does not cause a major performance problem on modern PCs. However, running virtual machines does consume CPU, RAM, storage, and network resources.
To keep performance reasonable:
- Assign only the RAM each virtual machine actually needs.
- Store virtual machine files on an SSD if possible.
- Avoid running too many VMs at the same time.
- Shut down VMs when you are not using them.
- Keep enough free memory for your main Windows 11 system.
If your PC has only 4 GB or 8 GB of RAM, heavy virtual machines will feel slow. A smoother experience generally requires 16 GB or more.
Some games, emulators, and anti-cheat systems behave differently when the Windows hypervisor is active, even when no VM is running. If you notice game performance issues after enabling Hyper-V, that is the likely cause.
Hyper-V vs VirtualBox: Which One Should You Use?
Hyper-V is the better choice for Windows 11 Pro users who want a native, Microsoft-supported virtualization platform. It works well for Windows labs, development environments, and professional setups.
VirtualBox may work better if you use Windows 11 Home, prefer a simpler third-party interface, or only need to run a basic VM occasionally.
| Feature | Hyper-V | VirtualBox |
|---|---|---|
| Built into Windows | Yes, on Pro and higher | No |
| Works officially on Windows 11 Home | No | Yes |
| Good for Windows testing | Yes | Yes |
| Beginner-friendly | Medium | Easy |
| Best for IT labs | Yes | Medium |
For Windows 11 Pro users, Hyper-V is a powerful built-in option. For Windows 11 Home users, VirtualBox is the easier and more straightforward path.
FAQs
Why is Hyper-V not showing in Windows Features on Windows 11?
Hyper-V does not appear if you use Windows 11 Home, if virtualization is disabled in BIOS or UEFI, or if your system files are damaged. Check your edition under Settings > System > About and confirm virtualization is enabled in Task Manager under Performance > CPU.
Do I need to enable virtualization in BIOS before turning on Hyper-V?
Yes. Hardware virtualization must be active in BIOS or UEFI before Hyper-V can install or run. Check Task Manager > Performance > CPU and look for the Virtualization row. If it shows Disabled, enter UEFI and enable Intel VT-x or AMD-V first.
Can I enable Hyper-V on Windows 11 Home?
Windows 11 Home does not officially support Hyper-V. Script-based workarounds exist but are unsupported by Microsoft and can break after Windows updates. The recommended options are upgrading to Windows 11 Pro or using VirtualBox instead.
Does enabling Hyper-V slow down Windows 11?
Enabling Hyper-V alone has little noticeable impact on performance. Running virtual machines will consume CPU and RAM, which can slow the host down depending on how much memory your PC has. Storing VMs on an SSD and using Dynamic Memory helps reduce the impact.
What is the fastest way to enable Hyper-V on Windows 11?
The fastest method is PowerShell. Open Terminal as administrator and run Enable-WindowsOptionalFeature -Online -FeatureName Microsoft-Hyper-V -All, then restart when prompted. The entire process takes under two minutes.
You can enable Hyper-V on Windows 11 through Windows Features, PowerShell, Command Prompt, or the newer Virtual Workspaces page in Settings. The Windows Features method is the easiest for most users, while PowerShell and Command Prompt work better for scripted setups or when the GUI option is not working.
Hyper-V is officially supported on Windows 11 Pro, Enterprise, and Education. If you run Windows 11 Home, upgrade to Pro or use VirtualBox instead of relying on unsupported scripts.
Related Tech How-To Guides
- Windows 11 Requirements for VMware and Hyper-V (Complete Setup Guide)
- How to Upgrade Windows 11 Home to Pro (3 Working Methods)
- How to Fix Hypervisor Error Windows 11 and Windows 10 (BSOD Solution Guide)

