OpenAI GPT Builder lets you create a custom version of ChatGPT for a specific task without writing any code. You can build a GPT for content writing, customer support, coding help, study assistance, data analysis, or internal business workflows.
A custom GPT holds your own instructions, uploaded knowledge files, selected capabilities, and, for advanced users, external API actions. OpenAI describes GPTs as custom versions of ChatGPT that combine instructions, knowledge, and capabilities for a specific purpose.
What Is GPT Builder?
GPT Builder is the tool inside ChatGPT that lets you create and configure a custom GPT. You can either describe what you want in a conversational builder or manually configure the GPT using fields such as name, description, instructions, conversation starters, knowledge files, and capabilities.
Instead of opening regular ChatGPT every time and re-explaining your requirements, you can create a GPT that already knows your rules. Examples include:
- SEO Blog Assistant
- Recipe Suggestion Assistant
- Customer Support Reply Generator
- Internal FAQ Bot for Company Documents
Who Can Use GPT Builder?
GPT Builder is available to ChatGPT Plus, Pro, Team, and Enterprise subscribers. Free plan users can use published GPTs but cannot create their own.
Step 1: Open GPT Builder
Open ChatGPT and go to Explore GPTs from the sidebar, or visit the GPTs page directly, then click Create. This opens GPT Builder.
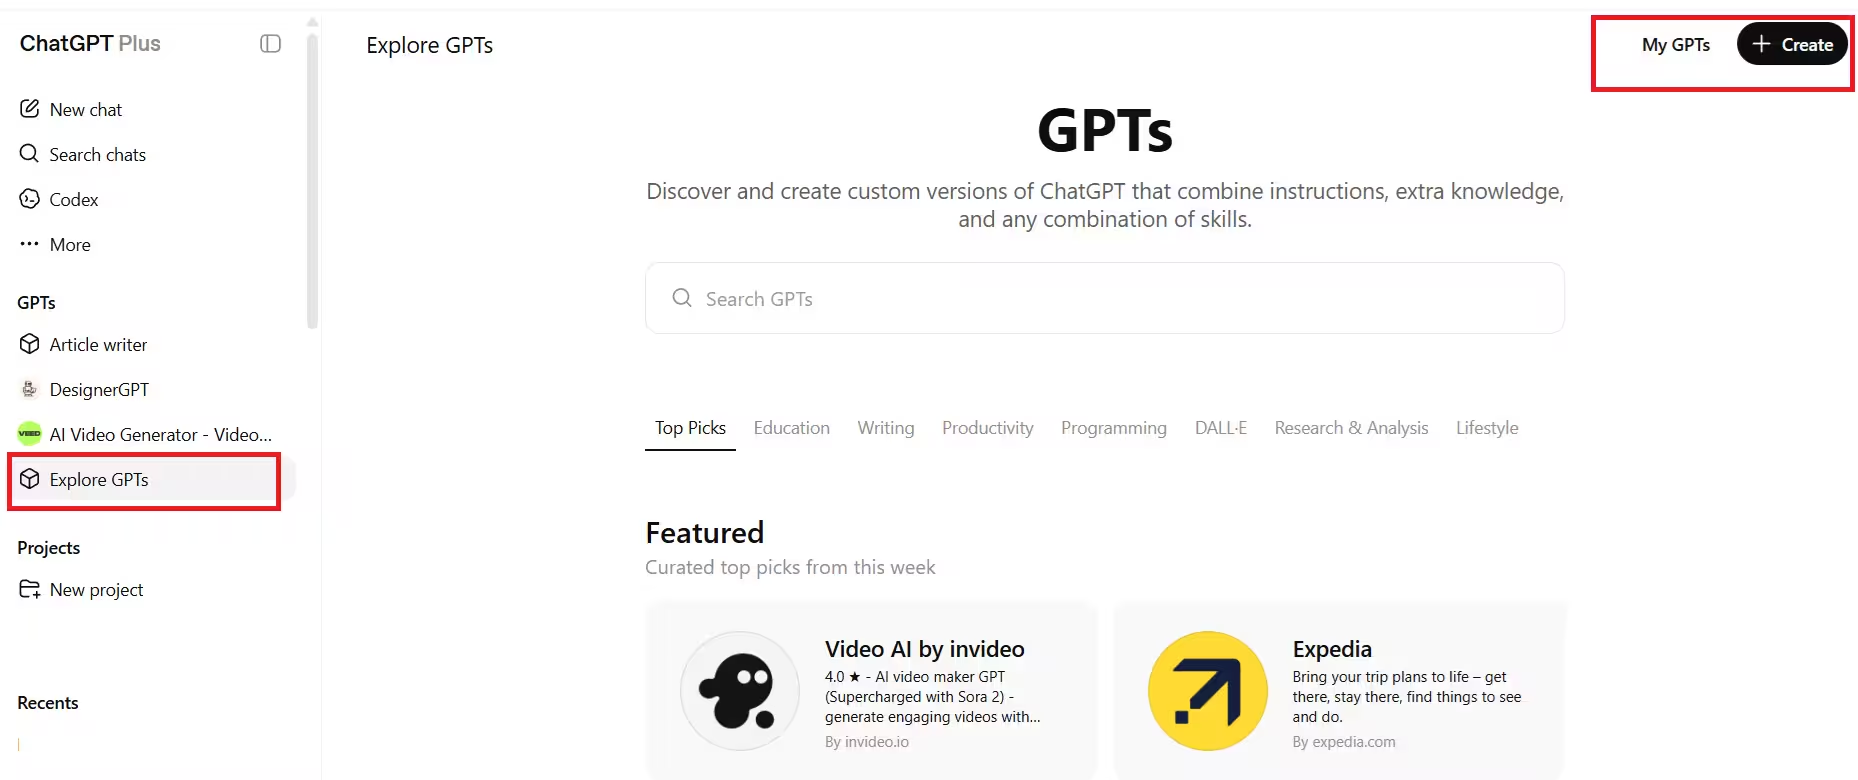
OpenAI offers two ways to build: the conversational builder or the configuration view.
Step 2: Choose How You Want to Build
Conversational Builder (Create tab)
This option suits beginners. You tell GPT Builder what kind of GPT you want in plain language. For example:
Create a GPT that helps me write SEO-friendly tech guides in a simple, beginner-friendly tone.
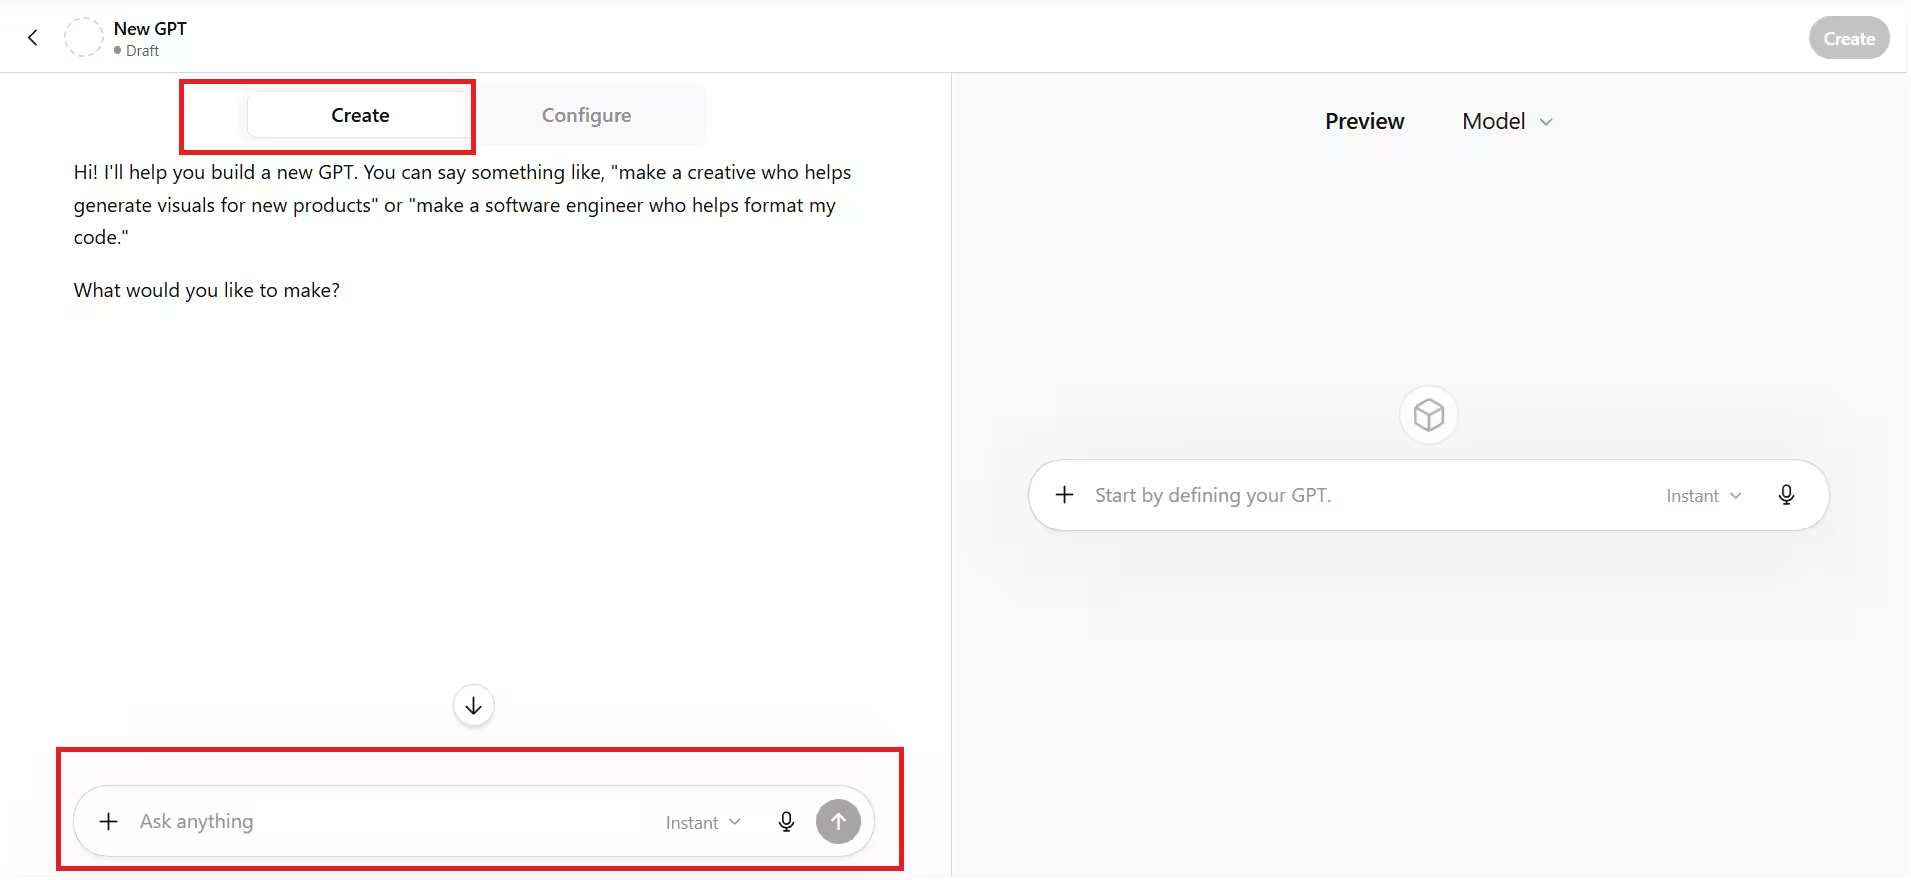
GPT Builder asks follow-up questions and automatically drafts the instructions for you.
Configuration View (Configure tab)
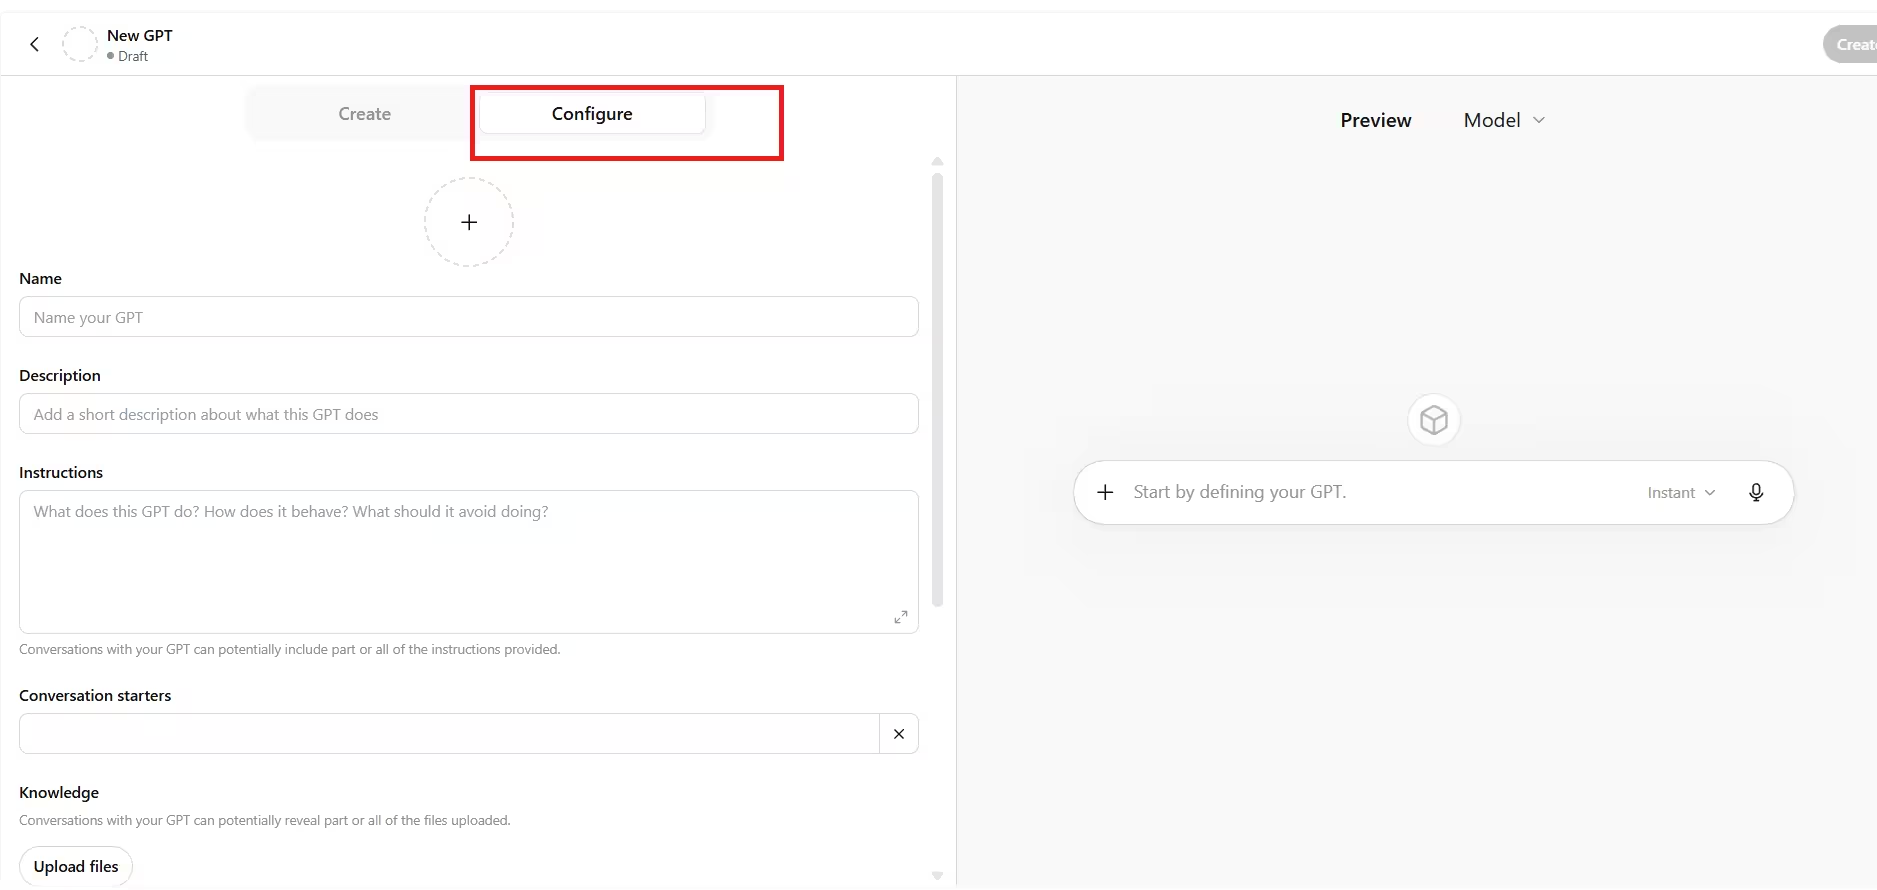
This option gives you more direct control. You manually fill in the GPT’s name, description, instructions, uploaded knowledge files, capabilities, and other settings. Use this when you want precise control over how the GPT behaves.
Step 3: Define a Clear Purpose
Before filling in any settings, decide exactly what your GPT should do. A focused GPT gives better results than a broad one.
Weak purpose:
Help me with everything.
Better purpose:
Help me answer customer support questions clearly, suggest the right product based on user needs, and keep responses friendly and professional.
A narrow, specific purpose makes the instructions easier to write and the outputs more consistent.
Step 4: Add Name, Description, and Instructions
In the Configure tab, fill in the basic fields.
Name
Use a clear name that tells users what the GPT does.
Example: Customer Support Reply Assistant
Description
Write one or two lines explaining the GPT’s purpose.
Example: Helps draft friendly, professional customer support replies based on the issue type, product details, and company tone guidelines.
Instructions
This is the most important field. Instructions tell the GPT how to behave, what style to follow, what to avoid, and how to format answers.
Example:
Write in a polite, professional tone. Always acknowledge the customer’s issue, provide a clear solution, and end with a helpful closing line. Avoid technical jargon. Keep replies concise and easy to understand.
OpenAI recommends uploading knowledge files for reference material but placing rules, tone, and workflow guidance directly inside the GPT instructions field.
Step 5: Add Conversation Starters
Conversation starters are sample prompts users can click when they open your GPT. They guide users toward the GPT’s intended use and make it easier to get started.
Examples:
Draft a reply for a customer asking for a refund.
Write a response to a delivery complaint.
Suggest the best product for a customer with a limited budget.
Rewrite this reply in a friendlier tone.
Pick starters that match the actual purpose of the GPT.
Step 6: Upload Knowledge Files
You can upload files your GPT will use as reference material. This works well when you want the GPT to follow your brand style, company policy, documentation, product details, or article templates.
Examples of useful files to upload:
- Previous reply samples
- Brand tone and voice guidelines
- Product catalog or documentation
- FAQ documents
- Return and refund policy
OpenAI supports common file types and allows up to 20 files, with each file up to 512 MB. Use clear, text-forward files because complex layouts and image-heavy PDFs reduce accuracy when the GPT needs to reference your content.
Step 7: Enable Capabilities
GPT Builder lets you choose what tools your GPT can access. Depending on availability, options may include web browsing, image generation, canvas, and code or data analysis.
Enable only the tools your GPT actually needs:
- For a data GPT, enable data analysis.
- For a writing GPT, uploaded knowledge is often enough without extra tools.
- For a visual content GPT, image generation can be useful.
- For editing long drafts, canvas access helps users work on extended content.
Enabling tools your GPT does not need can reduce focus and introduce unwanted behavior.
Step 8: Add Actions Only If Needed
Actions are advanced settings that let a GPT connect to an external API. For example, a GPT could fetch data from your own system, check order status, create support tickets, or interact with another app.
Configuring actions requires API details, authentication information, and an OpenAPI schema. A GPT can use either apps or actions, but not both at the same time.
Skip actions entirely if you do not have a specific API use case. Most custom GPTs work well without them.
Step 9: Test Your GPT
Before saving or sharing, test the GPT with real prompts in the Preview panel on the right side of GPT Builder.
Test it with:
- A simple task
- A complex or multi-step task
- A formatting task
- A prompt where it might make a mistake
- A prompt that checks whether it follows your specific rules
If your GPT is for blog writing, check whether it follows your headings, tone, SEO structure, and formatting rules. OpenAI recommends testing in Preview after uploading files to confirm the GPT uses your content correctly.
Step 10: Save and Share
After testing, click Save. You can choose whether the GPT is private (only you can use it), shared by link, shared within a workspace, or published more broadly depending on your account type.
Publishing to the GPT Store has its own eligibility requirements. For internal or personal use, keeping the GPT private or sharing by link is usually enough.
Best Practices for a Strong Custom GPT
A well-built custom GPT has a clear role, clear limits, and clear formatting rules. Use this structure when writing your instructions:
- Role: What the GPT is
- Goal: What it should help users do
- Tone: How it should write or respond
- Format: How answers should be structured
- Rules: What it must always do or avoid
- Examples: Sample outputs or preferred style
Example instruction block:
You are a customer support assistant. Your goal is to help draft clear, polite replies to customer questions and complaints. Write in simple, friendly English. Keep replies short and direct. Always acknowledge the issue, provide a solution, and close with a helpful line. Avoid technical jargon and generic responses.
Common Mistakes to Avoid
- Making the GPT too broad: A focused GPT always performs better than a general one. Pick one clear job for your first GPT.
- Relying only on uploaded files for behavior rules: Important behavior rules belong in the instructions field, not just in uploaded documents. The GPT may not always retrieve file content reliably for every response.
- Uploading messy PDFs or image-heavy files: These reduce accuracy when the GPT needs to reference specific content.
- Publishing before testing: Always test with real prompts before sharing or publishing.
- Enabling tools your GPT does not need: Extra tools can reduce focus and produce less consistent results.
Frequently Asked Questions
Do I need coding skills to use GPT Builder?
No. GPT Builder works entirely without code. You describe what you want, fill in the configuration fields, and test the result.
Can free ChatGPT users create custom GPTs?
No. GPT Builder requires a ChatGPT Plus, Pro, Team, or Enterprise subscription.
How many files can I upload to a custom GPT?
OpenAI allows up to 20 files per GPT, with each file up to 512 MB.
Can I share my custom GPT with others?
Yes. You can share it by link, within a workspace, or publish it to the GPT Store depending on your account type.
What is the difference between a custom GPT and a regular ChatGPT session?
A custom GPT retains your instructions, files, and settings permanently. Regular ChatGPT sessions start fresh each time unless memory is enabled separately.
OpenAI GPT Builder turns repeated prompts, writing rules, business workflows, and support processes into a reusable custom GPT. Start with one narrow use case, write strong instructions, upload only useful reference files, test carefully, and then save or share based on your needs. A well-configured custom GPT saves time on every repeated task.

