A wireless keyboard can stop responding for several reasons: dead batteries, a loose USB receiver, Bluetooth dropping out, outdated drivers, or power-saving settings cutting the connection. This guide walks you through every fix in order, starting with the fastest checks and moving to deeper solutions for Windows 10 and Windows 11.
1. Check and Replace the Batteries
Low or dead batteries cause roughly half of all wireless keyboard failures. Even batteries you recently installed can be faulty.
- Flip the keyboard over and open the battery compartment.
- Remove the existing batteries.
- Wait 30 seconds before inserting new ones. This short pause resets the keyboard’s internal state.
- Insert fresh batteries and match the polarity markings inside the compartment.
- Turn the keyboard on using the power switch on the side or bottom edge, if your model has one.
How to check battery level without replacing: Press Caps Lock or Num Lock and watch for an indicator light. No light at all usually means the batteries are dead. Some keyboards like the Logitech G613 have a dedicated battery LED that glows red when power is low.
2. Reconnect the USB Receiver (Dongle)
The USB receiver can lose its pairing even when it looks physically connected. A quick replug fixes this in most cases.
- Unplug the USB dongle from its current port.
- Wait 10 seconds.
- Plug it into a different USB port, preferably one on the back panel of your desktop rather than a front panel or USB hub.
- Turn the keyboard off and back on.
- Wait a few seconds for Windows to recognize the device.
Important: Avoid plugging the receiver into a USB 3.0 port (blue-colored). USB 3.0 generates electromagnetic noise that interferes with the 2.4 GHz signal the receiver uses. Use a black USB 2.0 port instead. If you must use a nearby port, connect the receiver with a short USB extension cable to add some physical distance from the interference source.
3. Re-pair the Keyboard via Bluetooth
If your keyboard connects over Bluetooth rather than a dongle, the pairing can drop after a Windows update or when the PC reconnects to too many devices.
- Press Windows + I to open Settings.
- Go to Bluetooth & devices.
- Toggle Bluetooth Off, wait 30 seconds, then toggle it back On.
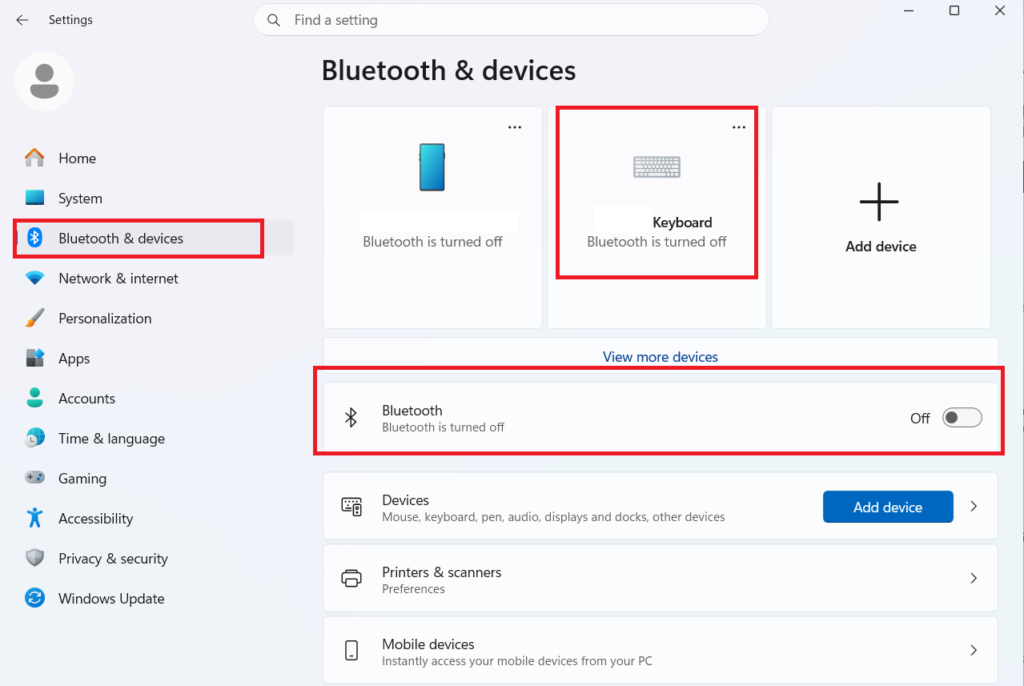
- Find your keyboard in the device list. If it shows Connected, click it and select Remove device, then pair it again from scratch.
- On the keyboard, press and hold the Bluetooth pairing button until the indicator light flashes rapidly. This puts the keyboard into pairing mode.
- Select the keyboard in Windows Bluetooth settings and complete the pairing.
Some keyboards support multiple Bluetooth channels. Press the channel button (often labeled 1, 2, or 3) to make sure the keyboard broadcasts on the correct channel your PC expects.
4. Move the Keyboard Closer and Reduce RF Interference
Wireless keyboards use the 2.4 GHz frequency band. Wi-Fi routers, Bluetooth speakers, and cordless phones operating on the same band can cause lag, missed keystrokes, or complete disconnections.
- Move the keyboard within one meter of the receiver to test if distance is the problem.
- Relocate your router or Bluetooth speakers away from your PC while troubleshooting.
- Remove other USB 3.0 devices plugged in near the receiver, as they emit noise that narrows the effective range of the wireless signal.
If typing becomes reliable when the keyboard is closer to the computer, RF interference from nearby devices is the likely cause.
5. Restart Windows
A full restart clears temporary driver faults and resets USB power states. This step fixes many intermittent keyboard failures, especially after Windows updates.
- Use your mouse to open the Start menu.
- Select Power > Restart (not Shut Down, which keeps certain states in memory on systems with Fast Startup enabled).
- After the system restarts, reconnect the receiver or re-enable Bluetooth and test the keyboard.
6. Enable the Keyboard in Device Manager
Windows lets you disable input devices manually, and it is worth confirming your keyboard has not been accidentally disabled.
- Press Windows + X and select Device Manager.
- Expand the Keyboards section.

- If your wireless keyboard shows a down arrow icon, right-click it and select Enable device.
- If you see a yellow warning triangle, the driver has an error. Move to the driver fix below.
7. Update or Reinstall the Keyboard Driver
Corrupted or outdated drivers frequently break wireless keyboard communication, especially after major Windows feature updates.
To update the driver:
- Open Device Manager (Windows + X > Device Manager).
- Expand Keyboards, right-click your wireless keyboard, and select Update driver.
- Choose Search automatically for drivers.
- Restart the PC after the update completes.
To reinstall the driver from scratch:
- In Device Manager, right-click the keyboard entry and select Uninstall device.
- Check the box to delete the driver software if the option appears.
- Restart Windows. The OS will automatically reinstall a fresh generic driver on startup.
For keyboards with advanced features (macros, RGB, multimedia keys): visit the manufacturer’s website, such as Logitech Options+, Razer Synapse, or Corsair iCUE, and download the official software package. These include newer and more stable driver versions than what Windows installs automatically.
If the keyboard stopped working after a recent Windows update: roll back the driver instead. In Device Manager, right-click the keyboard, select Properties, go to the Driver tab, and click Roll Back Driver.
8. Disable Filter Keys and Other Accessibility Features
Accidentally activated accessibility settings can make a working keyboard behave as though it is broken. Symptoms include long delays before characters appear, keys that register multiple times, or keystrokes that produce no output.
Disable Filter Keys in Windows 11/10:
- Press Windows + I to open Settings.
- Go to Accessibility > Keyboard.
- Turn off Filter Keys, Sticky Keys, and Toggle Keys.
Fix repeated keystrokes:
- Open Control Panel.
- Go to Ease of Access > Change how your keyboard works.
- Under Filter Keys, adjust the Repeat Delay slider toward Long.
Fix number keys appearing instead of letters:
Press Num Lock to toggle it off. On some laptops, a portion of the letter keys acts as a numeric keypad when Num Lock is active. You can also open the on-screen keyboard by pressing Windows + R, typing osk, and pressing Enter to verify what the keyboard is actually sending.
9. Disable Fast Startup and USB Power Saving
Windows power management can disconnect USB devices and Bluetooth receivers after a period of inactivity. If the keyboard works fine after a fresh boot but fails after sleep or lid close, this is the likely cause.
Disable USB Selective Suspend:
- Press Windows + R, type
powercfg.cpl, and press Enter. - Click Change plan settings next to your active plan.
- Click Change advanced power settings.
- Expand USB settings > USB selective suspend setting and set it to Disabled.
- Click OK and restart the PC.
Disable Fast Startup:
- In the same Power Options window, click Choose what the power buttons do in the left panel.
- Click Change settings that are currently unavailable.
- Uncheck Turn on fast startup.
- Click Save changes.
Fast startup causes certain peripherals to fail during initialization because it partially preserves the previous session state rather than doing a full power cycle.
10. Reset the Keyboard to Factory Settings
If none of the previous fixes work, resetting the keyboard forces a fresh pairing and clears any stored connection errors on the device itself.
Standard reset procedure for most wireless keyboards:
- Turn off the keyboard using its power switch.
- Shut down the PC and unplug the USB receiver.
- Wait 30 seconds.
- Plug the receiver back in and turn the PC on.
- Turn the keyboard on and press the Sync or Connect button on both the keyboard and the receiver until the indicator light flashes and stabilizes.
If the keyboard has a reset button in the battery compartment: press and hold it for 5 seconds using a paperclip. This restores the keyboard to factory pairing state and forces Windows to treat it as a new device.
After a full reset with driver reinstallation and port changes, if the keyboard still does not respond on a second computer, the wireless receiver or keyboard hardware itself is likely damaged. At that point, contact the manufacturer’s support if the device is under warranty, or consider replacing the keyboard.
Wireless Keyboard Not Working? Use the On-Screen Keyboard to Navigate
If your wireless keyboard is the only input device and you need to navigate Windows to apply any of these fixes, activate the on-screen keyboard:
- From the login screen, click the Accessibility icon in the lower-right corner and enable On-Screen Keyboard.
- From within Windows, press Windows + R, type
osk, and press Enter.

This gives you full keyboard input through your mouse while you troubleshoot the physical keyboard.

