PowerShell 7 is the modern, actively maintained version of Microsoft’s command-line shell and scripting platform. It runs on .NET, supports cross-platform scripting, and receives regular updates with new features and security fixes. The current LTS release is PowerShell 7.6.3 (released June 16, 2026), which is supported until November 2028.
PowerShell 7 installs alongside Windows PowerShell 5.1 without replacing it. Both versions run independently, so there is no risk to existing scripts or system tools.
What You Need Before Installing PowerShell 7
- Windows 10 or Windows 11 PC
- Administrator access on the system
- An active internet connection
Setup typically takes under five minutes.
Which Version Should You Install?
PowerShell 7 comes in two release types:
- LTS (Long-Term Support): Supported for three years. Best for stability. Current LTS is PowerShell 7.6.3.
- Stable: Receives new features faster but has a shorter support window (~18 months). Current Stable is PowerShell 7.5.8.
For most Windows users, installing the LTS version is the better choice.
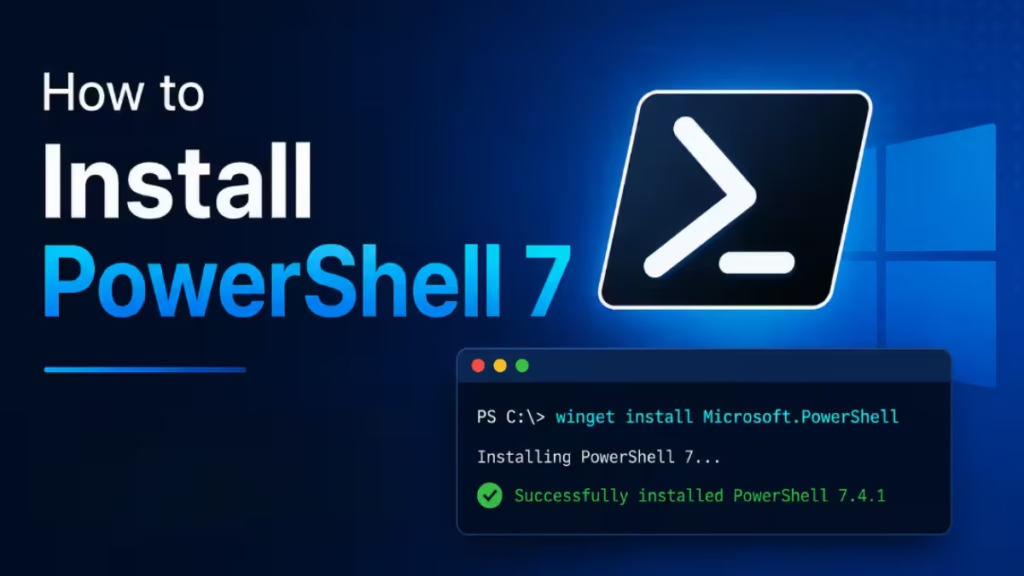
Method 1: Install PowerShell 7 Using Winget (Recommended)
Winget is built into Windows 11 and Windows 10 (version 1809 and later with App Installer). It installs the latest LTS release in seconds.
Steps
- Open Command Prompt, Windows PowerShell, or Windows Terminal
- Run the following command:
winget install --id Microsoft.PowerShell -e- Wait for the installation to complete
- No restart is required
To install a specific version, add --version 7.6.x to the command.
Note: Starting with PowerShell 7.6.0, winget installs the MSIX package by default. This replaces the older MSI format and provides automatic updates through the Microsoft Store infrastructure.
Method 2: Install PowerShell 7 Using the MSI Installer
The MSI installer works on systems where winget is unavailable or restricted by policy.
Step 1: Download the Installer
Go to the official PowerShell GitHub releases page: github.com/PowerShell
In the Assets section, select the correct package for your system:
PowerShell-7.x.x-win-x64.msifor most Windows PCs (64-bit)PowerShell-7.x.x-win-arm64.msifor ARM-based devices
Save the file to your computer.
Important: MSI packages are discontinued from PowerShell 7.7 onward. For any version beyond 7.6.x, use winget or the Microsoft Store instead. The MSI method only applies to PowerShell 7.6.x and earlier.
Step 2: Run the Installer
- Right-click the downloaded
.msifile and select Run as administrator - Click Next on the welcome screen
- Accept the license agreement
- Keep the following options enabled during setup:
- Add PowerShell 7 to the system PATH
- Enable PowerShell remoting
- Register Windows Event Logging
These options improve usability and do not affect system stability.
Step 3: Complete Installation
- Click Install
- Wait for setup to finish
- Click Finish to close the installer
Method 3: Install PowerShell 7 from Microsoft Store
The Store version installs quickly and receives automatic updates.
Steps
- Open Microsoft Store
- Search for PowerShell
- Select PowerShell by Microsoft
- Click Install
Store versions may receive updates slightly later than direct GitHub releases.
How to Open PowerShell 7 for the First Time
PowerShell 7 runs separately from Windows PowerShell 5.1 and must be launched explicitly.
From the Start Menu
- Press the Windows key
- Type PowerShell 7
- Select PowerShell 7 from the results
From the Terminal (Command Line)
Open any terminal window and run:
pwshThis launches PowerShell 7 directly. If the pwsh command is not recognized, the PATH variable may not have updated yet. Restart the terminal and try again.
How to Check If PowerShell 7 Is Installed Correctly
After installation, run the following command inside PowerShell 7:
$PSVersionTable.PSVersionThe output should show a version starting with 7.x. If it shows 5.x, you are running Windows PowerShell instead of PowerShell 7. Launch PowerShell 7 using pwsh or from the Start Menu and run the command again.
How to Set PowerShell 7 as Default in Windows Terminal
- Open Windows Terminal
- Click the dropdown arrow at the top and select Settings
- Under Default profile, choose PowerShell (not Windows PowerShell)
- Save the settings
All new terminal tabs will now open in PowerShell 7.
How to Update PowerShell 7 on Windows
PowerShell 7 supports multiple update methods depending on how it was installed.
Method 1: Update Using Winget
Open PowerShell 7 or Command Prompt and run:
winget upgrade Microsoft.PowerShellConfirm the update when prompted, then restart PowerShell 7.
Method 2: Update Through Windows Update (7.6 and Later)
PowerShell 7.6 supports Microsoft Update integration. Once enabled, updates arrive automatically through Windows Update, the same as system patches.
To enable this:
- Open PowerShell 7 as administrator
- Run:
$EnableMicrosoftUpdateOption = New-PSSessionConfigurationFile -Path "$env:TEMP\MicrosoftUpdate.pssc"Alternatively, the MSI installer includes a checkbox to enable Windows Update integration during setup.
Method 3: Reinstall from GitHub
Download the latest release from https://github.com/PowerShell/PowerShell/releases and run the installer over the existing version.
Troubleshooting PowerShell 7 Installation
1. pwsh Command Not Recognized After Installation
The PATH variable may not have refreshed. Close all terminal windows and reopen them. If the issue persists, restart the PC.
To check if PowerShell 7 is in PATH manually:
$env:PATH -split ";"Look for a path like C:\Program Files\PowerShell\7.
2. Winget Not Available on Your System
Winget requires Windows 10 version 1809 or later with the App Installer package installed. To get it, open Microsoft Store, search for App Installer, and update it. On Windows Server 2022 or earlier, winget is not available. Use the MSI installer instead.
3. Version Still Shows 5.1 After Installation
You opened Windows PowerShell instead of PowerShell 7. Run pwsh in the terminal to launch the correct version, or launch it from the Start Menu by searching for PowerShell 7.
4. Installation Fails or Rolls Back
Right-click the .msi file and select Run as administrator. Installer failures caused by permission issues are the most common reason for rollbacks.
How to Uninstall PowerShell 7 (If Needed)
PowerShell 7 can be removed without affecting Windows PowerShell or any system components.
Steps
- Open Settings
- Go to Apps > Installed apps
- Search for PowerShell 7
- Click Uninstall and confirm
Only PowerShell 7 is removed. Windows PowerShell 5.1 remains installed and fully functional.
Should You Remove Windows PowerShell 5.1?
No. Windows PowerShell 5.1 is a core part of Windows and is required by certain system scripts, Group Policy features, and legacy modules. PowerShell 7 is designed to run side by side with it, and some Windows-specific modules still require 5.1 to run. Removing 5.1 is not recommended and is not possible on most Windows versions.
Related Guides
- PowerShell for macOS Is Now Notarized: No More GateKeeper Warnings
- How to Install WinGet in PowerShell
- How to Disable Trusted Service Connectivity in Azure API Management (CLI & PowerShell)
- How to Install Exchange Online PowerShell Module

