Connecting a custom domain to Blogger using Cloudflare improves security, speeds up your site, and gives you full DNS control. Cloudflare also provides free SSL, DDoS protection, and performance optimization without extra cost.
This guide walks you through the full setup — domain connection, DNS configuration, HTTPS activation, and common fixes.
You don’t need coding knowledge to complete this setup.
What You Need Before Starting
Make sure you have these ready:
- A custom domain purchased from any registrar
- A Cloudflare account
- A Blogger website already created
- Access to your domain’s DNS settings
If your domain already points to another host, remove old DNS records before continuing.
Step 1: Add Your Domain to Cloudflare
First, move your domain DNS management to Cloudflare.
How to Add Domain
- Open cloudflare.com and sign in.
- Click Add a site.
- Enter your domain name (example:
example.com). - Click Continue.
- Choose the Free Plan.
- Click Confirm Plan.
Cloudflare scans existing DNS records automatically.
If you see unwanted records, delete them later.
Step 2: Change Nameservers at Your Domain Registrar
Cloudflare gives you two nameservers. You must update them at your domain registrar.
How to Update Nameservers
- Log in to your domain provider (GoDaddy, Namecheap, Google Domains, etc.).
- Open domain settings.
- Find Nameservers.
- Replace existing nameservers with Cloudflare nameservers.
- Save changes.
DNS propagation may take 5 minutes to 24 hours.
Cloudflare shows status as Active once completed.
Step 3: Get Blogger IP Addresses
Blogger requires four A-record IP addresses.
Use these IPs:
216.239.32.21
216.239.34.21
216.239.36.21
216.239.38.21
You’ll add these in Cloudflare DNS.
Step 4: Configure DNS Records in Cloudflare
Now point your domain to Blogger.
Add A Records
Open Cloudflare → Your Domain → DNS tab.
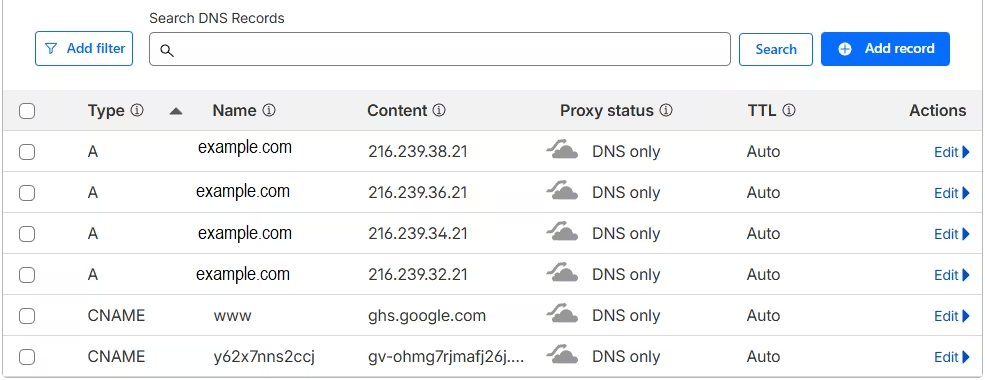
Add these four records:
| Type | Name | IPv4 Address | Proxy |
|---|---|---|---|
| A | @ | 216.239.32.21 | DNS Only |
| A | @ | 216.239.34.21 | DNS Only |
| A | @ | 216.239.36.21 | DNS Only |
| A | @ | 216.239.38.21 | DNS Only |
Important:
- Keep Proxy OFF (gray cloud) for all A records.
- TTL can remain Auto.
Add CNAME for www
Add one more record:
| Type | Name | Target | Proxy |
|---|---|---|---|
| CNAME | www | ghs.google.com | DNS Only |
Again, keep proxy disabled.
Step 5: Add Custom Domain Inside Blogger
Now connect the domain in Blogger.
How to Add Domain in Blogger
- Open Blogger Dashboard.
- Go to Settings.
- Open Publishing section.
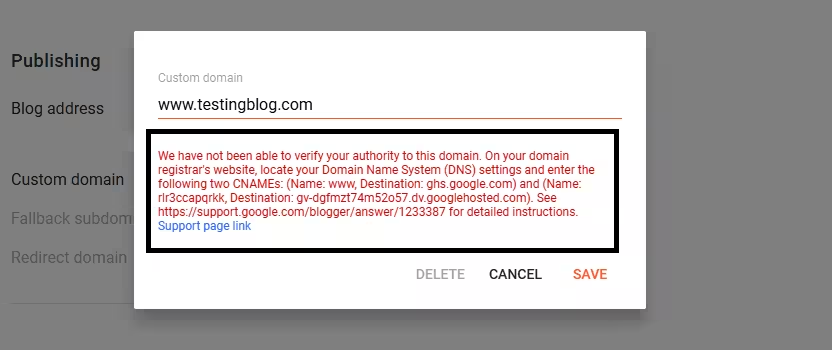
- Click Custom domain.
- Enter your domain with www:
www.example.com- Click Save.
Then Blogger asks for verification CNAME records, copy them.
Go back to Cloudflare → DNS and add the verification CNAME records exactly as Blogger shows. If you already added the www CNAME record in Step 5, do not delete it. Simply add this new CNAME record as an additional entry using the same method.
| Type | Name | Target | Proxy |
|---|---|---|---|
| CNAME | rlrXXXXXXX | gv-dgXXXXhosted.com | DNS Only |
Note: Type the values exactly as Blogger shows on your screen.
Wait 2–5 minutes and click Save again in Blogger.
Once connected, enable:
- Redirect domain
- Redirect non-www to www
Step 6: Enable HTTPS in Blogger
HTTPS protects user data and improves SEO trust.
Enable HTTPS
- Open Blogger Settings.
- Scroll to HTTPS.
- Turn ON:
- HTTPS Availability
- HTTPS Redirect
Wait 10–30 minutes for certificate activation.
Step 7: Configure SSL Settings in Cloudflare
Cloudflare SSL must match Blogger HTTPS behavior.
Recommended Settings
Open Cloudflare → SSL/TLS:
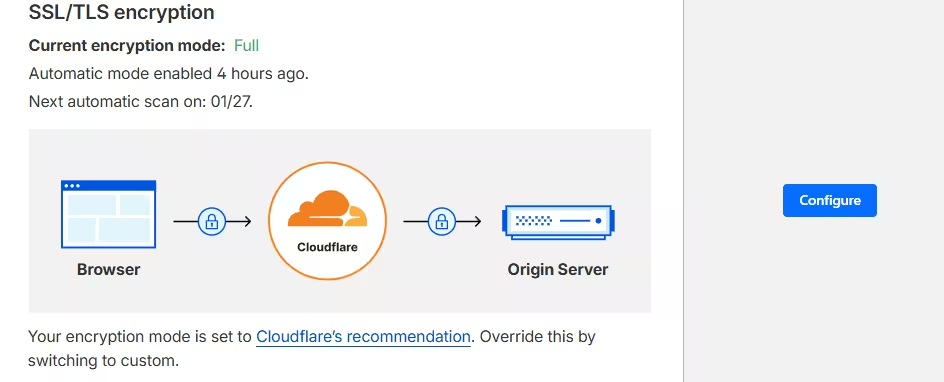
- SSL Mode: Full
- Always Use HTTPS: ON
- Automatic HTTPS Rewrites: ON
Avoid using Flexible SSL. It causes redirect loops with Blogger.
Step 8: Test Your Domain
Open these URLs in browser:
https://example.com
https://www.example.com
Both should load your Blogger site securely.
Check:
- HTTPS lock icon appears
- No redirect loops
- Pages load correctly
Common Issues and Fixes
1. DNS Not Propagated Yet
Symptoms:
- Site not loading
- Blogger shows error
Fix:
- Wait 30 minutes to 24 hours
- Clear browser cache
- Recheck nameservers
2. Too Many Redirects Error
Cause:
- Cloudflare proxy enabled on A or CNAME
- Flexible SSL enabled
Fix:
- Set all Blogger DNS records to DNS Only
- Change SSL mode to Full
3. Blogger Keeps Asking for Verification
Cause:
- CNAME verification record missing or wrong
Fix:
- Copy CNAME exactly from Blogger
- Add it in Cloudflare DNS
- Wait 5 minutes and retry
4. HTTPS Not Working
Error Message You May See in Blogger
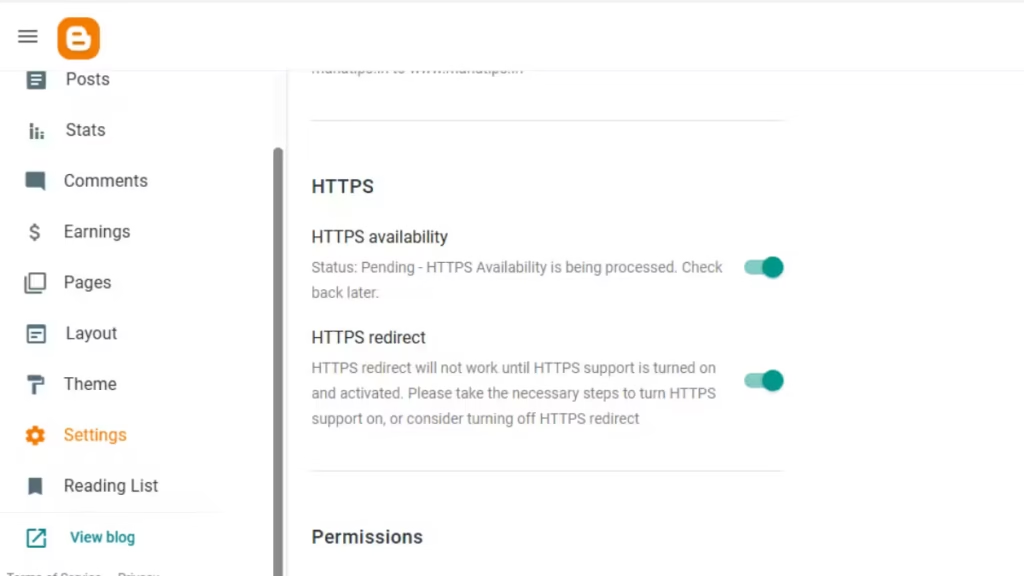
Status: Pending – HTTPS Availability is being processed. Check back later.This message appears when Blogger is still generating the SSL certificate for your custom domain. It usually shows immediately after connecting a new domain or changing DNS records.
Fix:
- Wait 30 minutes
- Refresh Blogger HTTPS settings
- Check Cloudflare SSL status- FULL (Active)
Once SSL activation completes, the status message disappears and HTTPS becomes active.
FAQs
How do I connect a custom domain to Blogger using Cloudflare?
To connect a custom domain to Blogger using Cloudflare, add your domain to Cloudflare, update nameservers, create four A records pointing to Blogger IPs, add a CNAME record for www pointing to ghs.google.com, connect the domain inside Blogger settings, and enable HTTPS.
Which DNS records are required to connect Blogger with Cloudflare?
You must add four A records pointing to 216.239.32.21, 216.239.34.21, 216.239.36.21, and 216.239.38.21, plus one CNAME record for www pointing to ghs.google.com, all set to DNS Only.
Should Cloudflare proxy be enabled for Blogger domains?
No, you should keep Cloudflare proxy disabled for all Blogger DNS records because proxy mode causes SSL conflicts, redirect loops, and verification errors.
What SSL mode should I use when connecting Blogger with Cloudflare?
You should use Full SSL mode in Cloudflare because it encrypts traffic correctly between Cloudflare and Blogger and prevents redirect issues caused by Flexible SSL.
How long does DNS propagation take after connecting Cloudflare to Blogger?
DNS propagation usually completes within 5 minutes to 24 hours, depending on your registrar and regional DNS caching.
Why does Blogger keep asking for CNAME verification?
Blogger requests CNAME verification when the required verification record is missing or incorrect in Cloudflare DNS, so you must copy the CNAME exactly and save it properly.
How do I fix “Too Many Redirects” error on Blogger with Cloudflare?
Disable Cloudflare proxy on all DNS records and switch SSL mode to Full, then clear browser cache and reload the site.
Why does Blogger show “Status: Pending – HTTPS Availability is being processed”?
This message appears when Blogger is provisioning the SSL certificate for your domain, and it usually resolves automatically within 30 to 60 minutes after DNS propagation.
Can I use HTTPS with Blogger when using Cloudflare?
Yes, you can enable HTTPS in Blogger settings and turn on Always Use HTTPS in Cloudflare to secure your site.
Can I connect a non-www domain directly to Blogger using Cloudflare?
No, Blogger requires adding the domain in www format first, then enabling redirect to handle non-www traffic.
Does connecting Cloudflare affect Blogger SEO rankings?
Cloudflare improves security, uptime, and performance, which supports SEO when DNS and HTTPS are configured correctly.
Can I use Cloudflare caching with Blogger?
Yes, you can cache static assets like images and CSS, but avoid caching HTML pages to prevent content delivery issues.
Connecting a custom domain to Blogger using Cloudflare gives you better security, faster loading, and full DNS control without extra cost.
Once configured correctly, the setup remains stable for years with minimal maintenance.
If you plan to scale your Blogger site or manage multiple domains, Cloudflare becomes an essential tool.

