You turned on Secure Boot in your BIOS, saved the settings, rebooted, and opened System Information. The Secure Boot State still says Off. The BIOS and Windows are giving you conflicting readings, and neither is obviously wrong.
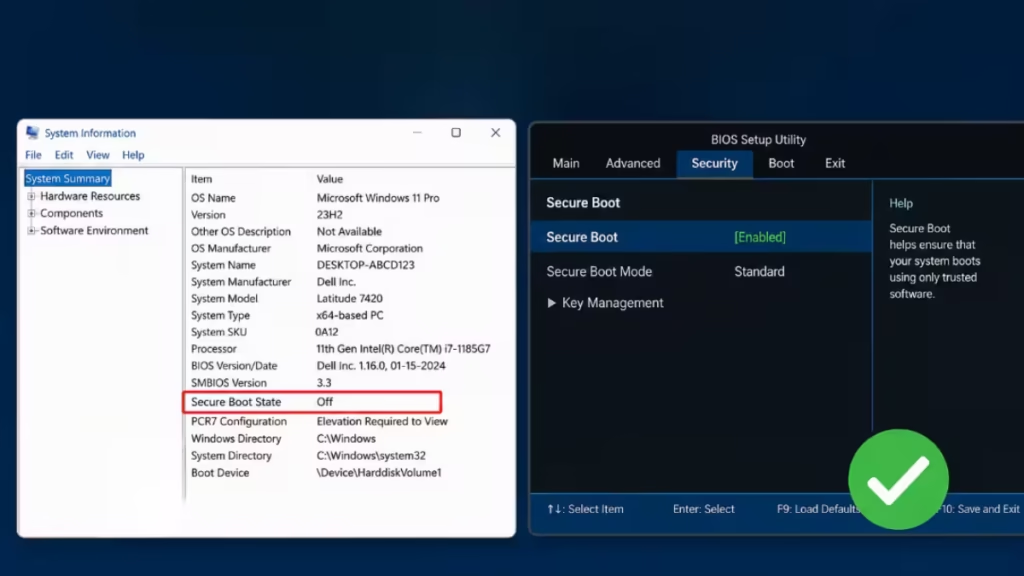
This mismatch is a real problem, not a display glitch. With the original Secure Boot certificates expiring in June 2026, Windows needs Secure Boot fully active to receive the updated 2023 certificates through Windows Update. If the chain is broken, your PC stays on the old certificates and loses part of its boot-level protection.
Why Secure Boot Shows Off in Windows But On in BIOS
Secure Boot works as a chain. Each link must be in place before Windows can report the feature as active. The BIOS toggle is only one link. If the firmware boot mode, disk partition style, certificate store, or OS type setting is wrong, Secure Boot stays off in Windows regardless of what the BIOS page shows.
The five most common causes are:
- UEFI is not the active boot mode: the PC is still booting in Legacy or BIOS mode
- CSM (Compatibility Support Module) is still enabled: this forces a BIOS-like environment that disables Secure Boot
- Secure Boot certificates were cleared, never loaded, or are in Custom mode: the trust data behind the toggle is missing
- The Windows system disk uses MBR instead of GPT: Secure Boot requires a GPT disk
- The firmware OS type is set to “Other OS”: this leaves Secure Boot dormant even when UEFI is active
Open msinfo32 (press Win + R, type msinfo32, press Enter) and check two lines: BIOS Mode and Secure Boot State. If BIOS Mode says Legacy, stop and work through the UEFI and disk fixes first. If it says UEFI and Secure Boot is still Off, the issue is inside firmware settings or the certificate store.
Fix 1: Confirm Your BIOS Changes Were Actually Saved
This is the first thing to check. Many users enable Secure Boot in the BIOS and exit without pressing the save key (usually F10). The BIOS discards unsaved changes on reboot.
- Restart your PC and enter the BIOS using your motherboard’s access key (Del, F2, or F10 at startup).
- Navigate to the Secure Boot setting.
- If it is Off, turn it On.
- Press F10 (or the save shortcut shown on screen) and confirm the save.
- Let Windows boot, then open msinfo32 and check Secure Boot State again.
If you saved correctly before and it still shows Off, move to the next fix.
Fix 2: Disable CSM or Legacy Boot in Firmware
CSM is the single most common cause of this mismatch. When CSM is active, the firmware runs in a BIOS-compatible mode that either disables Secure Boot or hides it entirely. The BIOS page may still show a Secure Boot toggle, but it has no effect until CSM is off.
- Enter your BIOS.
- Look for a Boot or Advanced tab.
- Find CSM (Compatibility Support Module) or Legacy Boot and set it to Disabled.
- If a prompt asks whether to switch to UEFI mode, confirm it.
- Save and reboot.
- Check msinfo32 again.
Note: Disabling CSM on a system with an MBR disk can prevent Windows from booting. Before you disable CSM, confirm your disk uses GPT (see Fix 5 below). If your disk is MBR, convert it first, then disable CSM.
Fix 3: Set the Firmware OS Type to Windows UEFI Mode
Some motherboards, especially gaming boards and systems previously used for Linux dual boot, have an OS Type or Boot Mode setting that controls how UEFI behaves. If this is set to Other OS, Secure Boot stays dormant even when UEFI mode is active.
- Enter your BIOS.
- Look for a setting labeled OS Type, Boot Option, or Windows OS Configuration (the name varies by brand).
- Change it from Other OS to Windows UEFI Mode or the equivalent on your board.
- Save and reboot.
This setting is easy to overlook because it sits outside the Secure Boot submenu. Changing a graphics card, adding an older PCIe device, or flashing firmware for a different OS can push this setting back to Other OS.
Fix 4: Switch Secure Boot Mode from Custom to Standard and Restore Factory Keys
Many boards offer two Secure Boot modes: Standard and Custom. Custom mode lets you load your own signing keys but does not automatically populate the certificate databases. If your board landed in Custom mode (from a reset, firmware update, or manual change), Secure Boot shows as enabled in the BIOS but has no trust data to work with, so Windows reads it as Off.
Here is how to restore the factory keys and switch back to Standard:
- Enter your BIOS and open the Secure Boot submenu.
- If the Secure Boot mode already shows Standard, skip to step 5.
- If it shows Custom, disable Secure Boot first.
- Change the Secure Boot mode from Standard to Custom (counterintuitively, you must be in Custom mode to access the key restore option).
- Find Restore Factory Keys, Install Default Secure Boot Keys, or a similar option (the label varies by brand).
- Confirm the action.
- Enable Secure Boot.
- Change the mode back to Standard.
- Save and exit.
After reboot, open msinfo32 and check Secure Boot State. This fix resolves the mismatch in most cases where UEFI is already active and CSM is already off.
For a full walkthrough of the Windows Secure Boot status indicators, including what the green, yellow, and red readings mean, see our dedicated guide.
Fix 5: Convert Your System Disk from MBR to GPT
Secure Boot and UEFI require a GPT system disk. If Windows was installed in Legacy mode years ago, the drive likely still uses MBR. Toggling Secure Boot in the BIOS will not fix the startup path when the partition style is wrong.
Check your partition style first:
- Press
Win + Xand open Disk Management. - Right-click your system disk (Disk 0) and choose Properties.
- Go to the Volumes tab and look at Partition style.
- If it says MBR, you need to convert before enabling Secure Boot properly.
Convert MBR to GPT without data loss using MBR2GPT:
Warning: Back up your data before proceeding. Conversion is generally safe when the disk meets the tool’s requirements, but a backup is essential.
- Open Command Prompt as Administrator.
- Run this command to validate the disk:
mbr2gpt /validate /disk:0 /allowFullOS- If validation passes, run the conversion:
mbr2gpt /convert /disk:0 /allowFullOS- After conversion, reboot into BIOS, disable CSM, enable UEFI mode, and enable Secure Boot.
- Check msinfo32 after Windows loads.
Important: Do not simply disable CSM on an MBR disk without converting first. The system will enter an unbootable state.
Fix 6: Suspend BitLocker Before Making Firmware Changes
If BitLocker is active on your system drive, changing firmware settings alters the boot measurements BitLocker uses to verify the startup path. This can trigger a BitLocker recovery prompt after reboot, which requires your 48-digit recovery key.
To avoid this:
- Open the Start menu and search for Manage BitLocker.
- Click Suspend protection next to the system drive.
- Make your firmware changes, save, and reboot.
- After confirming Windows starts normally, go back to Manage BitLocker and click Resume protection.
Do this before Fix 4, Fix 5, or any change that modifies the UEFI configuration.
Fix 7: Reset the BIOS to Factory Defaults
If none of the targeted fixes have worked yet, resetting the BIOS to its factory defaults clears any conflicting settings that may be holding Secure Boot in the off state. This is particularly useful when the disk was recently converted from MBR to GPT, because Windows sometimes still reports Secure Boot as Off after that conversion until the firmware is fully reset.
- Enter your BIOS.
- Look for Load Optimized Defaults, Restore Factory Settings, or Reset to Default (the label varies by brand).
- Confirm the reset.
- After the reset, re-enable Secure Boot, set the OS type to Windows UEFI mode, and disable CSM if it re-enabled itself.
- Save and exit.
Check msinfo32 once more after Windows loads.
Fix 8: Update Your BIOS Firmware
If BIOS Mode is UEFI, CSM is off, the disk is GPT, the certificates are loaded, and the OS type is correct but Secure Boot still reads Off, the remaining cause is often a firmware bug. Some boards expose the Secure Boot toggle but do not activate it correctly until a firmware update patches the behavior.
Visit your motherboard or PC manufacturer’s support page and download the latest BIOS or UEFI firmware. Installation steps differ by brand:
- ASUS / MSI / Gigabyte / ASRock: Use the EZ Flash or M-Flash utility inside the BIOS to update from a USB drive.
- Dell / HP / Lenovo: Download the firmware executable from the manufacturer’s support site and run it inside Windows.
After the update, go through the Secure Boot settings again, since a BIOS update often resets them to defaults.
For step-by-step instructions on manually updating Secure Boot certificates in Windows 11 after you get Secure Boot active, see our detailed certificate update guide.
What to Do When Secure Boot State Is Off in System Information
| Check | Where To Look | Target Result |
|---|---|---|
| BIOS Mode | msinfo32 | UEFI |
| Partition style | Disk Management > Disk Properties > Volumes | GPT |
| CSM / Legacy Boot | Firmware Boot tab | Disabled |
| Secure Boot mode | Firmware Security or Boot tab | Standard |
| OS Type | Firmware Boot or Advanced tab | Windows UEFI Mode |
| Certificate store | Firmware Secure Boot submenu | Default / Factory keys installed |
| Secure Boot State | msinfo32 after reboot | On |
Frequently Asked Questions
Why is Secure Boot off in System Information but on in BIOS?
The BIOS toggle controls only one part of the chain. For Windows to report Secure Boot as active, the firmware must also be in UEFI mode, CSM must be disabled, the system disk must use GPT, and the Secure Boot certificate databases must be populated. If any of those conditions fail, Windows reports the feature as Off regardless of the BIOS setting.
What should I do if my Secure Boot state is off after enabling it?
Start with msinfo32. If BIOS Mode says Legacy, disable CSM and confirm your disk is GPT before enabling Secure Boot. If BIOS Mode already says UEFI, enter firmware settings and check the Secure Boot mode (Standard vs Custom), restore factory keys, and verify the OS type is set to Windows UEFI Mode. Reset BIOS to defaults if targeted fixes do not resolve it.
Can I enable Secure Boot on an MBR disk?
No. Secure Boot requires a GPT disk. Forcing Secure Boot on an MBR system disk causes an infinite boot loop. Convert the disk to GPT using the MBR2GPT command-line tool first, then enable Secure Boot.
Does resetting BIOS to defaults fix the Secure Boot mismatch?
In many cases, yes. A BIOS reset clears conflicting settings that prevent the full Secure Boot chain from activating. After the reset, re-enable Secure Boot, disable CSM, and set the OS type to Windows UEFI Mode before saving.
Do I need Secure Boot active to receive the new 2023 certificates?
Yes. Microsoft started rolling out the updated Secure Boot certificates beginning in April 2026 through Windows Update, but the update only applies when Secure Boot is fully enabled. If the feature reads Off in msinfo32, the certificate update will not install.
Related Guides
- Secure Boot Certificate Expiring in Windows 11: How to Check and Fix It Before June 2026
- Windows Secure Boot Status: Check and Fix Guide
- How to Enable Secure Boot in Windows 11 (Complete How-To Guide)
- How to Manually Update Secure Boot Certificates in Windows 11
- How to Enable Secure Boot in MSI Click BIOS 5 (Windows 11 Guide)
- How to Enable TPM 2.0 and Secure Boot for Gaming on Windows PCs

