Safe Mode starts Windows 11 with only the essential drivers and services running. You use it to troubleshoot driver conflicts, remove stubborn malware, or fix a program that prevents Windows from starting normally.

Windows 11 offers two versions of Safe Mode. Safe Mode loads the bare minimum with no internet access. Safe Mode with Networking adds network drivers so you can still browse the web or download a fix.
This guide covers every way to enter Safe Mode in Windows 11, whether your PC boots normally or not.
Enter Safe Mode Using Shift + Restart
This is the fastest method when Windows 11 still boots normally.
- Press
Windows key + X, or right-click Start. - Hold Shift and click Restart from the power menu.
- After the PC restarts, select Troubleshoot > Advanced options > Startup Settings.
- Click Restart again.
- On the list that appears, press
4orF4for Safe Mode, or press5orF5for Safe Mode with Networking.
Enter Safe Mode From Settings
If you prefer using the Settings app instead of the power menu, this method gets you to the same Startup Settings screen.
- Press
Windows key + Ito open Settings. - Go to System > Recovery.
- Under Advanced startup, click Restart now.
- After the PC restarts to the Choose an option screen, select Troubleshoot > Advanced options > Startup Settings.
- Click Restart.
- Press
4orF4for Safe Mode, or5orF5for Safe Mode with Networking.
Enter Safe Mode From the Sign-in Screen
Use this method when you can reach the lock screen but can’t log in normally, or want to enter Safe Mode before signing in.
- On the sign-in screen, hold Shift while clicking Power > Restart.
- After the restart, select Troubleshoot > Advanced options > Startup Settings.
- Click Restart.
- Press
4orF4for Safe Mode, or5orF5for Safe Mode with Networking.
Force Safe Mode on Every Restart Using MSConfig
This method makes Windows 11 boot into Safe Mode automatically every time, which is useful if your PC crashes before you can use the Shift + Restart trick.
- Press
Win + R, typemsconfig, and press Enter. - Click the Boot tab.
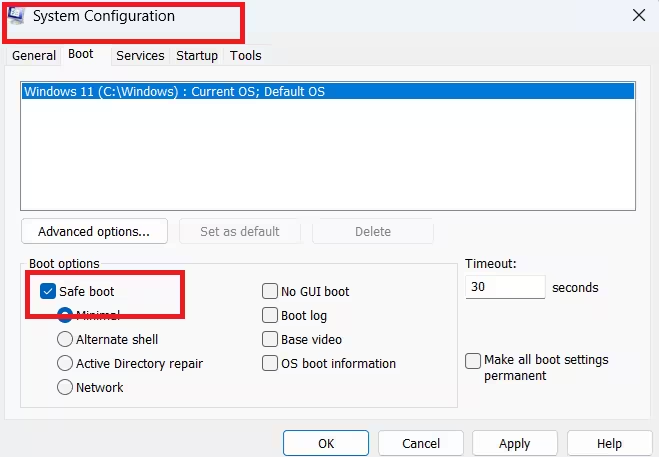
- Check the Safe boot option and click Apply.
- Click Restart when System Configuration prompts you.
Windows 11 now loads Safe Mode on every startup until you reverse this setting. Once you finish troubleshooting, open msconfig again, uncheck Safe boot, and restart to return to normal mode.
Enter Safe Mode When Windows 11 Won’t Boot
If Windows 11 fails to start after three failed boot attempts, it automatically enters the Windows Recovery Environment (WinRE). From here:
- On the Automatic Repair or recovery screen, select Advanced options.
- Go to Troubleshoot > Advanced options > Startup Settings.
- Click Restart.
- Press
4orF4for Safe Mode, or5orF5for Safe Mode with Networking.
If your PC doesn’t reach this screen automatically, force it by interrupting startup. Turn the device off and on as Windows begins to load, and repeat this two or three times. Windows 11 detects the failed boots and opens WinRE.
Quick Checklist
- Use Shift + Restart when Windows boots normally and you want one-time access.
- Use the sign-in screen method when you’re locked out before login.
- Use MSConfig when you need Safe Mode on every restart, such as for repeated driver testing.
- Use the forced restart interruption method when Windows 11 won’t boot at all.
Safe Mode vs Safe Mode With Networking
Pick Safe Mode without networking when you’re isolating a problem caused by background apps, services, or a recent driver update, since it loads the fewest components possible. Pick Safe Mode with Networking when you need internet access to download a fix, check for updates, or sign in with an online account.
Related Guides
- How to Exit Safe Mode in Windows 11 (All Methods)
- How to Enable Quick Machine Recovery on Windows 11 (3 Methods)
- How to Roll Back Your PC to an Earlier State Using Point-in-Time Restore on Windows 11
- Best Disk Management Tools for Windows 11 (Free and Paid)
- How to Enable Hidden CPU Boost Mode on Windows 11
