Windows 11 now includes a built-in recovery tool called Point-in-Time Restore that lets you roll back your entire PC to an earlier working state in a matter of minutes. If a bad driver update, botched configuration, or software conflict breaks your system, this feature gives you a reliable way to undo the damage without lengthy troubleshooting or a full Windows reinstall.
This guide covers everything you need to know: what Point-in-Time Restore is, how it differs from the old System Restore, how to enable and configure it, and how to use it to recover your PC.
What Is Point-in-Time Restore on Windows 11
Point-in-Time Restore is a recovery feature introduced by Microsoft starting with the July 2026 Security Update for Windows 11. It automatically creates snapshots of your entire system at regular intervals using the Volume Shadow Copy Service (VSS) and stores them locally on your device.
Each restore point captures the full system state, including:
- The Windows operating system
- Installed applications
- System and app settings
- Local user files
- Passwords, certificates, and encryption keys
If something goes wrong, you can use one of these snapshots to revert your PC to a previous state. The entire process typically completes within several minutes.
The feature works on Windows 11 Home, Pro, and Enterprise editions. On devices with an OS volume of 200 GB or larger, it turns on by default for Home and Pro editions. On enterprise-managed systems, administrators must enable it manually until Windows 11 version 26H2.
How Point-in-Time Restore Differs from System Restore
Both features use VSS under the hood, but Point-in-Time Restore is a major upgrade over the older System Restore. Here is how they compare:
| Capability | Point-in-Time Restore | System Restore |
|---|---|---|
| Configuration location | Settings app | Control Panel |
| Restore point trigger | Automatic, scheduled | Manual or event-triggered |
| Scope | Full system state including user files | System files and registry only |
| Retention | Up to 72 hours | Indefinite (disk space dependent) |
| Storage impact | Lower (uses reserved storage) | Higher |
| Remote management | Robust support | Very limited |
The most important difference: Point-in-Time Restore includes your personal files, apps, passwords, and credentials in every snapshot. System Restore does not. That wider scope makes recovery more complete, but it also means rolling back will delete files and data created after the restore point.
How Restore Points Work
Windows captures restore points automatically at a default interval of approximately every 24 hours. Each restore point includes the complete OS state at that moment.
Storage: Restore points live in system reserved storage. They share VSS storage space with other tools that use VSS, such as System Restore or third-party backup software. The default maximum storage cap is 2% of your disk size.
Deletion: Windows removes the oldest restore points automatically under these conditions:
- A restore point is older than 72 hours
- VSS storage reaches its configured maximum
- Free disk space drops to 20 GB or below
- VSS cannot allocate the space needed to write a new snapshot
Storage buffer: When free disk space hits 20 GB or less, Windows creates a new snapshot and then removes old snapshots from oldest to newest until more than 20 GB of space is free again.
To complete a restoration, your device needs at least as much free disk space as the total size of all existing restore points. Keep that in mind if your drive is nearly full.
How to Enable Point-in-Time Restore on Windows 11
If Point-in-Time Restore is not already active on your system, follow these steps to turn it on:
- Open Settings.
- Click System.
- Click Recovery.
- Click the View or edit button next to the Point-in-time restore setting.
- Toggle Point-in-time restore to On.
- Use the Restore point disk usage slider to set the maximum storage you want it to use.
- Click Save.
After you save, Windows will schedule the first restore point. If no recent restore point exists, one gets created promptly after you enable the feature.
Note: You need Windows 11 build 26220.7271 or later to see this option. If your build is supported but the option is missing, the rollout may not have reached your device yet.
How to Configure Point-in-Time Restore Settings
Windows lets you adjust several settings beyond just the on/off toggle. Most users can leave the defaults as is, but here is what each setting controls:
| Setting | Default | Available Options |
|---|---|---|
| Feature On/Off | On (Home/Pro) | On, Off |
| Restore point frequency | Every 24 hours | 4, 6, 12, 16, or 24 hours (Enterprise only) |
| Restore point retention | 72 hours | 4, 6, 12, 16, 24, or 72 hours (Enterprise only) |
| Maximum disk usage | 2% of disk | Min 2 GB, max 50 GB |
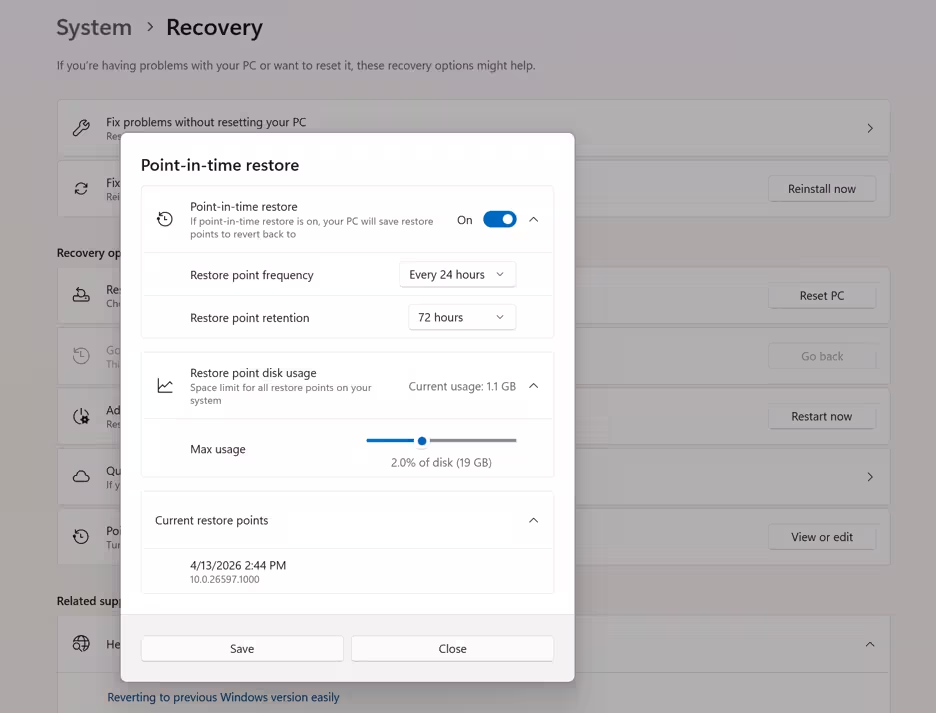
Home and Pro users can adjust the maximum disk usage limit. Frequency and retention controls are restricted to Enterprise editions.
How to Recover Your PC Using Point-in-Time Restore
Recovery happens through the Windows Recovery Environment (WinRE). You can reach WinRE whether your desktop is working or your PC fails to boot.
Before you start: If BitLocker or Device Encryption is active on your device, Windows will ask for your BitLocker recovery key during the restore process. Temporarily disabling BitLocker before proceeding saves you this step.
Method 1: Access WinRE from a Working Desktop
Use this method when your PC still boots and you can reach the desktop.
- Open Settings.
- Click System.
- Click Recovery.
- Click Restart now under the Advanced startup section.
- Click Restart now again to confirm.
- On the WinRE screen, click Troubleshoot.
- Click Advanced options.
- Click Point-in-time Restore.
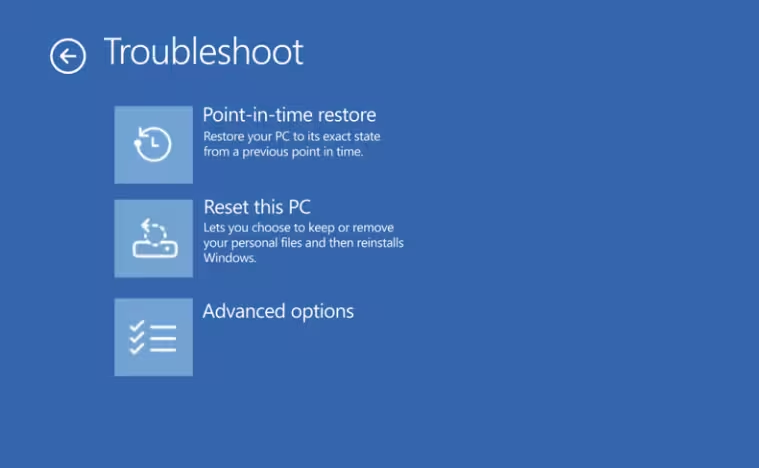
- Enter your BitLocker recovery key if prompted, then click Continue.
- Select a restore point from the list.
- Click Continue.
- Review the warning: all changes made after the selected restore point will be deleted, including settings, apps, data, passwords, and credentials.
- Click Restore to begin.
Windows will restore your system to the selected snapshot. After several minutes, your PC reboots and returns to normal operation.
Method 2: Access WinRE After Boot Failure
If your PC cannot boot, Windows automatically enters WinRE after repeated failed boot attempts. You can also use Windows installation media to access the recovery environment.
Once inside WinRE:
- Click Troubleshoot.
- Click Advanced options.
- Click Point-in-time Restore.
- Enter your BitLocker recovery key if prompted.
- Select a restore point.
- Click Continue, review the warning, then click Restore.
Risks and Limitations to Know Before You Restore
Point-in-Time Restore is powerful but not risk-free. Read these before you proceed.
Data loss: The restore reverts your entire system to the selected snapshot. Every file, app, setting, password, certificate, and key created after that point will be gone. Files already synced to OneDrive are the one exception since they are not stored only on your local drive.
Failed capture: Windows may fail to create a restore point if disk space is too low, the system is under heavy I/O load, or VSS encounters a writer error. No capture means no rollback option for that period.
Failed restore: A restore can fail due to insufficient free disk space, EFS-encrypted files that changed after the snapshot, a corrupted file system, or a power loss during the process.
Boot failure: Certain corruptions or sudden power loss during restoration can leave the device in an unbootable state.
Security updates reverted: Restoring the system rolls back any security patches or policy changes applied after the restore point. Run Windows Update and audit security policies after any restore.
Other limitations:
- You can only start restoration from WinRE, not directly from Windows
- Restore points from a different Windows edition (for example, Home to Pro) are not usable after an edition upgrade
- Only the OS volume restores; other drives and partitions are not affected
- EFS-encrypted files that changed after the snapshot block restoration
- The feature does not support exporting or mounting restore points as standalone images
Best Practices for Using Point-in-Time Restore
Follow these practices to get the most out of the feature and avoid issues:
- Keep the device plugged in during restoration. Running on battery increases the risk of power loss mid-process. A failed restore can leave the system in an inconsistent or unbootable state.
- Do not turn off your PC during restoration. Interrupting the process can corrupt the system.
- Monitor your free disk space. The restore process itself needs free space equal to the total size of all restore points. If your drive is nearly full, older restore points get removed and you may have fewer rollback options.
- Keep your BitLocker recovery key accessible. Store it in your Microsoft account or another safe location before you ever need it.
- Validate your system after restoring. Check that critical apps, security agents, and policies are up to date after any restore.
- Do not combine Point-in-Time Restore with other VSS backup tools. Competing VSS tools share the same storage pool and can crowd out your restore points.
- Point-in-Time Restore is not a backup replacement. It does not protect against hardware failure, drive failure, or catastrophic data loss. Maintain a separate full image backup for disaster recovery scenarios.
Common Problems You May See After a Restore
Outlook .ost file mismatch: After a restore, Outlook may display an error about an outdated data file. To fix this:
- Close Outlook.
- Open File Explorer and navigate to
%LOCALAPPDATA%\Microsoft\Outlook. - Rename or delete the
.ostfile in that folder. - Restart Outlook and let it rebuild the cache from your mail server.
Recall disabled after restore: Windows Recall turns off after a restore and asks you to confirm presence before re-enabling. Existing Recall snapshots from before the restore are still available. Enable Recall again manually if you want new snapshots to resume.
BitLocker auto-unlock lost: If the restore point predates when BitLocker was enabled, auto-unlock settings for data volumes will not carry over. Unlock those volumes manually using your recovery key.
Frequently Asked Questions
What can Point-in-Time Restore fix?
You can use it to recover from buggy Windows updates, driver problems, malware infections, misconfigurations, corrupted system files, app conflicts, and accidental user changes.
Does Point-in-Time Restore delete my personal files?
Yes. Any files, settings, apps, passwords, certificates, and keys created after the selected restore point will be removed. Files synced to OneDrive and already in the cloud are not affected.
Do I need to disable BitLocker before restoring?
It is strongly recommended. WinRE will prompt you for the BitLocker recovery key if encryption is active. Disabling it temporarily avoids that interruption.
How much storage does this feature use?
By default, it uses up to 2% of your disk. You can adjust this limit using the disk usage slider in the Point-in-Time Restore settings. The system manages cleanup automatically to stay within your chosen limit.
Can I restore if Windows does not start?
Yes. WinRE activates automatically after repeated failed boot attempts. You can also boot into WinRE using Windows installation media and then use Point-in-Time Restore from there.
How long does a restore take?
Most restores finish within several minutes. The exact time depends on how many changes occurred since the restore point and the speed of your hardware.
Can malware survive a restore?
If malware was present on your system before the restore point was created, it will still be there after you roll back. Always choose a restore point that predates the infection.
Does this replace a full system backup?
No. Point-in-Time Restore handles short-term recovery within a 72-hour window. For hardware failure, drive failure, or long-term disaster recovery, you still need a full image backup.
Why do I not see Point-in-Time Restore in Settings?
You need Windows 11 build 26220.7271 or later. If your build is supported and the option is still missing, the feature rollout has not reached your machine yet.
Is Point-in-Time Restore available on all Windows 11 editions?
Yes. Microsoft enables it by default on Windows 11 Home and Pro on devices with at least 200 GB of storage. Enterprise editions require an administrator to enable it manually until version 26H2.

