Quick Machine Recovery (QMR) is a Windows 11 feature that automatically detects and repairs critical boot failures using Windows Recovery Environment (WinRE) and Windows Update. When your PC cannot start correctly, QMR connects to the internet, checks for Microsoft-provided fixes, applies them, and restarts the system without requiring a full reinstall or any manual steps from you.
This feature is especially useful when boot failures are caused by a bad update, a driver conflict, or a corrupted system component. Microsoft designed it to handle large-scale failure scenarios where multiple devices may be affected by the same issue, but it works just as well on a single personal PC.
This guide covers all three methods to enable and configure Quick Machine Recovery on Windows 11: using the Settings app, accessing it from Windows Recovery Environment, and applying an advanced XML configuration through Command Prompt.
Is Quick Machine Recovery Already Enabled on Your PC?
Before changing any settings, check whether Quick Machine Recovery is already active on your device.
Quick Machine Recovery is enabled by default on Windows 11 Home and on unmanaged Windows 11 Pro installations. If your PC belongs to a company or school domain, the feature may be disabled by default and will require manual configuration by an IT administrator.
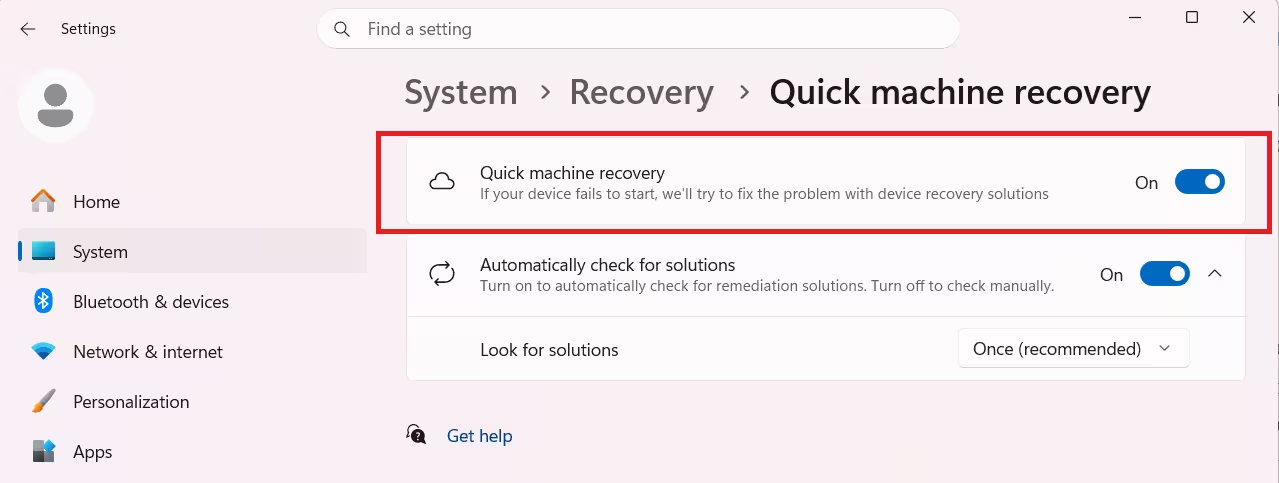
To check, go to Settings > System > Recovery and look for the Quick machine recovery option. If the toggle is already on, no changes are needed.
If you are running Windows 11 Home and want to upgrade to Pro to access managed deployment options, see How to Upgrade Windows 11 Home to Pro (3 Working Methods).
Method 1: Enable Quick Machine Recovery from Settings
This is the simplest method and works for most Windows 11 users.
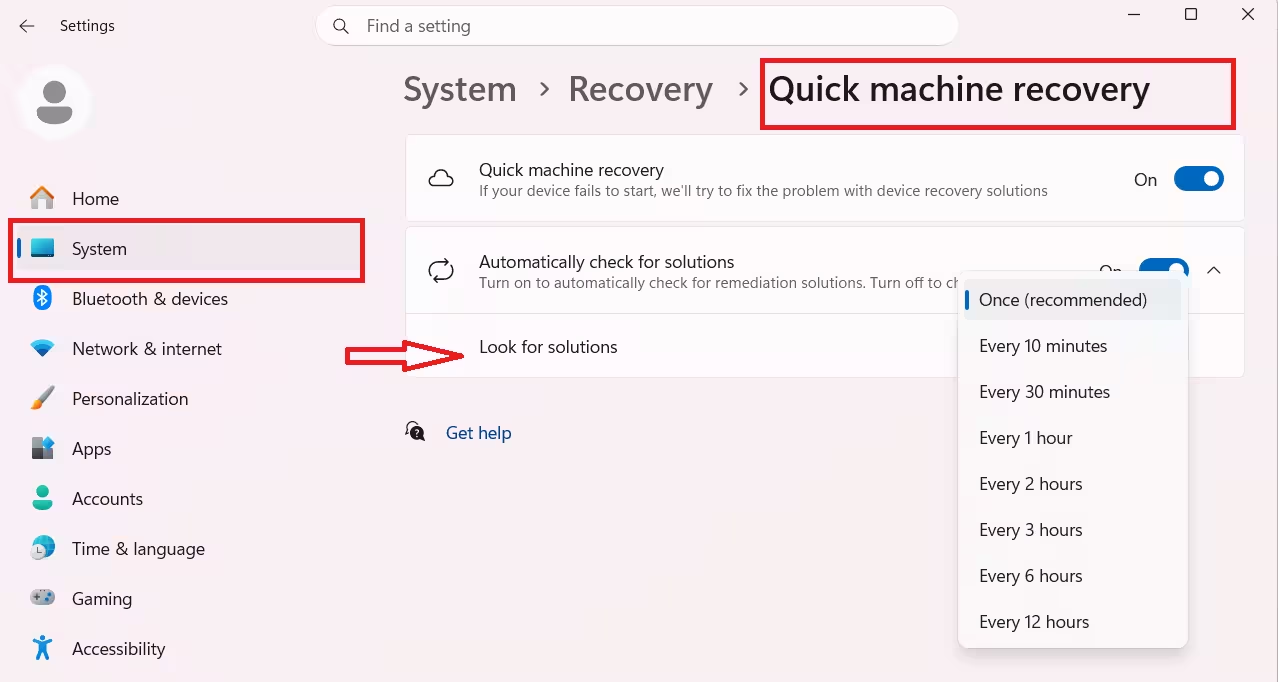
- Open Settings on Windows 11.
- Click System in the left sidebar.
- Click Recovery.
- Click Quick machine recovery.
- Turn on the Quick machine recovery toggle.
- Turn on Automatically check for solutions.
- Under Look for solutions, choose one of the following:
- Once: Quick Machine Recovery checks for a fix one time only. This prevents restart loops and is the safer option for most users.
- Custom interval: Quick Machine Recovery keeps checking at set intervals. Use this when Microsoft is actively working on a known startup issue and you want the system to keep retrying.
- Under Restart every, set how often the system should restart during the recovery process.
Once you save these settings, Quick Machine Recovery activates automatically if Windows fails to boot. The system connects to the internet, downloads any available fix from Windows Update, applies it, and reboots.
Method 2: Use Quick Machine Recovery from Windows Recovery Environment
If Windows cannot boot at all, you may not be able to reach the Settings app. In that case, you can access Quick Machine Recovery directly from Windows Recovery Environment.
How Quick Machine Recovery starts automatically
After two or three consecutive boot failures, Windows enters Automatic Repair mode. If Automatic Repair cannot fix the issue, Quick Machine Recovery should start automatically during the third reboot cycle. You do not need to do anything for this to happen.
How to launch Quick Machine Recovery manually from WinRE
If Quick Machine Recovery does not start automatically, follow these steps:
- Turn on your PC.
- When the Windows logo appears, hold the power button to force a shutdown.
- Repeat this two more times.
- On the fourth startup, Windows should open the Automatic Repair screen.
- Click Advanced options.
- Go to Troubleshoot > Advanced options.
- Click Quick Machine Recovery.
Windows will then connect to the internet and check Windows Update for targeted remediations. If a fix is available, it downloads and applies it automatically.
Important: Quick Machine Recovery requires an active internet connection. A wired Ethernet connection works most reliably inside recovery mode. Wi-Fi can also work, but only if the wireless adapter is recognized and configured in WinRE. If no internet connection is available, QMR falls back to the local Startup Repair tool.
Method 3: Configure Quick Machine Recovery Using XML and Command Prompt
This method is intended for advanced users, IT administrators, and managed environments. It gives you full control over Quick Machine Recovery behavior using a configuration file and the reagentc.exe command-line tool.
Step 1: Create the XML configuration file
- Open Start and search for Notepad.
- Open Notepad and create a new file.
- Add the following settings to your XML file:
| Setting | What It Does |
|---|---|
CloudRemediation | Enables cloud-based recovery through Windows Update. Set to 1 to enable. |
AutoRemediation | Allows automatic recovery without requiring manual input. Set to 1 to enable. |
totalwaittime | Time in minutes Windows waits before rebooting during recovery. Example: 120 |
waitinterval | Time in minutes between each check for available fixes. Example: 2 |
Wifi > SSID | Your Wi-Fi network name. Required only if using a wireless connection. |
Wifi > Password | Your Wi-Fi password. Required only if using a wireless connection. |
- If your PC connects via Ethernet, skip the Wi-Fi fields entirely.
- Save the file as
settings.xmlin a location you can remember, such asC:\myrec\settings.xml.
Step 2: Open Command Prompt as Administrator
- Open Start.
- Search for Command Prompt.
- Right-click it and select Run as administrator.
Step 3: Check your current recovery configuration
Run this command to see the existing Quick Machine Recovery settings before making changes:
reagentc.exe /getrecoverysettingsStep 4: Apply the XML configuration
Run this command and replace the path with the actual location of your settings.xml file:
reagentc.exe /setrecoverysettings /path C:\myrec\settings.xmlExample with a desktop path:
reagentc.exe /setrecoverysettings /path C:\Users\YourName\Desktop\settings.xmlStep 5: Confirm the new settings
Run this again to verify the new configuration applied correctly:
reagentc.exe /getrecoverysettingsOptional: Test Quick Machine Recovery
If you want to test Quick Machine Recovery behavior before relying on it in a real failure, use these commands:
Enable Quick Machine Recovery test mode:
reagentc.exe /SetRecoveryTestmodeForce Windows to boot into WinRE on the next restart:
reagentc.exe /BootToReThese commands are intended for advanced users and IT admins testing recovery behavior in controlled environments.
How to Remove Quick Machine Recovery Settings
To clear any custom Quick Machine Recovery configuration applied through an XML file, run:
reagentc.exe /clearrecoverysettingsThis removes the custom settings and resets Quick Machine Recovery to its default state.
What Happens If Quick Machine Recovery Cannot Find a Fix?
If Quick Machine Recovery connects to Windows Update and no fix is available for your specific boot issue, Windows displays one of these messages:
- Your device couldn’t be repaired at this time
- Your device ran into a problem and couldn’t be repaired
Windows then shows the path to a log file and gives you access to the recovery environment, where you can try other options manually.
From Windows Recovery Environment, you can:
- Run Startup Repair
- Uninstall a recent Windows Update
- Use System Restore to roll back to an earlier state
- Reset the PC while keeping or removing your files
- Restore from a system image backup (see UEFI Settings for System Image Recovery)
If you suspect a trojan virus or ransomware caused the boot failure rather than a bad update or driver, standard Quick Machine Recovery remediations may not be enough. In those cases, run a full offline scan after recovery.
Boot failures triggered by driver conflicts may also benefit from the newer Windows 11 automatic driver rollback feature, which detects faulty drivers before they cause a crash.
Frequently Asked Questions
What is Quick Machine Recovery in Windows 11?
Quick Machine Recovery is a Windows 11 feature that automatically detects and repairs critical boot failures using Windows Recovery Environment and Windows Update, without requiring a full reinstall or manual recovery steps.
Does Quick Machine Recovery work without an internet connection?
No. QMR requires an active internet connection to check Windows Update for fixes. Ethernet works most reliably inside recovery mode. If no connection is available, QMR falls back to local Startup Repair.
Is Quick Machine Recovery enabled by default on Windows 11?
QMR is enabled by default on Windows 11 Home and unmanaged Windows 11 Pro devices. On managed Pro and Enterprise devices joined to an organization, it is disabled by default.
Will Quick Machine Recovery delete my files or reset Windows?
No. QMR only applies targeted remediations downloaded from Windows Update. It does not reset Windows or remove any personal files.
What happens if Quick Machine Recovery cannot find a fix?
Windows displays a message saying the device could not be repaired and then gives you access to Windows Recovery Environment, where you can run Startup Repair, use System Restore, or reset the PC manually.

