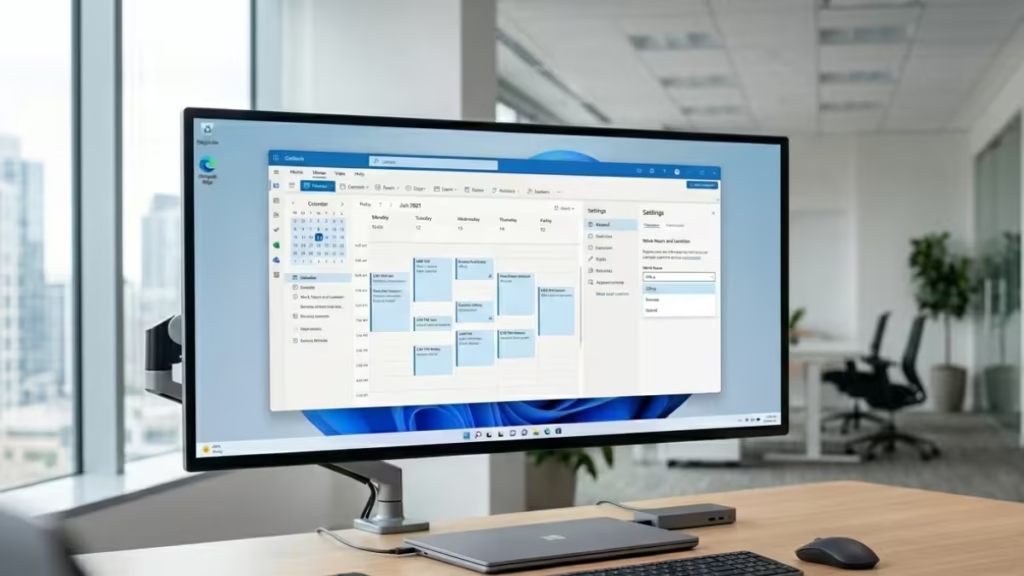
When colleagues schedule meetings outside your available hours, or when your Scheduling Assistant shows incorrect availability, the root cause is almost always an unconfigured or outdated work hours setting. Outlook lets you define your working days, start and end times, and work location so the entire Microsoft 365 ecosystem reflects your actual schedule. This guide covers every version: New Outlook for Windows, Outlook on the web, Classic Outlook, and Outlook for Mac.
What Work Hours Actually Do in Outlook
Before you configure anything, it helps to understand what these settings actually control.
When you set work hours in Outlook, two things happen immediately:
- Scheduling Assistant accuracy: When a colleague opens “Find a time” or the Scheduling Assistant to book a meeting, your non-working hours appear shaded. The assistant marks those slots as outside your schedule.
- Outside-hours warning: If someone manually picks a time slot that falls outside your configured hours, Outlook surfaces a warning that reads something like “This meeting is outside of [your name]’s working hours.” The invite still sends but the flag alerts the organizer.
One important limitation: Outlook work hours do not automatically decline meeting invites. They surface warnings and shape availability views, but they do not block calendar time. To hard-block a stretch of unavailability, you need to combine work hours with Out of Office replies or manually marked calendar events.
Work hours also sync your availability into Microsoft Teams. When you update your schedule in Outlook, Teams pulls that data automatically and updates your presence status and availability across the organization.
How to Set Work Hours in Outlook (New Outlook for Windows)
New Outlook (the redesigned Windows app) supports per-day scheduling, which means you can set different start and end times for each day of the week.
- Open New Outlook and click the Settings gear icon in the top-right corner.
- Select Calendar from the left sidebar.
- Click Work hours and location.
- Check the boxes next to the days you work. Uncheck any days you do not work.
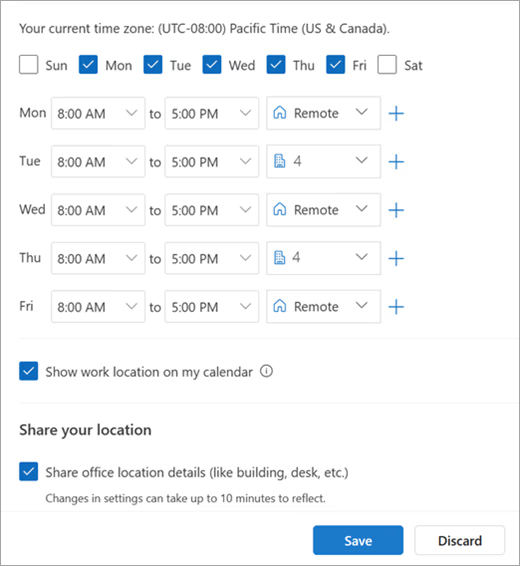
- Use the dropdowns next to each selected day to set a Start time and End time.
- Click Save.
Split shifts: If you work a morning block and an evening block with a gap in between, click the + icon next to a day to add a second time range for that day.
Set Work Hours in Outlook on the Web
Outlook on the web supports the same per-day configuration as New Outlook.
- Go to outlook.office.com and sign in.
- Click the Settings gear icon in the top-right corner.
- Scroll to the bottom of the settings panel and click View all Outlook settings.
- Navigate to Calendar and then select Work hours and location.
- Check the days you work and uncheck the rest.
- Set your Start time and End time for each active day.
- Click Save.
Once saved, any Microsoft 365 colleague who uses the Scheduling Assistant will see your off-hours shaded correctly.
Set Work Hours in Classic Outlook for Windows
Classic Outlook (the traditional desktop app) applies one universal start and end time across all your selected workdays. It does not support different hours per individual day.
- Open Classic Outlook.
- Click File in the top-left menu.
- Select Options at the bottom of the list.
- In the left sidebar of the Options window, select Calendar.
- Scroll down to the Work time section.
- Set your Start time and End time.
- Check the boxes for the days you work under Work week.
- Click OK.
If you need per-day customization (for example, shorter hours on Fridays), log into Outlook on the web instead. Settings configured there take precedence for Exchange and Microsoft 365 accounts.
Set Work Hours in Outlook for Mac
Outlook for Mac handles work hours through its own preferences panel.
- Open Outlook on your Mac.
- Click Outlook in the menu bar, then select Settings (or press Command + comma).
- Click Calendar.
- Under Work week, check the days you work.
- Set your Day starts and Day ends times.
- Close the settings window. Changes save automatically.
Like Classic Outlook for Windows, the Mac version applies the same start and end time to every selected workday. Use Outlook on the web if you need different hours per day.
Set Different Hours for Different Days
Only New Outlook for Windows and Outlook on the web support per-day hour configuration. Here is how to do it on the web:
- Go to outlook.office.com.
- Open Settings and click View all Outlook settings.
- Navigate to Calendar and then Work hours and location.
- Each checked workday shows its own independent time dropdowns.
- Set a unique start and end time for each day as needed.
- For days you do not work at all, uncheck the checkbox next to that day.
- Click Save.
This is the only place in Outlook where per-day scheduling is fully configurable.
Set Your Work Location in New Outlook
Microsoft 365 adds a work location layer on top of standard work hours. This lets you specify whether you will be in the office or working remotely each day, and optionally share your specific building location with coworkers.
Set a Recurring Work Location
- Click the Settings gear icon in New Outlook or Outlook on the web.
- Navigate to Calendar and then Work hours and location.
- For each workday, use the location dropdown to select Office, Remote, or No location.
- To share which building you are working from, check Share office location details and select the building from the dropdown. This option only appears if your organization has configured a building directory.
- Click Save.
Coworkers inside your organization can then see your in-office or remote status through the Scheduling Assistant, your profile card, and the daily work location card.
Keep Your Location Private
If you prefer not to share your work location:
- Open Settings and go to Calendar and then Work hours and location.
- Set the location dropdown for each day to No location.
- Uncheck Share your location.
- Click Save.
Your coworkers will see your availability blocks but not your physical work status.
Update Your Work Location for a Specific Day
When your plan changes for a single day (for example, you scheduled a remote day but decide to go into the office for an in-person meeting), update your location directly from the calendar view instead of editing your recurring settings.
- Open the Calendar view in New Outlook or Outlook on the web.
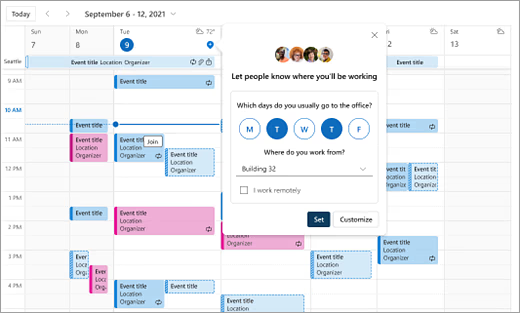
- Click the Work plan icon on the specific day you want to change. The icon appearance varies depending on whether that day is currently set as office or remote.
- Use the dropdown to change your location for that day.
- If your organization uses a building directory, select the specific building from the dropdown.
- Click Set.
A location icon then appears on that calendar day to reflect your updated status.
Set Your Out of Office Location
When you take a full day or a stretch of days off, you can mark your status directly through the Work plan panel.
- In the calendar view, click the Work plan icon on the date you want to mark.
- Select Out of office from the dropdown.
- Type a title for the absence and set the start and end date and time.
- Click Save.
This adds an Out of Office appointment to your Outlook calendar and updates your Teams presence status simultaneously.
Alternative method: Create a calendar appointment on any device and set the Free/Busy option to Out of office. Outlook marks your location as out of office for the duration of that appointment.
Set Automatic Replies for Extended Absences
Work hours handle your recurring weekly schedule. For vacations or any period where you are entirely unavailable, pair your work hours with automatic replies.
In Outlook on the Web
- Open Settings and go to View all Outlook settings.
- Navigate to Mail and then Automatic replies.
- Toggle Automatic replies on.
- Check Send replies only during a time period and set your start and end dates.
- Write your reply message for internal senders, and optionally for external senders.
- Click Save.
In Classic Outlook for Windows
- Click File and then Automatic Replies (Out of Office).
- Select Send automatic replies.
- Check Only send during this time range and enter the dates.
- Write your messages for internal and external senders.
- Click OK.
In Outlook for Mac
- Click Tools in the menu bar and then Automatic Replies.
- Check Send automatic replies for account [your account].
- Set the date range and write your message.
- Click OK.
Automatic replies handle email responses. To block your calendar time during the same period, create a calendar event marked as Out of Office so the Scheduling Assistant shows the time as unavailable.
View Coworkers’ Work Locations
When your colleagues set their work locations, you can see where they are working from in several places.
- From your daily work location card: Your own work location card shows which coworkers are also going into the office that day. If you have a specific building set, the list filters to colleagues who set the same building.
- In the Scheduling Assistant: When you create a meeting and open the Scheduling Assistant, each attendee’s current work location appears next to their availability blocks, provided they have configured their work location.
- From a profile card: Click on a coworker’s name or photo anywhere in Outlook to open their profile card. Their current work location appears next to their availability status.
How Outlook Work Hours Sync with Microsoft Teams
Outlook and Teams share availability data through Microsoft 365. When you save work hours in Outlook, Teams reads that data automatically and updates your presence indicators and availability status across the organization.
You do not need to configure work hours separately in Teams. A single update in Outlook or Outlook on the web acts as the source of truth that Teams references for scheduling suggestions, presence statuses, and calendar availability.
If your work location is visible in Outlook, it also populates into your Teams profile card, giving colleagues a clear view of whether you are in the office or working remotely that day.
Outlook Mobile: Read-Only on Work Hours
The Outlook mobile app for iOS and Android does not let you edit work hours. The app displays the schedule you already configured on the web or desktop, but it does not provide a settings panel to change hours or location.
To update your schedule, use Outlook on the web or the desktop app. Changes sync automatically to your mobile app. If you use Outlook on your iPhone and also rely on iPhone Reminders for task management, note that Outlook Tasks Not Syncing with iPhone Reminders: How to Fix It covers common sync issues between those two systems.
Troubleshooting Common Work Hours Issues
| Problem | Likely Cause | Fix |
|---|---|---|
| Work hours not saving | App sync issue or local glitch | Restart Outlook and try again; use Outlook on the web as a fallback |
| Wrong availability in Scheduling Assistant | Desktop hours differ from web hours | Set hours in Outlook on the web; web settings override desktop for Exchange accounts |
| Different hours per day not available | Using Classic Outlook or Outlook for Mac | Switch to New Outlook or Outlook on the web for per-day configuration |
| Out of Office not sending | IMAP or POP account | Automatic replies require an Exchange or Microsoft 365 account |
| Time zone looks wrong | Laptop updated local clock but Outlook did not sync | Go to Settings and then General and then Language and time to reset the time zone |
| Teams shows wrong availability | Delayed sync between Outlook and Teams | Hard refresh Teams or restart the Teams desktop client |
| Location options greyed out | IT admin restriction | Contact your IT helpdesk to confirm account permissions |
| Friday missing from Work Week view | Friday unchecked in calendar options | Go to File and then Options and then Calendar (Classic) or Settings and then Calendar and then Work hours (New/Web) and check Friday |
| Outlook Web and Desktop show different schedules | Desktop app locked to a different time zone than the browser | Ensure both platforms point to the same time zone, then restart the desktop app |
If you notice that the calendar looks correct in settings but your existing appointments behave unexpectedly, a sync or account-level issue may be at play. The guide Outlook Calendar Deleted All Appointments Except Invitee Events: How to Fix It covers that specific scenario in detail.
Frequently Asked Questions
Does Outlook automatically decline meetings booked outside work hours?
No. Setting work hours changes how your availability appears in the Scheduling Assistant and surfaces a warning to meeting organizers. It does not automatically decline invites. To hard-block those times, create recurring calendar events marked as Busy or use Out of Office replies.
Can I set different working hours for each day?
Yes, but only in New Outlook for Windows and Outlook on the web. Classic Outlook for Windows and Outlook for Mac apply one universal start and end time to all selected workdays. Use the web version for per-day configuration.
Can coworkers see my work location?
Yes. Coworkers inside your organization can see your work location through the Scheduling Assistant, profile cards, and the daily work location card. To restrict this, navigate to Work hours and location settings and uncheck Share office location details or set all days to No location.
Why are my Outlook work hours showing the wrong time zone?
This usually happens after travel, when your laptop updates to local time but Outlook does not sync immediately. Navigate to your calendar settings and manually reset the time zone to your correct location.
How do I add a second time zone in Outlook?
In Classic Outlook, go to File and then Options and then Calendar and then Time Zones. Check Show a second time zone and select the region you want to display alongside your local schedule.
Do work hours sync automatically with Teams?
Yes. Teams reads your Outlook work hours data automatically through Microsoft 365. You do not need to configure a separate schedule inside Teams.
Can I change work hours from Outlook Mobile?
No. The Outlook mobile app on iOS and Android shows your existing schedule but does not allow edits. Make changes from Outlook on the web or the desktop app. If you sync your Outlook calendar to your Android device and use a third-party calendar app, check the guide on How to Sync Outlook Calendar to Samsung Calendar on Your Phone for additional steps.
Why do Outlook Web and Desktop show different work schedules?
This usually happens when the desktop client uses a different time zone than your web browser, or when the desktop app has not completed a background sync with your cloud profile. Confirm that both platforms use the same time zone setting, then restart the desktop app.
Related Tech How-To

