Hybrid work has become the standard for many organizations. Employees split time between the office, home, and shared workspaces, and keeping every device secure and consistent across those locations is a real challenge.
Windows 11 Pro includes built-in tools that address exactly this problem. Features like Remote Desktop, Dynamic Lock, BitLocker, and Group Policy give IT admins and advanced users direct control over remote access, automatic security, and centralized policy management without relying on third-party software.
This guide covers the key steps to configure Windows 11 Pro for hybrid work: enabling Remote Desktop for secure remote access, setting up Dynamic Lock to protect unattended devices, applying Group Policy settings for consistent security, and enabling additional protections like Windows Hello and OneDrive backup.
What You Need Before You Start
Before making any changes, confirm the following:
- You are running Windows 11 Pro (not Home). Windows 11 Home cannot host Remote Desktop sessions.
- You have local administrator rights on the device.
- For Remote Desktop, have the PC name or IP address ready. You can find the IP address at Settings > Network and Internet > Advanced network settings > Hardware and connections properties, then check the IPv4 address.
- For Dynamic Lock, have a Bluetooth-enabled smartphone available to pair.
1. Enable Remote Desktop on Windows 11 Pro
Remote Desktop lets users connect to and control their office PC from home, another office location, or while traveling. The employee can open apps, access files, and use internal tools as if they were sitting at the device.
For hybrid teams, this removes the need to carry extra hardware or wait for office access to complete a task. IT admins also benefit because Remote Desktop makes it easier to maintain and troubleshoot remote devices.
Turn On Remote Desktop
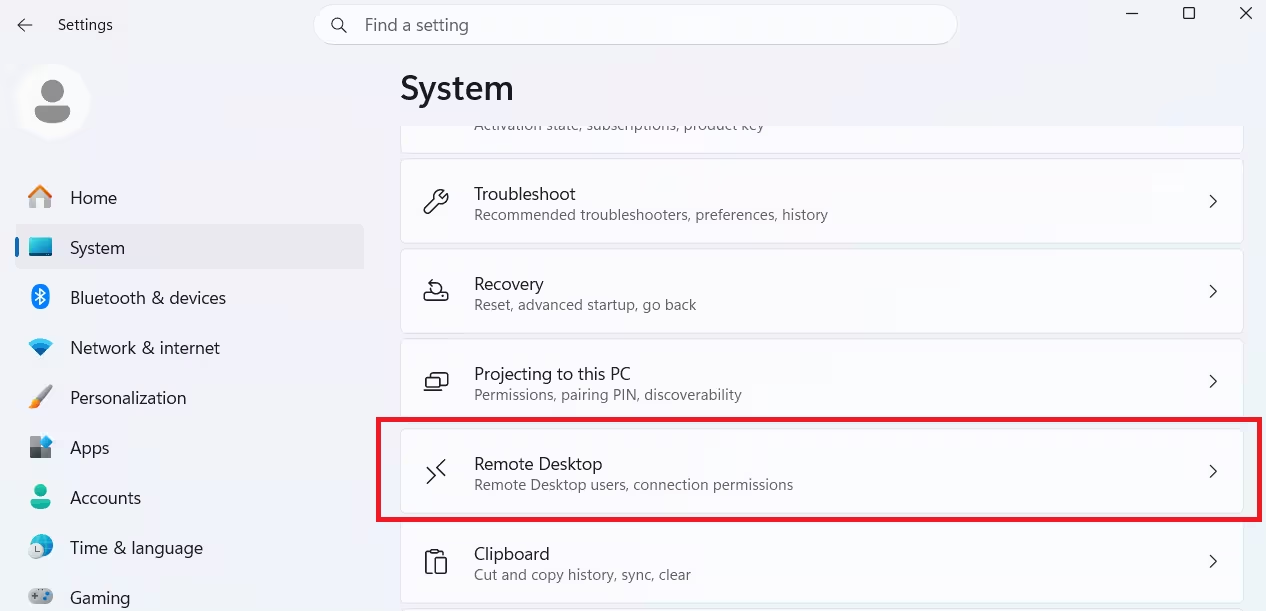
- Open Settings.
- Click System.
- Click Remote Desktop on the right side.
- Toggle Remote Desktop to On.
- Click Confirm.
- Note the PC name on the same page. You will need this to connect from another device.
Tip: You can also use the device’s IP address to connect remotely if the PC name does not resolve on your network.
Once you complete these steps, the computer is ready for remote connections as long as it remains powered on.
Keep Network Level Authentication (NLA) enabled. This setting adds an extra authentication step before the remote session starts, which reduces exposure to unauthorized access attempts.
Add Authorized Users
By default, only administrator accounts can connect via Remote Desktop. To grant access to standard user accounts:
- On the Remote Desktop settings page, click Remote Desktop users.
- Click Add.
- Enter the username and click OK.
Restrict access to IT admins and approved employees only. Avoid granting broad access across the team.
Best Practices for Hybrid Teams
- Always use a VPN: Never expose Remote Desktop directly to the internet. Ask your network administrator to set up a VPN so employees connect through a secure tunnel first.
- Enable Windows Firewall rules when Remote Desktop is turned on. Windows does this automatically, but verify the rule is active under Windows Defender Firewall > Advanced settings.
- Rename PCs clearly so remote connections are easy to identify. Use a naming convention like
SALES-LAPTOP-01orHR-DESKTOP-02.
Connect from Another Device
Employees can use any of these apps to establish a remote connection:
- Windows App (available on Windows, macOS, iOS, and Android)
- Remote Desktop Connection (built into Windows)
- Microsoft Remote Desktop mobile apps
2. Set Up Dynamic Lock
Dynamic Lock automatically locks a Windows 11 PC when the user walks away. It works by pairing a smartphone with the computer over Bluetooth. When the phone moves out of Bluetooth range, Windows detects the separation and locks the device after a short delay.
This is especially useful in shared office spaces, coworking locations, and meeting rooms where employees move between desks frequently and may forget to lock their screen manually.
Enable Dynamic Lock
Step 1: Pair your phone via Bluetooth
- On your phone, turn on Bluetooth and enable pairing mode.
- On your Windows 11 PC, open Settings.
- Click Bluetooth and devices.
- Enable the Bluetooth toggle if it is off.
- Click Add device.
- Select Bluetooth.
- Choose your phone from the list and follow the on-screen pairing instructions.
Step 2: Enable Dynamic Lock
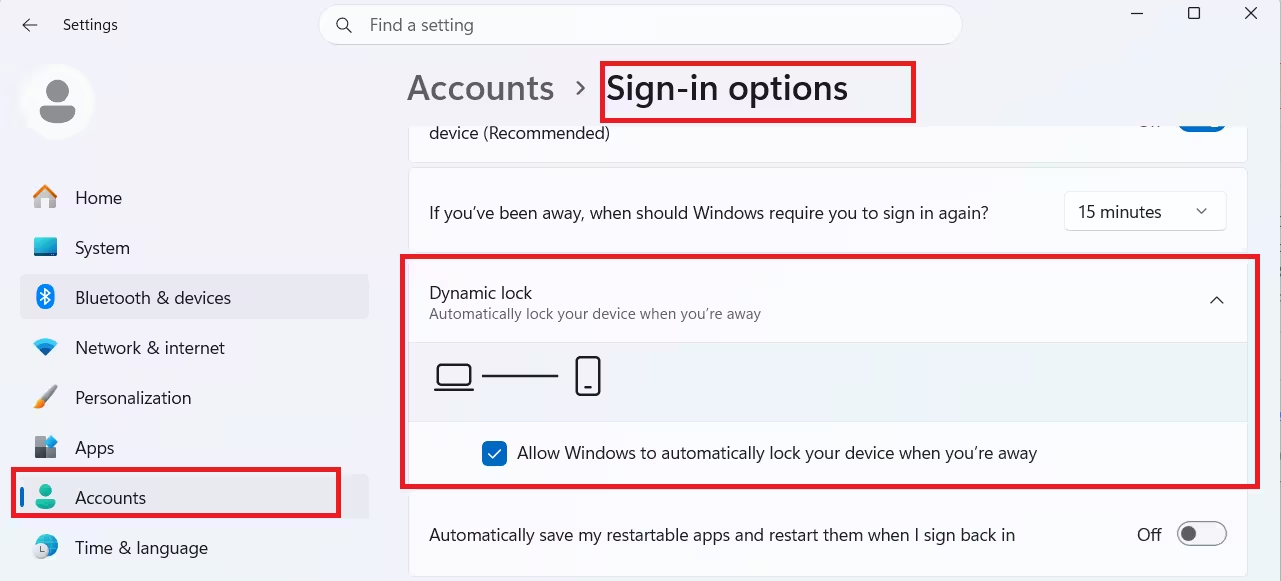
- Open Settings.
- Click Accounts.
- Click Sign-in options.
- Scroll to Dynamic Lock.
- Check Allow Windows to automatically lock your device when you’re away.
After you complete these steps, Windows monitors the Bluetooth signal from your paired phone. When you walk away, the session locks automatically in the background.
Recommended Setup for Hybrid Teams
- Require employees to keep Bluetooth enabled on their work devices.
- Pair company-issued phones where possible for consistent behavior.
- Combine Dynamic Lock with a screen timeout policy (5 to 10 minutes) and password-protected wake-up for layered protection.
3. Apply Group Policy Settings for Hybrid Security
Windows 11 Pro includes the Local Group Policy Editor, which gives admins and advanced users centralized control over security rules, update behavior, and access settings. In enterprise environments, these policies run through Active Directory or Microsoft Intune. On standalone Pro devices, the Local Group Policy Editor handles the same configurations.
Open the Group Policy Editor
- Press Windows + R, type
gpedit.msc, and press Enter.
The Group Policy Editor opens with two main trees: Computer Configuration (applies to the device) and User Configuration (applies to the logged-in user).
A. Password and Lock Policies
Path:
Computer Configuration
  Windows Settings
    Security Settings
      Account Policies
Configure these recommended settings:
| Setting | Recommended Value |
|---|---|
| Minimum password length | 12 characters or more |
| Password complexity | Enabled |
| Account lockout threshold | 5 failed attempts |
These settings reduce the risk of brute-force login attempts on remote and office devices alike.
B. Auto Lock Screen Timeout
Path:
User Configuration
  Administrative Templates
    Control Panel
      Personalization
Enable these two policies:
- Screen saver timeout (set to 300 to 600 seconds, which equals 5 to 10 minutes)
- Password protect the screen saver
This forces a password prompt whenever the screen saver activates, which protects unattended devices even when Dynamic Lock is not available.
C. Windows Update Policies
Path:
Computer Configuration
  Administrative Templates
    Windows Components
      Windows Update
        Manage end user experience
Open Configure Automatic Updates and set it to:
- Auto download and schedule the install
- Schedule installs for off-hours (for example, 3:00 AM daily)
- Enable restart notifications so users are not caught off guard
Consistent Windows Update behavior across all hybrid devices prevents a situation where remote laptops fall behind on security patches.
D. Disable Consumer Features
Path:
Computer Configuration
  Administrative Templates
    Windows Components
      Cloud Content
Enable the policy:
- Turn off Microsoft consumer experiences
This removes suggested apps, promotional notifications, and other consumer-facing features that do not belong on business PCs. It reduces distractions and keeps the work environment focused.
E. Enable BitLocker Encryption
BitLocker is a priority for all remote laptops. If a device gets lost or stolen, BitLocker prevents anyone from reading the data on the drive without the recovery key.
To enable BitLocker:
- Open Control Panel.
- Click BitLocker Drive Encryption.
- Click Turn on BitLocker for the OS drive.
- Follow the setup wizard to choose how to unlock the drive at startup and where to save the recovery key.
- Optionally, enable encryption for external drives as well.
Store all BitLocker recovery keys in a secure location, such as a company Azure AD account or a dedicated password manager accessible to IT admins.
4. Additional Security Recommendations
Beyond the core three areas, these additional configurations round out a complete hybrid work baseline.
Enable Windows Hello
Replace passwords with stronger, faster authentication methods through Windows Hello:
- PIN (device-specific, not transmitted over the network)
- Fingerprint recognition (requires a fingerprint reader)
- Face unlock (requires an IR camera)
To set up Windows Hello, go to Settings > Accounts > Sign-in options and configure the method that matches the device’s hardware.
Configure OneDrive Backup
Enable folder backup for each user’s key locations:
- Open the OneDrive system tray icon and go to Settings > Sync and backup > Manage backup.
- Enable backup for Desktop, Documents, and Pictures.
This ensures that employees working remotely do not lose data if a device fails or gets stolen. For more details, see our guide on OneDrive backup.
Use Microsoft Defender
Microsoft Defender is built into Windows 11 and provides strong baseline protection for hybrid devices. Enable these specific settings:
- Tamper Protection: Prevents malicious software or unauthorized users from disabling Defender settings.
- Controlled Folder Access: Blocks unauthorized apps from modifying protected folders, which directly defends against ransomware.
- Smart App Control: Blocks apps that are not trusted or verified by Microsoft’s cloud intelligence.
To access these settings, go to Windows Security > Virus and threat protection > Manage settings and App and browser control.
5. Company Baseline Summary
Use this table as a quick reference for deploying Windows 11 Pro across a hybrid team:
| Feature | Recommended Setting |
|---|---|
| Remote Desktop | Enabled, accessed via VPN only |
| Dynamic Lock | Enabled with paired company phone |
| BitLocker | Enabled on all remote laptops |
| Windows Hello | Enabled (PIN at minimum) |
| Automatic Updates | Required, scheduled for off-hours |
| Screen Lock Timeout | 5 minutes |
| Local Admin Rights | Restricted to IT admins only |
| Consumer Features | Disabled via Group Policy |
Important Notes
- Windows 11 Home does not support Remote Desktop hosting. You need Windows 11 Pro or Enterprise to allow incoming remote connections.
- Never expose Remote Desktop directly to the internet. Always require a VPN as the entry point.
- For organizations managing more than a handful of devices, use centralized management tools: Microsoft Intune, Active Directory, or Group Policy Objects (GPOs) applied at the domain level rather than configuring each device individually.
- Group Policy settings applied locally through
gpedit.mscwork on standalone Pro devices. In a domain environment, domain-level GPOs override local settings, so coordinate with your network admin before making local policy changes.
Related Windows How-To Guides
- How to Get Live Wallpaper on Windows 11 Without Installing Any App (6 Methods)
- How to Disable Web Search in Windows 11 and Remove Spam from Search Results
- How to Remap the Copilot Key to Right Ctrl or Context Menu in Windows 11
- How to Fix Windows 11 Audio Muted After Update and Notifications Not Working (24H2 / 25H2)
- How to Fix Windows Update Error 0x80010002 in Restricted Network Environments (Windows 11)

