HP Support Assistant fails to install on some Windows 11 PCs, showing an error that reads: “HP Support Assistant was not installed successfully. An error occurred during the installation: -2.” This can happen after a clean Windows install, after you removed the app manually, or on a device where it was never pre-loaded.
Why HP Support Assistant Is Not Installing on Windows 11
A corrupted leftover installation, a bad installer file, antivirus interference, or a conflicting startup service can each block the setup from completing. Work through the fixes below in order until the installation succeeds.
1. Remove the Existing HP Support Assistant Installation
A corrupted or incomplete previous installation often blocks the new setup from running correctly. Removing it fully before reinstalling clears the conflict.
- Press Win + I to open Settings.
- Go to Apps > Installed Apps.
- Search for HP Support Assistant in the list.
- Click the three-dot menu next to it and select Uninstall.
- Click Uninstall again to confirm.
- After uninstalling, open File Explorer and delete any leftover HP Support Assistant folders from:
C:\Program Files (x86)\HPC:\ProgramData\HP
- Press Win + R, type
regedit, and press Enter. - Navigate to
HKEY_LOCAL_MACHINE\SOFTWARE\HPand delete any HP Support Assistant keys you find there. - Restart your PC before attempting a fresh installation.
Note: You can also use a third-party uninstaller such as Revo Uninstaller or Geek Uninstaller to scan for and remove leftover files and registry entries automatically.
2. Download a Fresh Installer and Run It as Administrator
A corrupted, incomplete, or outdated installer file causes setup failures. Downloading a clean copy from HP’s official site and running it with administrator rights resolves this in most cases.
- Go to hp.com/go/hpsupportassistant and download the latest installer to your PC.
- Download the latest installer to your PC.
- Right-click the downloaded
.exefile and select Run as administrator. - Click Yes when the User Account Control prompt appears.
- Follow the on-screen instructions to complete the installation.
Do not use an old installer you downloaded previously. Always pull a fresh copy directly from HP.
3. Temporarily Disable Your Antivirus Software
Third-party antivirus programs sometimes block installer files, registry changes, or background services that HP Support Assistant needs during setup. Disabling protection temporarily lets the installer run without interference.
- Locate your antivirus icon in the system tray (bottom-right corner of the taskbar).
- Right-click it and look for an option such as Disable, Pause Protection, or Turn Off.
- Choose to disable it for 15 minutes or until you restart, depending on what the software offers.
- Run the HP Support Assistant installer again as administrator.
- Once the installation completes, re-enable your antivirus immediately.
Windows Defender does not typically block HP Support Assistant. If you only use Windows Defender, skip this step and move to the next fix.
4. Run the Windows Installer Troubleshooter
If HP Support Assistant is partially installed and stuck, Windows 11 lets you repair or reset it directly from Settings without needing a third-party tool.
- Press Win + I to open Settings.
- Go to Apps > Installed Apps.
- Search for HP Support Assistant in the list.
- Click the three-dot menu next to it and select Advanced options.
- Click Repair first and wait for it to finish.
- If the problem continues, return to the same screen and click Reset.
- Restart your PC and check whether HP Support Assistant works correctly.
Note: If Advanced options does not appear for HP Support Assistant, the app does not support the built-in repair feature. Skip to Fix 5.
5. Install HP Support Assistant in a Clean Boot State
If the installation still fails, a third-party startup service or application is likely interfering with the setup process. A clean boot starts Windows with only essential Microsoft services running, which isolates the conflict.
Step 1: Configure Clean Boot
- Press Win + R, type
msconfig, and press Enter. - On the General tab, select Selective startup.
- Uncheck Load startup items.
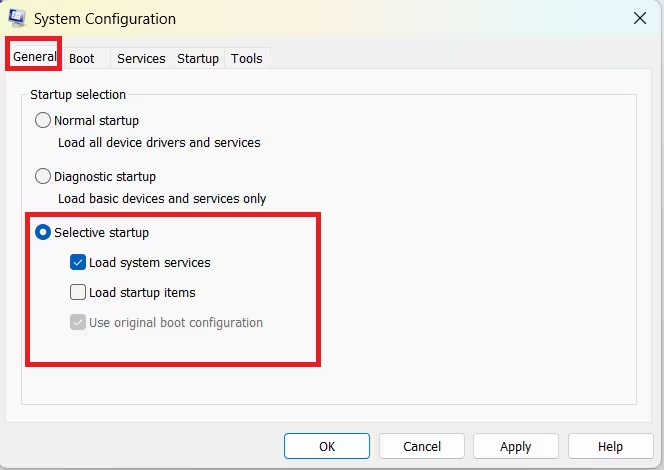
- Make sure Load system services and Use original boot configuration remain checked.
Step 2: Disable Third-Party Services
- Switch to the Services tab.
- Check Hide all Microsoft services at the bottom.
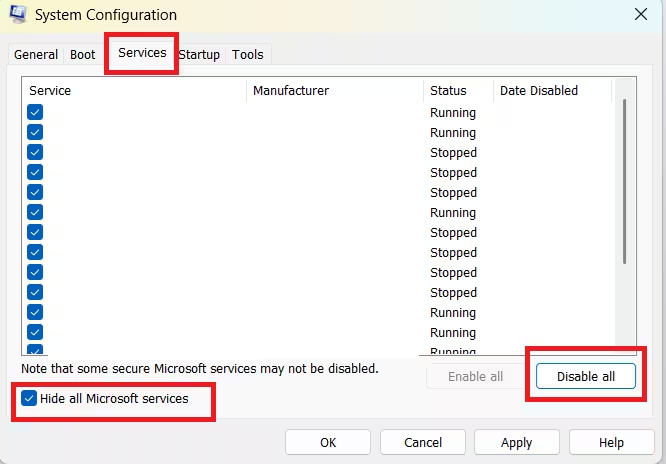
- Click Disable all.
Step 3: Disable Startup Items
- Switch to the Startup tab and click Open Task Manager.
- Right-click each startup item and select Disable.
- Close Task Manager.
- Click OK in the System Configuration window.
Step 4: Restart and Install
- Restart your PC. Windows starts in Clean Boot state.
- Run the HP Support Assistant installer as administrator.
- Check whether the installation completes.
If it succeeds, re-enable the disabled services one at a time and restart after each to find the one causing the conflict. Once you identify it, leave it disabled or check for an update for that program.
To restore normal startup after troubleshooting:
- Open
msconfig - On the General tab, select Normal startup.
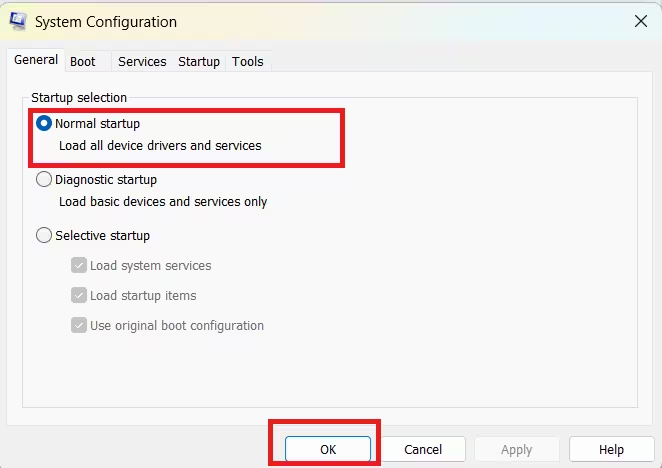
- Click OK and restart.
Additional Notes
- Windows S Mode: HP Support Assistant does not support Windows in S mode. If your PC runs Windows 11 in S mode, use Windows Update to check for driver and software updates instead.
- ARM processors: HP Support Assistant does not support devices with ARM-based processors. If your PC uses an ARM chip, the app will not install regardless of the steps above.
- Business PCs: If you need driver and software updates for an HP business PC, use HP Image Assistant instead of HP Support Assistant.
- Still stuck: If none of the fixes above work, visit the HP Support Assistant help page for additional guidance and support options from HP.
Most HP Support Assistant installation failures on Windows 11 come down to three things: a leftover corrupted install, a bad installer file, or something blocking the setup in the background. Removing the old installation cleanly and running a fresh installer as administrator fixes the problem for most users. If that does not work, disabling antivirus temporarily or running the installer in Clean Boot state will isolate whatever is interfering. Once HP Support Assistant installs successfully, it keeps your HP drivers and firmware updated automatically so you avoid these kinds of issues going forward.

