The KMODE_EXCEPTION_NOT_HANDLED error is a Blue Screen of Death (BSOD) with Stop Code 0x1E. It appears when a kernel-mode process or driver throws an exception that Windows cannot resolve, forcing the system to crash to prevent data corruption or further instability.
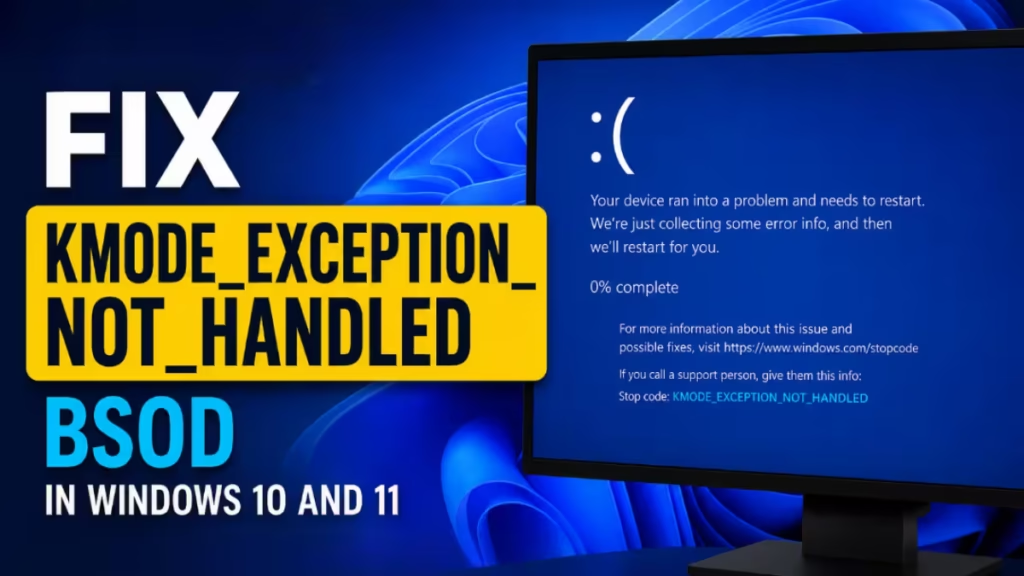
The most frequent causes are buggy or outdated drivers, faulty RAM, corrupted system files, conflicting third-party security software, and in some cases, outdated BIOS firmware or failing storage hardware. The error can appear at boot, mid-session, or during a Windows installation.
This guide covers every confirmed fix in priority order, starting with the safest and fastest steps.
Before you start: Note any driver filename shown on the blue screen (for example, nvlddmkm.sys, ntfs.sys, or ntoskrnl.exe). That filename is your first diagnostic lead and will help you target the right driver. Also collect any minidump files from C:\Windows\Minidump if you can access them.
Do this first: Boot into Safe Mode before working through the fixes below. Safe Mode loads only the minimum required drivers. If your system stays stable in Safe Mode, a third-party driver or service is almost certainly responsible. To enter Safe Mode, force three interrupted boots by powering off during the Windows loading screen, then go to Advanced Options > Troubleshoot > Startup Settings and press F4.
What Causes KMODE_EXCEPTION_NOT_HANDLED?
The Windows kernel and kernel-mode drivers run with elevated system privileges. When a driver attempts an invalid memory access, uses a bad pointer, or executes an illegal instruction, the kernel receives an exception. If the kernel cannot handle that exception, Windows issues this BSOD.
Common causes include:
- Outdated, corrupted, or mismatched device drivers (graphics, network, storage, chipset)
- Third-party antivirus suites, VPN clients, or disk encryption tools with kernel-level drivers
- Faulty or improperly seated RAM
- Corrupted Windows system files
- Fast Startup preloading broken drivers on every boot
- Failing SSD or HDD causing file-system faults
- Outdated BIOS/UEFI firmware incompatible with current hardware or Windows version
- Overclocked memory (XMP profiles) creating instability
- The Esportal anti-cheat driver (EspoDriver.sys) on CS:GO systems
How to Fix KMODE_EXCEPTION_NOT_HANDLED
Fix 1: Disable Fast Startup
Fast Startup keeps a cached system state so Windows loads faster from shutdown. If a broken driver is part of that cached state, Windows reloads the error on every boot. Disabling Fast Startup often stops the BSOD loop immediately.
- Open Control Panel and go to System and Security > Power Options.
- Click Choose what the power buttons do.
- Click Change settings that are currently unavailable.
- Uncheck Turn on fast startup.
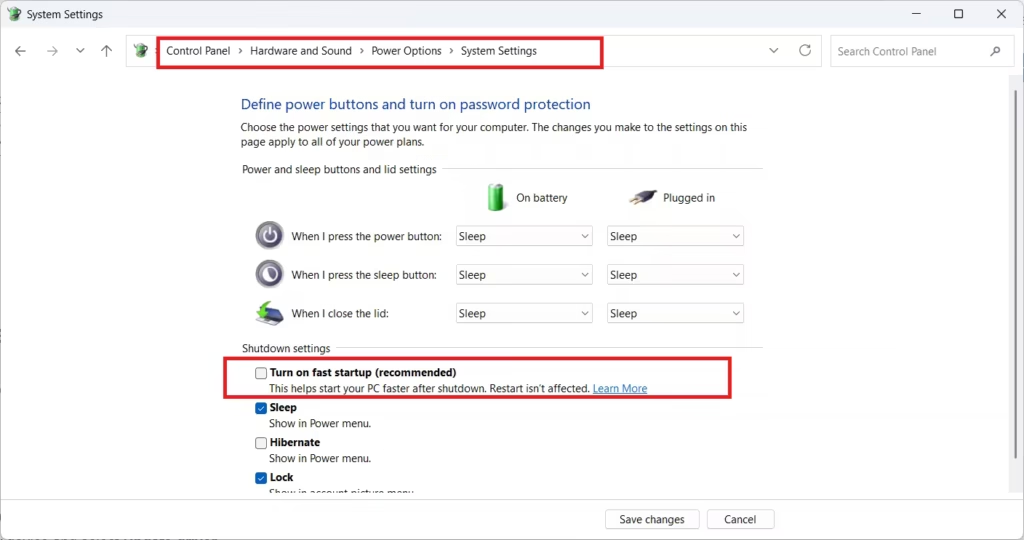
- Save changes and restart your PC.
Fix 2: Update or Roll Back Problem Drivers
Outdated or mismatched drivers are the most common trigger for this BSOD. Prioritize graphics, network, storage, and chipset drivers first.
To update drivers:
- Press Windows + X and open Device Manager.
- Right-click any device and select Update driver.
- Select Search automatically for drivers.
- If Windows finds nothing new, visit the hardware manufacturer’s website and download the latest driver manually.
To roll back a driver (if the BSOD started right after a recent driver update):
- Open Device Manager and locate the affected device.
- Right-click it and go to Properties > Driver tab.
- Click Roll Back Driver.
If any device shows a yellow warning icon or appears as Unknown Device, that driver is likely missing or corrupted. Right-click it, open Properties > Details, copy the Hardware ID, search online to identify the device, and install the correct driver.
Fix 3: Clean Reinstall GPU Drivers with DDU
If a graphics driver filename appears on the BSOD (for example, nvlddmkm.sys for NVIDIA or an AMD driver file), a standard driver update may not be enough. DDU performs a complete clean removal of all GPU driver files before you reinstall fresh ones. This fix is also effective when the KMODE error appears during a Windows 11 upgrade, where AMD or NVIDIA drivers can conflict with the installation process.
- Boot into Safe Mode (see the “Do this first” step above).
- Download Display Driver Uninstaller (DDU) from the official Guru3D website.
- Open DDU and select your GPU type from the Select device type dropdown.
- Click Clean and restart.
- After your PC reboots, download and install the latest GPU driver directly from the NVIDIA, AMD, or Intel website.
Fix 4: Uninstall Third-Party Security Software
Antivirus suites, VPN clients, disk encryption tools, and file-system filter drivers run at the kernel level. A poorly coded kernel driver from any of these programs can conflict directly with Windows and cause KMODE exceptions. McAfee is a confirmed culprit, but other third-party security products can trigger the same issue.
- Open Settings > Apps > Installed Apps.
- Uninstall any recently added antivirus, VPN software, system optimizer, or disk encryption tool.
- Restart and test.
To confirm a conflict before uninstalling: Boot with early launch anti-malware (ELAM) protection disabled for one session.
Go to Settings > System > Recovery, click Restart now next to Advanced startup, then navigate to Troubleshoot > Startup Settings > Restart and press 8 or F8 to disable ELAM. If the KMODE error disappears in that session, your antivirus driver is the cause. Uninstall it and switch to Windows Defender or a compatible alternative.
Fix 5: Run SFC and DISM to Repair System Files
Corrupted Windows system files can cause kernel exceptions. System File Checker and DISM repair those files without requiring a reinstall.
- Press Windows + S, type cmd, right-click Command Prompt, and select Run as administrator.
- Run SFC and wait for it to finish:
sfc /scannow- If SFC reports unfixable errors, run DISM next:
DISM /Online /Cleanup-Image /RestoreHealth- Restart your PC after both tools complete.
Fix 6: Test RAM and Replace Faulty Sticks
Faulty RAM is one of the most frequently cited causes of kernel exceptions. Run a memory check even if the BSOD message does not specifically mention memory.
Run Windows Memory Diagnostic:
- Press Windows + S and search for Windows Memory Diagnostic.
- Click Restart now and check for problems.
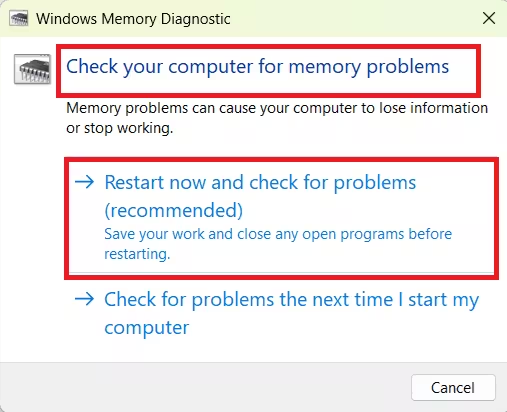
- Your PC will reboot and run the scan automatically.
For a more thorough test, download Memtest86 (free) and run it overnight with multiple passes.
If errors appear:
- Reseat both RAM sticks first and retest.
- If errors persist, remove one stick and boot with only the other installed. Test for 10 to 15 minutes. Swap sticks and repeat.
- The stick that causes the error when present is the faulty one. Replace it.
On dual-channel systems, a single failing stick can cause the KMODE error within minutes of every boot. Running on one good stick is a temporary workaround while you order a replacement.
Fix 7: Check Storage Health and Run CHKDSK
Failing drives or corrupted file systems can surface as kernel exceptions, particularly during file-system operations.
Run CHKDSK:
- Open Command Prompt as administrator.
- Run the following (replace
C:with your OS drive letter if different):
chkdsk C: /f /r- If prompted to schedule the scan on reboot, press Y and restart.
Check drive SMART health:
Download CrystalDiskInfo (free) or use your SSD/HDD manufacturer’s official diagnostic tool. Any failing SMART attributes mean the drive is degrading and needs replacement.
Fix 8: Disable Overclocking and Reset XMP Profiles
Aggressive XMP memory profiles and CPU or GPU overclocks create instability that can trigger kernel exceptions. The system may appear stable under light loads but crash during gaming or heavy workloads.
- Restart your PC and press the BIOS key (commonly Del, F2, or Esc) during POST to enter BIOS settings.
- Find Load Optimized Defaults (or equivalent) and apply it.
- Save and exit.
This disables XMP and resets all overclocks to stock settings. If the crashes stop, your previous memory timings or CPU settings were the cause. Reconfigure them one step at a time if you want to restore performance.
Fix 9: Uninstall Esportal and Delete EspoDriver.sys (CS:GO Players Only)
If you play Counter-Strike: Global Offensive and use the Esportal platform, the kernel driver EspoDriver.sys is a confirmed cause of KMODE_EXCEPTION_NOT_HANDLED, particularly on Windows 11. You must uninstall Esportal before deleting the driver file because the driver is actively in use while Esportal is installed.
- Press Windows + R, type
appwiz.cpl, and press Enter. - Find Esportal in the list, right-click it, and select Uninstall.
- Complete the uninstallation.
- Navigate to
C:\WINDOWS\System32\drivers\and delete EspoDriver.sys. - Restart your PC.
You need an administrator account to delete the file from the drivers directory.
Fix 10: Update Your BIOS/UEFI Firmware
An outdated BIOS can cause driver fleet crashes at the kernel level, especially after hardware changes or Windows feature updates. Most major motherboard manufacturers have released firmware fixes for this type of KMODE instability.
Important: A BIOS update carries real risk. An interrupted or incorrect flash can make your motherboard unbootable. Follow your manufacturer’s documentation exactly and perform the update only on a stable power connection.
General BIOS update steps:
- Format a USB flash drive to FAT32.
- Visit your motherboard manufacturer’s website (ASUS, MSI, Gigabyte, ASRock, or your laptop maker’s support page) and download the latest BIOS for your exact board model and revision.
- Copy the BIOS files to the USB drive according to the manufacturer’s instructions.
- Restart your PC and press the BIOS key to enter BIOS settings.
- Look for a BIOS Update, Q-Flash, EZ-Flash, or M-Flash option and follow the on-screen instructions.
Always download the correct BIOS revision for your specific motherboard. Never flash a BIOS file intended for a different model.
Fix 11: Perform a Repair Install or Clean Install of Windows
If all previous fixes have failed and hardware checks return no faults, corrupted Windows dependencies may be the root cause. A repair install refreshes all system files while keeping your personal files, installed apps, and settings intact.
If nothing else works, analyze your minidumps first: Download BlueScreenView or WhoCrashed (both free), point either tool at C:\Windows\Minidump, and check which driver or module appears as the likely cause. Use that result to target one more specific driver fix before committing to a reinstall.
Repair install:
- Download the Windows Media Creation Tool from Microsoft’s official website.
- Run the tool and choose Upgrade this PC now.
- Select Keep personal files and apps when prompted.
- Let the installation complete.
Clean install (last resort): This wipes the OS drive completely. Use this only if the repair install fails or every other fix has been exhausted.
Important: If Windows crashes during installation or the file-copying phase, the problem is hardware, not the OS. A clean install cannot fix failing RAM, a corrupted NVMe controller, or a bad BIOS. Return to hardware diagnostics in that case.

