Windows 11 does not include a single toggle to turn on mouse click sounds. Instead, you can get audio feedback for clicks through three working methods: Windows Sound Settings, an AutoHotkey script, or a lightweight third-party app. This guide covers all three so you can pick the one that fits your setup.
Method 1: Enable Mouse Click Sound in Windows 11 via Sound Settings
Windows 11 Sound Settings let you attach audio cues to system events that fire on mouse clicks and navigation actions. This is the quickest method and requires no extra software.
- Press Win + I to open Windows Settings.
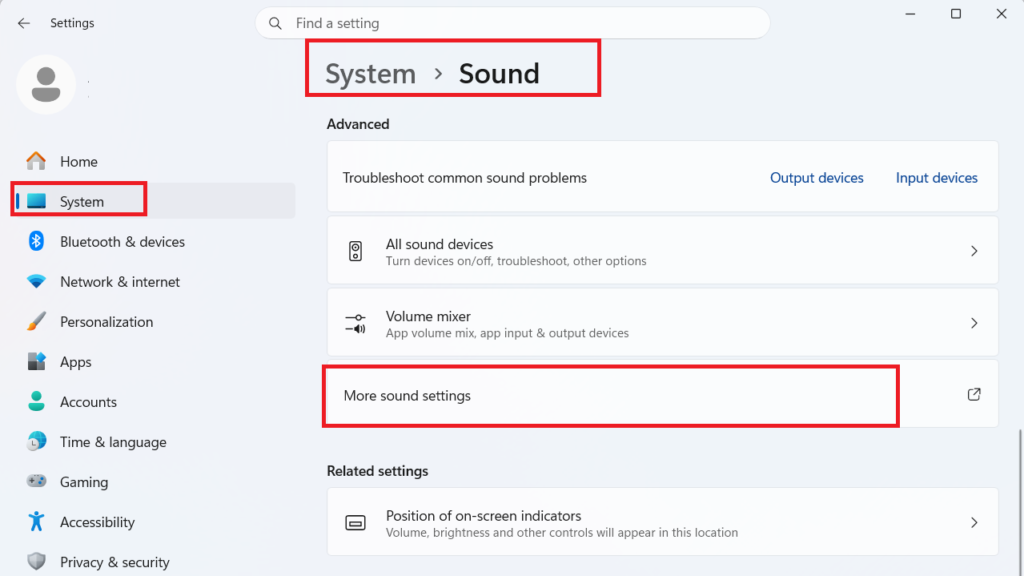
- Click System, then click Sound.
- Scroll down and click More sound settings.
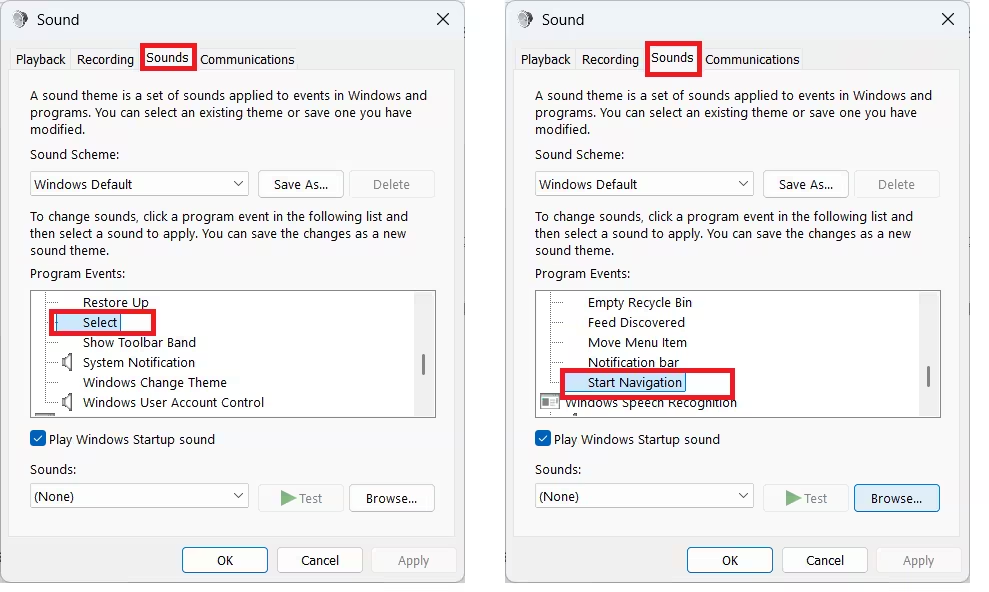
- In the Sound dialog, select the Sounds tab.
- Under Program Events, scroll to the Windows section and locate these two events:
- Select — plays when you select or click items.
- Start Navigation — plays when you open files or folders in File Explorer.
- Click Select first, then open the Sounds dropdown and pick a sound such as Windows Navigation Start.wav. Click Browse to load a custom
.wavfile instead.
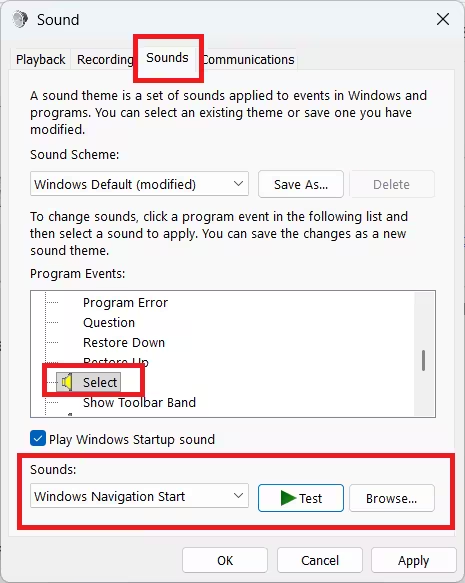
- Click Test to preview the sound.
- Repeat steps 5 and 6 for Start Navigation.
- Click Apply, then OK.
You can also assign sounds to other events like Open Program, Close Program, Maximize, or Minimize for a more personalized experience.
Windows now plays your chosen sound whenever you select or navigate items with your mouse.
Note: This method covers Select and Navigation events, not every single mouse click. For a click sound on every left-button press, use Method 2 or Method 3 below.
Method 2: Use AutoHotkey to Play Sound on Every Click
AutoHotkey is a free scripting tool that lets you trigger a sound file every time you press the left mouse button. This method covers all clicks, not just menu events.
Step 1: Install AutoHotkey
- Go to autohotkey.com and download the latest installer.
- Run the installer and complete the setup with default settings.
Step 2: Create the Click Sound Script
- Right-click your desktop and select New > AutoHotkey Script. If this option does not appear, create a new text file and rename it with a
.ahkextension. - Right-click the file and choose Edit Script (or open it in Notepad).
- Delete any default content and paste the following:
~LButton::SoundPlay("C:\Windows\Media\Windows Navigation Start.wav")- Save and close the file.
- Double-click the
.ahkfile to activate the script.
Every left mouse click now plays the assigned sound. To use a different sound, replace the file path with the full path to any .wav file on your PC.
Tip: Keep the
~at the start of~LButton. This lets the normal click action pass through so your mouse still works as expected.
Step 3: Run the Script at Startup (Optional)
To make the click sound work automatically every time Windows starts:
- Press Win + R, type
shell:startup, and press Enter. - Copy your
.ahkscript file into this folder.
Windows loads the script automatically on every boot.
Method 3: Use a Third-Party Click Sound App
If scripting is not your preference, dedicated apps handle mouse click sounds with a simple installer and a settings panel. Search for “mouse click sound Windows 11” on trusted software sites such as MajorGeeks, Softpedia, or SourceForge. Look for tools that are lightweight, do not require admin access to run, and support custom .wav files so you can swap sounds later.
Most of these apps run silently in the system tray and let you:
- Adjust click sound volume independently from system volume
- Assign different sounds to left click, right click, and middle click
- Toggle sounds on and off with a hotkey
Which Method Should You Use?
| Method | Covers Every Click | Requires Extra Software |
|---|---|---|
| Windows Sound Settings | Select and Navigation events only | No |
| AutoHotkey Script | Every left click | Yes (free) |
| Third-Party App | All mouse buttons | Yes (free options available) |

