A drive failure, a failed update, or a malware infection can wipe out your Windows setup in seconds. A full backup protects you from that. It does not just save your documents and photos. It captures your entire PC exactly as it is right now. If something goes wrong later, you can put everything back the way it was without reinstalling Windows or your apps from scratch.
Windows 11 still has a built in way to do this, even though Microsoft has stopped actively developing it. This guide covers three ways to back up your PC to an external USB drive, when to use each one, and how to restore your system if you ever need to.
What You Need Before You Start
Gather these before you start, so the backup does not fail partway through.
- An external USB hard drive or a secondary internal drive. Do not use a USB flash drive (also called a thumb drive). It is too slow, and Windows blocks it for this type of backup.
- A drive formatted as NTFS.
- Enough free space on the drive. Aim for at least 1.5 times the storage currently used on your system drive.
- Your BitLocker recovery key, if your main drive is encrypted. BitLocker is a Windows feature that locks your drive with a password.
- A computer that stays powered on for the whole backup. Do not let a laptop run out of battery mid-backup.
Method 1: Create a Full Backup of Windows 11 Using System Image Backup
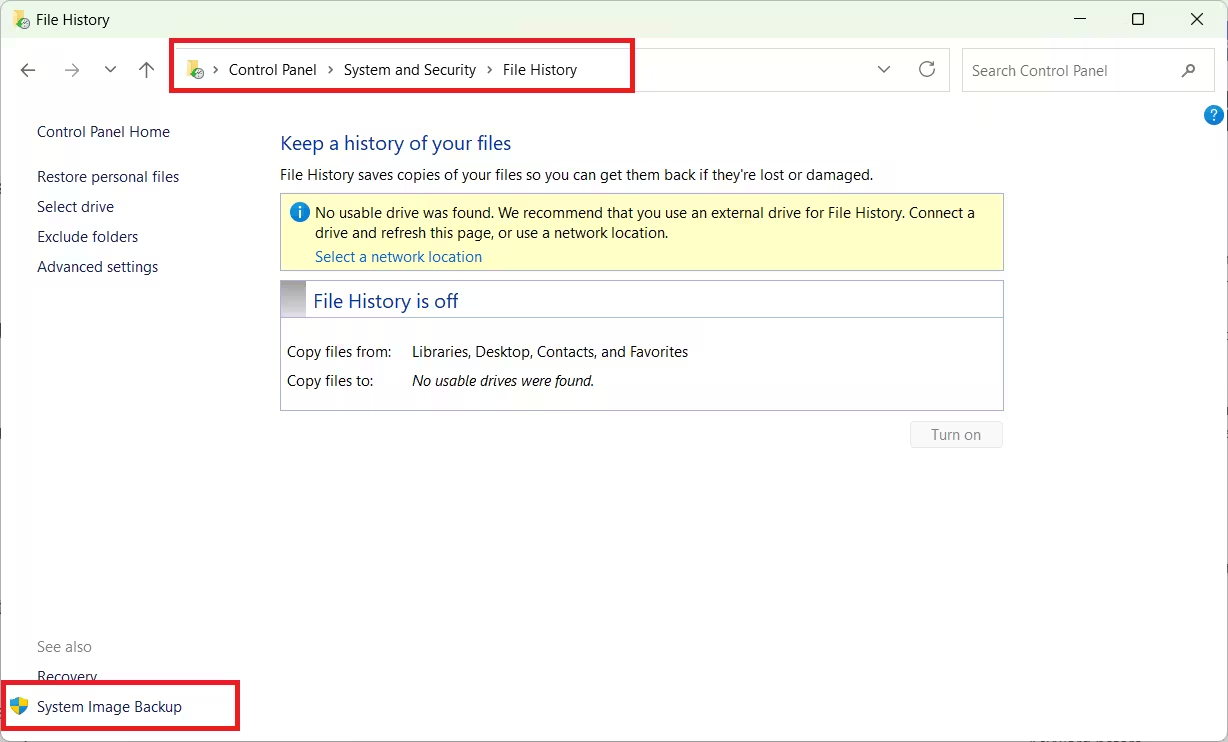
This is the main built in option for a complete backup. This is a different feature from the modern File History tool covered in Method 3, so do not confuse the two, even though you reach it through a section also named File History in Control Panel.
- Open Start.
- Search for Control Panel and open it.
- Select System and Security.
- Select File History.
- Select System Image Backup in the left pane.
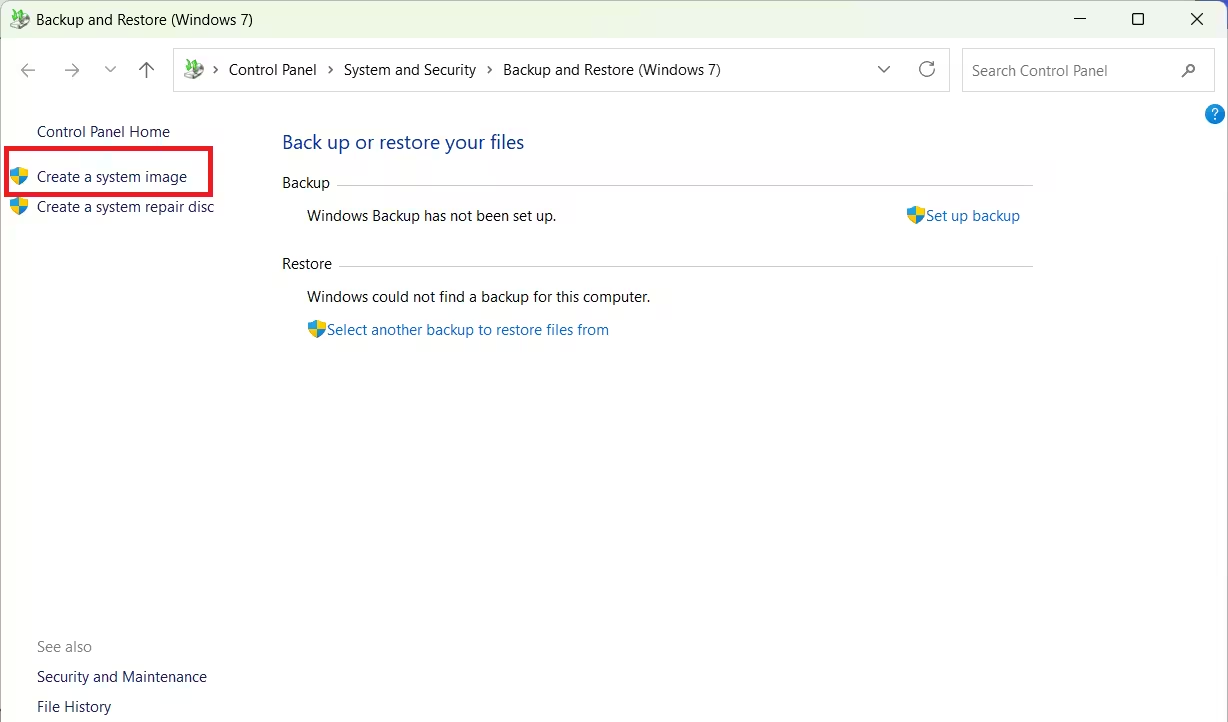
- Select Create a system image.
- Select On a hard disk.
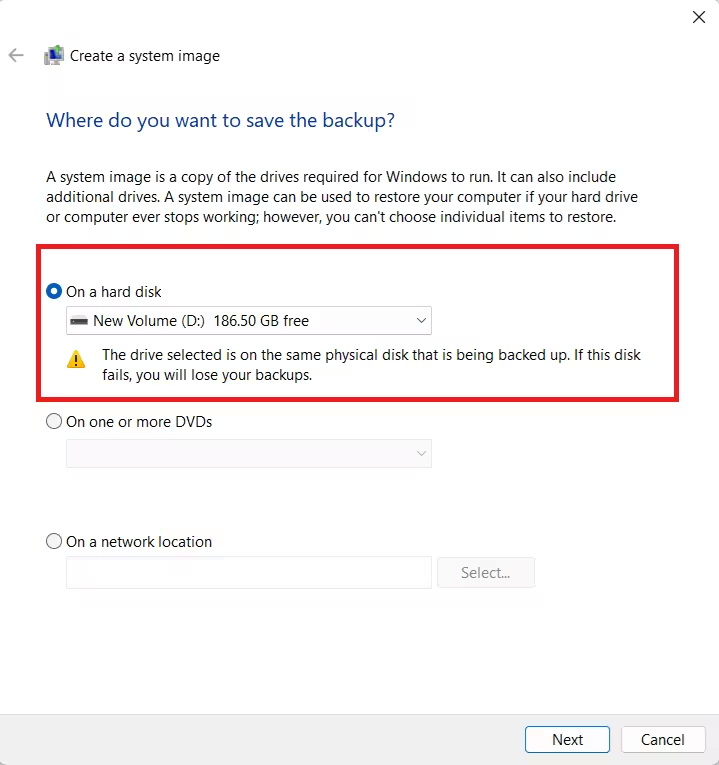
- Choose your external USB drive from the dropdown menu.
- Select Next.
- Select any extra drives you want included in the backup, if you have more than one.
- Select Next again.
- Select Start backup.
- Select No when Windows asks about creating a system repair disc.
- Select Close once the backup finishes.
You can safely skip the repair disc. A Windows 11 installation USB gets you to the same recovery tools later if you ever need them.
Windows now has a full copy of your operating system, apps, settings, and personal files sitting on the external drive.
This process relies on a Windows feature called Shadow Copy, which lets Windows back up files even while they are open and programs are running. You can keep using your PC normally while the backup runs in the background.
Expect the backup to take anywhere from 20 minutes to several hours. The exact time depends on:
- How much data is on your PC
- How fast your internal storage is
- How fast your USB connection is
Method 2: Create a Full Backup of Windows 11 Using the wbAdmin Command
If you would rather skip the Control Panel menus, the wbAdmin command creates the same type of full backup directly from Command Prompt.
- Open Start.
- Search for Command Prompt.
- Right click the top result.
- Select Run as administrator. This gives Command Prompt permission to make system level changes, which the backup command needs.
- Run this command, replacing
E:with your actual external drive letter:
wbAdmin start backup -backupTarget:E: -include:C: -allCritical -quiet- To include more than one drive in the same backup, use this version instead, replacing the letters with your own drives:
wbAdmin start backup -backupTarget:E: -include:C:,D:,F: -allCritical -quietOnce the command finishes, the backup is saved to your chosen drive. It works exactly like the Control Panel version, so you can restore from either one using the same steps later.
Method 3: File History for Personal Files Only
System Image Backup and wbAdmin both create a full copy of your entire system. If you only care about protecting personal files like documents, photos, and videos, and do not need a way to restore Windows itself, File History is a lighter option.
- Open Settings.
- Select Privacy & security.
- Select Backup.
- Find File History.
- Connect your external drive and select Add a drive.
- Turn on Automatically back up my files.
- Select More options to choose how often backups run and which folders are included.
File History keeps multiple saved versions of your files. If a file gets damaged, deleted, or overwritten, you can recover an older copy. It does not back up installed apps or Windows settings. Use it alongside System Image Backup or wbAdmin, not as a replacement for either one.
How to Restore a Full Backup on Windows 11
Connect the drive holding your backup along with a Windows 11 bootable USB drive, then follow these steps.
- Start the computer and press any key at the USB boot prompt.
- Select Next on the Windows Setup screen.
- Select Next again.
- Select Repair my PC.
- Select your keyboard layout.
- Select Troubleshoot.
- Select Advanced options.
- Select See more recovery options.
- Select System Image Recovery.
- If your drive is encrypted with BitLocker, enter your BitLocker recovery key.
- Select Continue.
- Choose the Windows 11 entry.
- Select Use the latest available system image.
- Select Next.
- Select Next again to confirm the settings.
- Select Finish.
- Select Yes to confirm.
Windows restores the operating system, apps, settings, and files exactly as they were at the time of the backup.
If you restored to a larger new drive, you may notice extra free space that is not yet part of any partition. Windows calls this unallocated space. For example, say your old drive was 500GB and the new one is 1TB. You will have roughly 500GB sitting unused until you create a new partition with it.
Do not interrupt the restore once it starts. A failed restore can leave the PC unable to boot. Keep a laptop connected to power during the restore, and use a UPS (a battery backup device) for a desktop if you have one.
After Restoring a Full Backup on Windows 11
Your restored system may be missing updates released after the backup date. Catch up with these steps:
- Open Settings.
- Go to Windows Update.
- Select Check for updates.
Keep in mind that a system image only reflects your PC at the exact moment you created it. If you back up on Monday and save a new file on Wednesday, that file will not be part of the backup if you restore later. Build a regular backup schedule, especially before big system changes, so you always have a recent version to fall back on.
Do You Need a Full System Image, or Just File Backup?
A full system image is not meant to be your only backup strategy. For everyday protection against accidental deletion or file corruption, cloud sync tools or File History cover more ground with less effort. A full system image earns its place right before something risky, such as an SSD upgrade, a major Windows update, or replacing a failing drive. In those moments, it lets you get your entire setup back quickly instead of rebuilding it piece by piece.
Third party imaging tools such as Macrium Reflect and Veeam are worth a look if you back up often. They offer more scheduling options, and some support incremental backups, which only save the changes made since your last backup instead of a full copy every time. This can save time and storage space, but it is not required to follow the steps in this guide.
Frequently Asked Questions
Does Windows 11 have a built in backup tool?
Yes. Windows 11 gives you a few options: System Image Backup (through Backup and Restore) for a full copy of your entire PC, File History for personal files, and Windows Backup for saving settings and app data to the cloud. You can also use OneDrive or backup software made by other companies.
What is the difference between a system image and a regular file backup?
A system image copies your entire PC, including Windows itself, installed apps, and settings, so you can restore everything at once. A regular file backup, like File History or OneDrive, only protects your personal files and does not let you restore Windows or your apps.
Can I save a Windows 11 backup to a USB flash drive?
No. System Image Backup needs an external USB hard drive or a secondary internal drive. Flash drives are too slow and are not supported by the feature.
How often should I create a full backup?
Once a week is a reasonable baseline, or right before a major change like a feature update, an SSD swap, or a drive replacement. Back up critical personal files more often than that, ideally daily, using File History or cloud sync.
Can I restore a backup to a different computer?
No. You can restore a system image to a new drive inside the same computer, but not to a different machine, since the hardware configuration will not match.
Why does my external drive show as incompatible with System Image Backup?
This happens when the drive uses a file system other than NTFS. A file system is the format Windows uses to organize data on a drive, and common ones include NTFS, FAT32, and exFAT. System Image Backup only works with NTFS, so reformat the drive as NTFS before using it for a system image.
Is System Image Backup going away on Windows 11?
Microsoft has stopped actively developing it and could remove it in a future update. For now, it still works on current versions of Windows 11 and remains a reliable option for a full backup.

