Microsoft has not released Windows 11 26H2 through the official download page yet, but you can build a bootable USB drive right now using three methods: Rufus, Ventoy, or Command Prompt. All three rely on a Windows 11 26H2 ISO that you build yourself using UUP Dump, since Microsoft’s Media Creation Tool is not yet available for this preview release.
Rufus is the easiest option for most users and includes hardware bypass options. Ventoy suits users who want to store multiple ISO files on a single drive and switch between them at boot. Command Prompt works without any third-party tools and is suited for advanced users who prefer a manual approach.
Back up your PC before you begin. Preview builds are not final software, and a backup gives you a fast recovery path if anything goes wrong.
What You Need Before Starting
- A Windows PC to run the UUP Dump conversion script
- At least 70 GB of free disk space for the script to download and package the build files
- A reliable internet connection
- A USB drive with at least 8 GB of storage
- A Windows 11 26H2 ISO file (covered in Steps 1 and 2 below)
Check the Windows 11 26H2 system requirements before you start if you are unsure whether your target device supports the update. You can also run the Windows 11 26H2 Compatibility Checker Tool to get a quick answer.
Step 1: Download Windows 11 26H2 ISO Using UUP Dump
All three methods below require a Windows 11 26H2 ISO file. UUP Dump pulls Windows Update Package files directly from Microsoft’s servers and packages them into an ISO. No third-party files enter the image.
- Open your browser and go to uupdump.net.
- Click the Dev Channel button on the homepage, or type
category:devin the search bar and press Enter. This filters the list to show the latest Windows 11 Insider Preview releases.
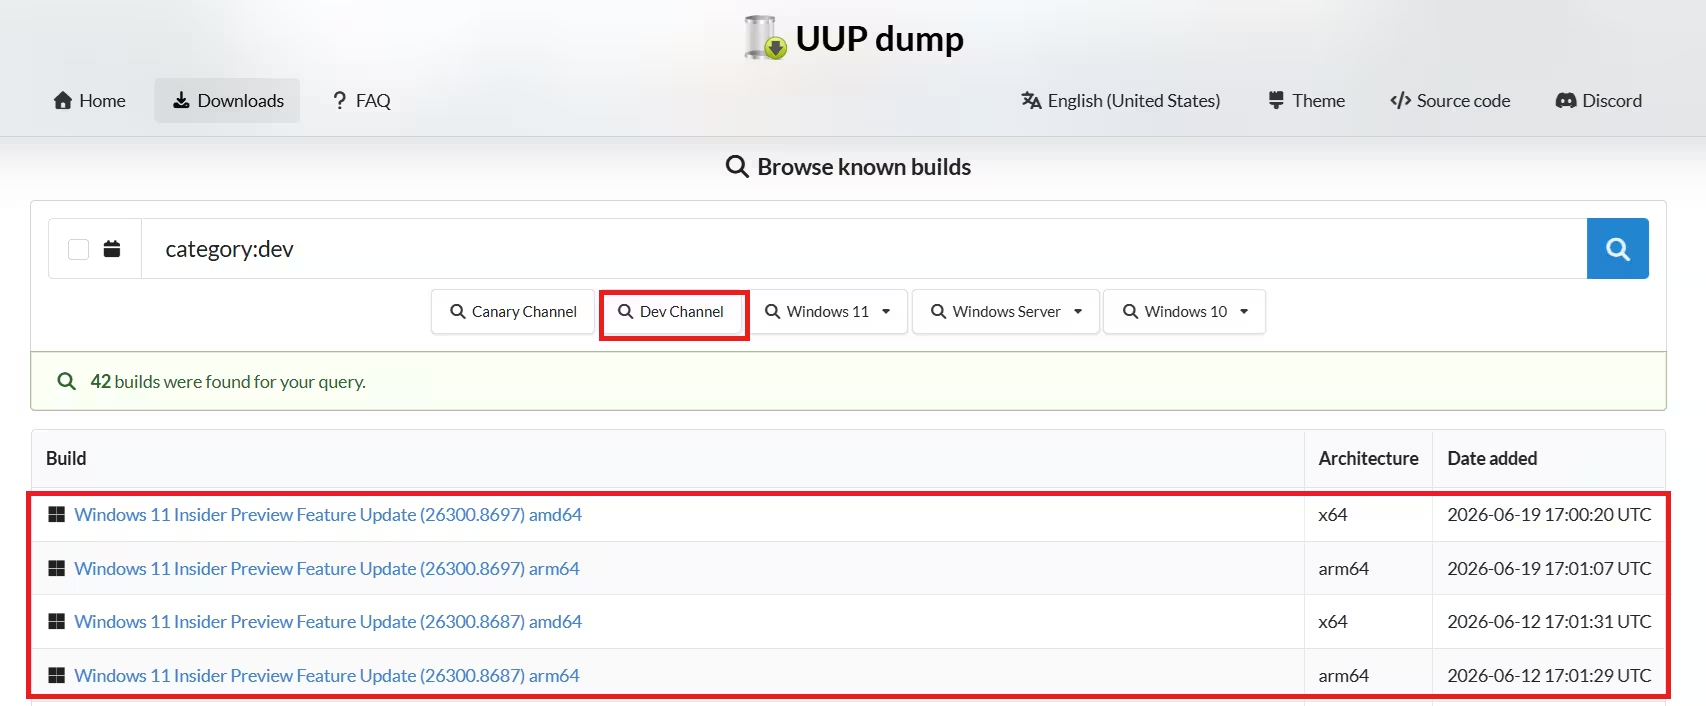
- From the results list, select the latest Windows 11 Insider Preview Feature Update (26300.xxxx) amd64 entry. Always pick the entry with the higher build number.
Note: If your device uses an ARM processor or qualifies as a Copilot+ PC, select the arm64 entry instead of amd64.
- Choose your language from the Language dropdown, then click Next.
- Select the Windows 11 editions you want in the ISO (Home, Pro, or both), then click Next.
- Under Download method, select Download and convert to ISO.
- Check Include updates (Windows converter only). This tells the script to integrate the latest updates and produces a proper 26H2 ISO.
- Click Create download package. UUP Dump saves a small ZIP file to your PC.
Step 2: Run the Conversion Script
- Open the downloaded ZIP file in File Explorer.
- Click Extract all, choose a destination folder, then click Extract.
- Inside the extracted folder, right-click uup_download_windows.cmd and select Run as administrator.
- If Windows SmartScreen blocks the file, click More info then Run anyway.
- When the Command Prompt window prompts you, press R then Enter to run the script.
The script downloads the 26H2 build files from Microsoft’s servers. This step takes 20 to 60 minutes depending on your internet speed. Do not close the window while it runs.
- After the download and conversion finish, press 0 to close the script window.
The completed Windows 11 26H2 ISO file appears inside the folder where you extracted the UUP Dump tool.
Troubleshooting: If the script fails partway through, right-click Remove_Failure_MountDr_TempDir.cmd in the same folder and select Run as administrator. After that process finishes, run the UUP Dump script again from Step 3 above.
Method 1: Create Bootable USB with Rufus
Rufus is the fastest and most straightforward option. It handles partitioning, formatting, and writing the ISO in one pass, and it offers bypass options for devices that do not meet Windows 11 hardware requirements.
- Open rufus.ie and download the latest version from the Download section.
- Double-click the rufus.x.xx.exe file to launch the tool.
- Plug in your USB drive. Rufus detects it automatically. Confirm the correct drive appears under the Device dropdown before you continue.
- Click Select, browse to the Windows 11 26H2 ISO file you created in Step 2, then click Open.
- Under Image option, select Standard Windows 11 Installation.
- Set Partition scheme to GPT.
- Set Target system to UEFI (non-CSM). Switch to MBR only if you are installing on an older BIOS-only system.
- In the Volume label field, enter a name such as Windows 11 26H2 Setup.
- Leave File system and Cluster size at their defaults.
- Check Quick format.
- Check Create extended label and icon files.
- Click Start.
After you click Start, Rufus displays a Windows User Experience dialog with bypass options.
If your hardware meets Windows 11 requirements: Clear all checked options and click OK.
If your hardware does not meet Windows 11 requirements: Check the options that apply to your device.
- Remove requirement for 4 GB+ RAM, Secure Boot, and TPM 2.0 bypasses the RAM, firmware signature, and Trusted Platform Module checks.
- Remove requirement for an online Microsoft account lets you create a local account during setup instead of signing in with a Microsoft account.
Click OK to confirm. Rufus warns you that all data on the USB drive will be erased. Click OK again to proceed. The writing process takes 5 to 10 minutes.
Method 2: Create Bootable USB with Ventoy
Ventoy works differently from Rufus. Instead of writing a single ISO directly to the drive, it installs a boot environment on the USB drive. You then copy one or more ISO files onto the drive and select which one to boot from at startup. This makes Ventoy a practical choice if you regularly test different Windows builds or need multiple ISOs on one drive.
- Open github.com/ventoy/Ventoy in your browser.
- Under the Assets section of the latest release, click ventoy-x.x.xx-windows.zip to download it.
Note: Your browser may flag the file as potentially harmful. Click Keep or Keep anyway to proceed.
- Open File Explorer and navigate to the downloaded ZIP file.
- Click Extract all, choose a destination folder, then click Extract.
- Open the extracted ventoy-x.x.xx folder.
- Double-click Ventoy2Disk.exe to launch the installer.
- Under the Device dropdown, select your USB drive.
- Click Install, then click OK to confirm. Ventoy formats the drive and installs its boot environment.
- After the installation finishes, open This PC in File Explorer.
- Open the Ventoy drive that now appears.
- Copy and paste your Windows 11 26H2 ISO file into the root of the Ventoy drive.
The USB drive is ready. When you boot a device from this drive, Ventoy displays a menu listing all ISO files on the drive. Select the Windows 11 26H2 ISO to start the installer.
Method 3: Create Bootable USB with Command Prompt
This method uses only built-in Windows tools. It requires more steps than Rufus or Ventoy but does not depend on any third-party software. Run all commands as administrator.
- Open Start, search for Command Prompt, right-click the top result, and select Run as administrator.
- Type the following command and press Enter to open Diskpart:
diskpart- Type the following command and press Enter to list all connected drives:
list disk- Identify your USB drive by its size. Type the following command and press Enter, replacing 1 with the disk number of your USB drive:
select disk 1Warning: Selecting the wrong disk will erase that drive. Double-check the disk number before continuing.
- Type the following commands one at a time, pressing Enter after each:
clean
create partition primary
select partition 1
format FS=NTFS quick
assign letter=X
exit
Replace X with any available drive letter you want to assign to the USB drive.
- Type the following command and press Enter to mount the Windows 11 26H2 ISO file, replacing the path with the actual location of your ISO:
PowerShell Mount-DiskImage -ImagePath "C:\path\to\Windows11-26H2.iso"- Type the following command and press Enter to reopen Diskpart:
diskpart- Type the following command and press Enter to find the drive letter assigned to the mounted ISO:
list volume- Note the drive letter of the mounted ISO (for example, E), then type the following command and press Enter to exit Diskpart:
exit- Type the following command and press Enter to switch to the ISO drive, replacing E with your ISO drive letter:
E:- Type the following command and press Enter to open the boot folder:
cd boot- Type the following command and press Enter to update the volume boot code for the USB drive, replacing X with your USB drive letter:
bootsect /nt60 X:- Type the following command and press Enter to return to the root of the ISO drive:
cd..- Type the following command and press Enter to copy all Windows 11 26H2 installation files to the USB drive, replacing E with your ISO drive letter and X with your USB drive letter:
xcopy E:\*.* X:\ /E /F /HThis step copies several gigabytes of files and takes several minutes to complete. After it finishes, your USB drive is ready for a clean install.es to complete. After it finishes, your USB drive is ready for a clean install.
How to Boot and Install Windows 11 26H2 from USB
You have two options once the USB drive is ready.
Clean install: Restart your PC and enter the BIOS or UEFI firmware settings. Most devices use F2, F12, Delete, or Esc during startup. Set the USB drive as the first boot device, save, and exit. Windows Setup launches from the USB drive and walks you through a fresh installation. This process wipes everything on the target drive, so back up your files first.
In-place upgrade: Keep your current Windows installation running. Open File Explorer, browse to the USB drive, and run setup.exe. This upgrades your system and keeps your files and installed apps in place.
Related Guides
- How to Download Windows 11 26H2 ISO File (Preview Build)
- How to Install Windows 11 26H2 Early Before the Official Release
- Windows 11 26H2 System Requirements: Is Your PC Compatible?
Frequently Asked Questions
Which method should I use: Rufus, Ventoy, or Command Prompt?
Use Rufus if you want the fastest and simplest experience, especially if your hardware does not fully meet Windows 11 requirements. Use Ventoy if you test multiple Windows builds or want to keep several ISO files on one drive. Use Command Prompt if you prefer not to install third-party tools and are comfortable with manual steps.
Do I need a product key to install Windows 11 26H2 from USB?
No. During setup, click “I don’t have a product key” and continue. Windows activates automatically if your device has a digital license linked to your Microsoft account or tied to your hardware.
Can I use this USB drive on multiple PCs?
Yes. The bootable USB works on any compatible device. Make sure each target PC meets the [Windows 11 26H2 system requirements](https://www.fdaytalk.com/windows-11-26h2-system-requirements/) or that you applied the correct bypass options in Rufus before writing the drive.
Will a clean install delete my files?
Yes. A clean install wipes everything on the target drive. Back up your data before you start. Running setup.exe from inside Windows performs an in-place upgrade and keeps your files and apps.
How do I know if my PC is compatible with Windows 11 26H2?
Run the [Windows 11 26H2 Compatibility Checker Tool](https://www.fdaytalk.com/windows-11-26h2-compatibility-checker-tool/) to check your hardware against the official requirements in seconds.
When does the official Windows 11 26H2 ISO come out?
Microsoft targets the second half of 2026, likely September or October. Once a stable build is ready, Microsoft will publish the official ISO on the Windows Insider Preview Downloads page. Until then, UUP Dump is the most reliable way to [download Windows 11 26H2 ISO](https://www.fdaytalk.com/how-to-download-windows-11-26h2-iso-file/) files directly from Microsoft’s servers.
What is the difference between GPT and MBR in Rufus?
GPT works with UEFI firmware, which all modern PCs use. MBR works with older BIOS-only systems. Use GPT and UEFI unless you are installing on legacy hardware that does not support UEFI boot.

