BitLocker encrypts your drive to protect data from unauthorized access. But there are real situations where you need it off: hardware repairs, BIOS updates, selling your PC, or fixing a BitLocker recovery key loop that triggers on every boot. This guide walks you through every working method to disable BitLocker on Windows 11, whether you run Home, Pro, or Enterprise.

Decryption takes time. Depending on drive size and speed, expect anywhere from 20 minutes to a couple of hours. Keep your PC plugged in and do not let it sleep during the process.
What You Need Before You Start
- Administrator access on the Windows 11 PC
- Your BitLocker recovery key if the drive is locked (check your Microsoft account at account.microsoft.com/devices/recoverykey)
- A power source connected (laptops especially)
Method 1: Turn Off Device Encryption (Windows 11 Home)
Windows 11 Home does not include the full BitLocker interface. Instead, it uses Device Encryption, which you control through Settings.
- Press
Win + Ito open Settings. - Go to Privacy and Security and click Device Encryption.
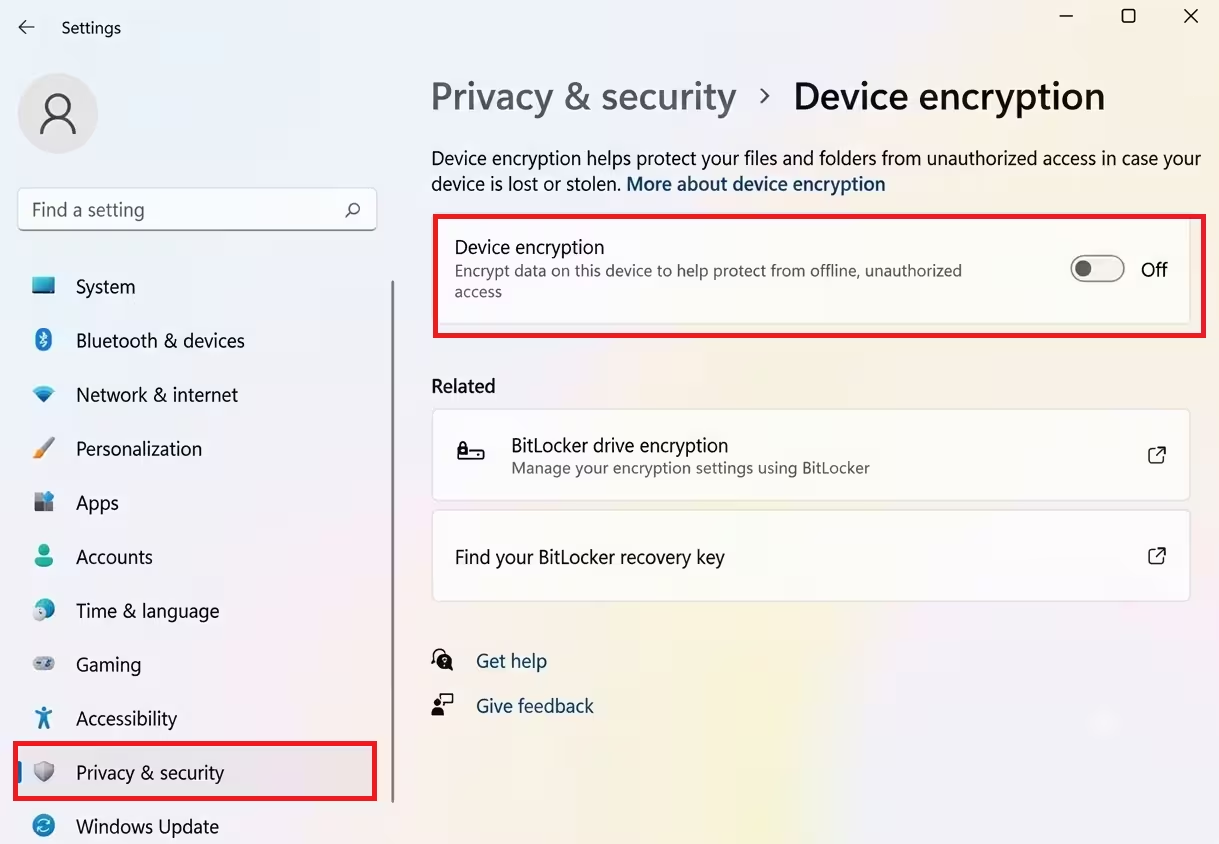
- Toggle Device Encryption to Off.
- Click Turn Off in the confirmation dialog.
Windows starts decrypting your drive immediately. A progress indicator appears at the top of the Device Encryption page. Wait for it to finish before restarting.
Method 2: Turn Off BitLocker via Control Panel (Windows 11 Pro and Enterprise)
This is the standard method for Pro and Enterprise editions.
- Click the Start button and type
Manage BitLockerin the search bar. - Click Open to launch the BitLocker Drive Encryption panel.
- Find the drive you want to decrypt (usually C:).
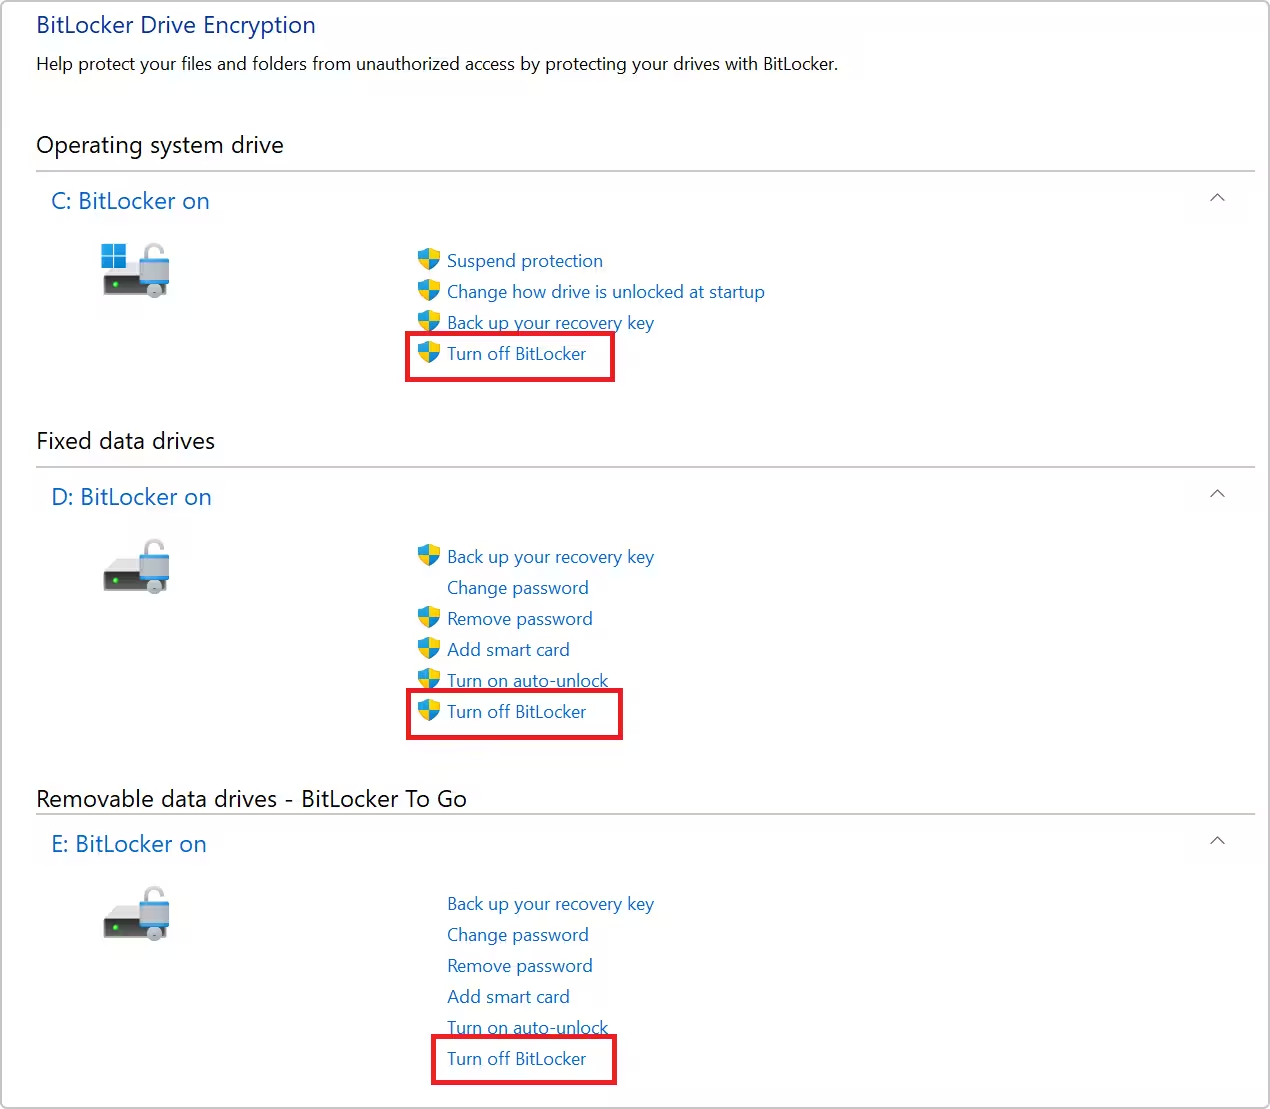
- Click Turn Off BitLocker under that drive.
- Click Turn Off BitLocker again in the confirmation prompt.
If the drive shows a locked status, click Unlock Drive first and enter your password or recovery key. After unlocking, follow the same steps above.
Windows begins decryption in the background. You can continue using your PC normally while this runs.
Method 3: Turn Off BitLocker from File Explorer
This is a quicker path if you prefer not to navigate the Control Panel.
- Open File Explorer with
Win + E. - Right-click the encrypted drive (look for the gold padlock icon on the drive letter).
- Click Manage BitLocker.
- Click Turn Off BitLocker in the panel that opens.
- Confirm by clicking Turn Off BitLocker.
Method 4: Disable BitLocker Using Command Prompt
Use this method when the Settings or Control Panel route fails, or when you need to decrypt a non-OS drive quickly.
- Press
Win + S, typecmd, right-click Command Prompt, and select Run as Administrator. - To check which drives have BitLocker active, run:
manage-bde -status- To turn off BitLocker on a specific drive, run:
manage-bde -off C:Replace C: with the letter of the drive you want to decrypt.
- To monitor decryption progress, run:
manage-bde -status C:The Conversion Status field changes from Decryption In Progress to Fully Decrypted once complete.
Method 5: Disable BitLocker Using PowerShell
PowerShell gives you more control, especially for managing multiple drives at once.
- Press
Win + S, typePowerShell, right-click Windows PowerShell, and select Run as Administrator. - To see all BitLocker-protected volumes, run:
Get-BitLockerVolume- To disable BitLocker on the C: drive, run:
Disable-BitLocker -MountPoint "C:"- To disable BitLocker on all drives at once, run:
Get-BitLockerVolume | Disable-BitLockerWatch the VolumeStatus field in the output. It changes from DecryptionInProgress to FullyDecrypted when done.
How to Suspend BitLocker Instead of Turning It Off
If you need to update your BIOS or run a firmware update, suspend BitLocker rather than fully disabling it. Leaving BitLocker active during a BIOS update wipes the keys stored in the TPM chip, which triggers a recovery key prompt on next boot.
- Open Manage BitLocker from the Start menu search.
- Click Suspend Protection next to your drive.
- Click Yes to confirm.
After the BIOS update, Windows automatically resumes BitLocker protection on the next restart. You do not need to re-enable it manually.
Fix: BitLocker Asking for Recovery Key on Every Boot
If BitLocker prompts for a recovery key after a repair, hardware change, or software update, follow these steps to stop the loop:
- Enter your recovery key to boot into Windows.
- Open Manage BitLocker from the Start menu.
- Click Suspend Protection, then immediately click Resume Protection.
This resets the TPM measurement baseline and clears the recovery key prompt. If the loop continues, check whether your BIOS needs an update. Skylake-era Intel systems especially require an up-to-date BIOS for BitLocker to work correctly with TPM 2.0.
Does Turning Off BitLocker Delete Your Files?
No, turning off BitLocker does not delete your files. Here is what actually happens when you disable it.
Data stays intact: Turning off BitLocker decrypts your drive but does not delete any files.
Recovery key matters: If you enabled BitLocker and your drive is locked, you need the recovery key to start decryption. Without it, the data on the drive is inaccessible.
One drive at a time: Each physical or logical drive has its own BitLocker setting. Turning off BitLocker on C: does not affect a secondary D: drive.
BIOS updates require suspension first: Always suspend BitLocker before updating firmware. This protects your TPM keys and prevents a recovery key prompt after the update.
Decryption runs in the background: Windows continues decrypting even while you work. Shutting down or sleeping the PC pauses progress, which resumes on the next boot.
Read More
- How to Fix HP BIOS Update BitLocker Recovery Loop on Windows 11
- Microsoft Has No Patch Yet for This BitLocker USB Attack. Do This Now
- YellowKey BitLocker Vulnerability (CVE-2026-45585) on Windows 11: What It Is and How to Fix It
- BitLocker Recovery Key Not Showing in Microsoft Account: How to Fix It
- BitLocker Vulnerability CVE-2026-27913 Lets Attackers Bypass Security – Fix Now

