A clean install of Windows 11 26H2 wipes the target drive and puts a fresh copy of the OS on it. This gives you a faster, cleaner system than an in-place upgrade and clears out years of accumulated software, registry clutter, and driver conflicts. This guide walks you through every step: downloading the 26H2 ISO, creating a bootable USB drive, booting into setup, and finishing the out-of-box experience.
Do you actually need a clean install? If your device already runs Windows 11 24H2 or 25H2, you do not need this guide. Microsoft delivers 26H2 to those versions as a small enablement package through Windows Update, similar to a monthly cumulative update. The process takes a few minutes and keeps your files, apps, and settings intact. A clean install is the right choice if your device runs Windows 11 23H2 or an earlier release, if you want a completely fresh start, or if your current installation has accumulated performance or stability problems over several years.
Warning: Back up your files to an external drive or cloud storage before you start. A clean install erases everything on the target drive permanently, and there is no recovery path once the process begins.
What You Need Before Starting
- A Windows PC to run the UUP Dump conversion script
- At least 70 GB of free disk space on that PC for the script to download and package the build files
- A reliable internet connection
- A USB drive with at least 8 GB of storage
- Rufus (free download from rufus.ie)
- 20 to 60 minutes for the ISO build, depending on your internet speed
Microsoft has not released Windows 11 26H2 through its official download page yet. The only way to get a clean 26H2 ISO right now is through UUP Dump, which pulls build files directly from Microsoft’s servers and packages them locally. No third-party files enter the image.
Step 1: Download the Windows 11 26H2 ISO Using UUP Dump
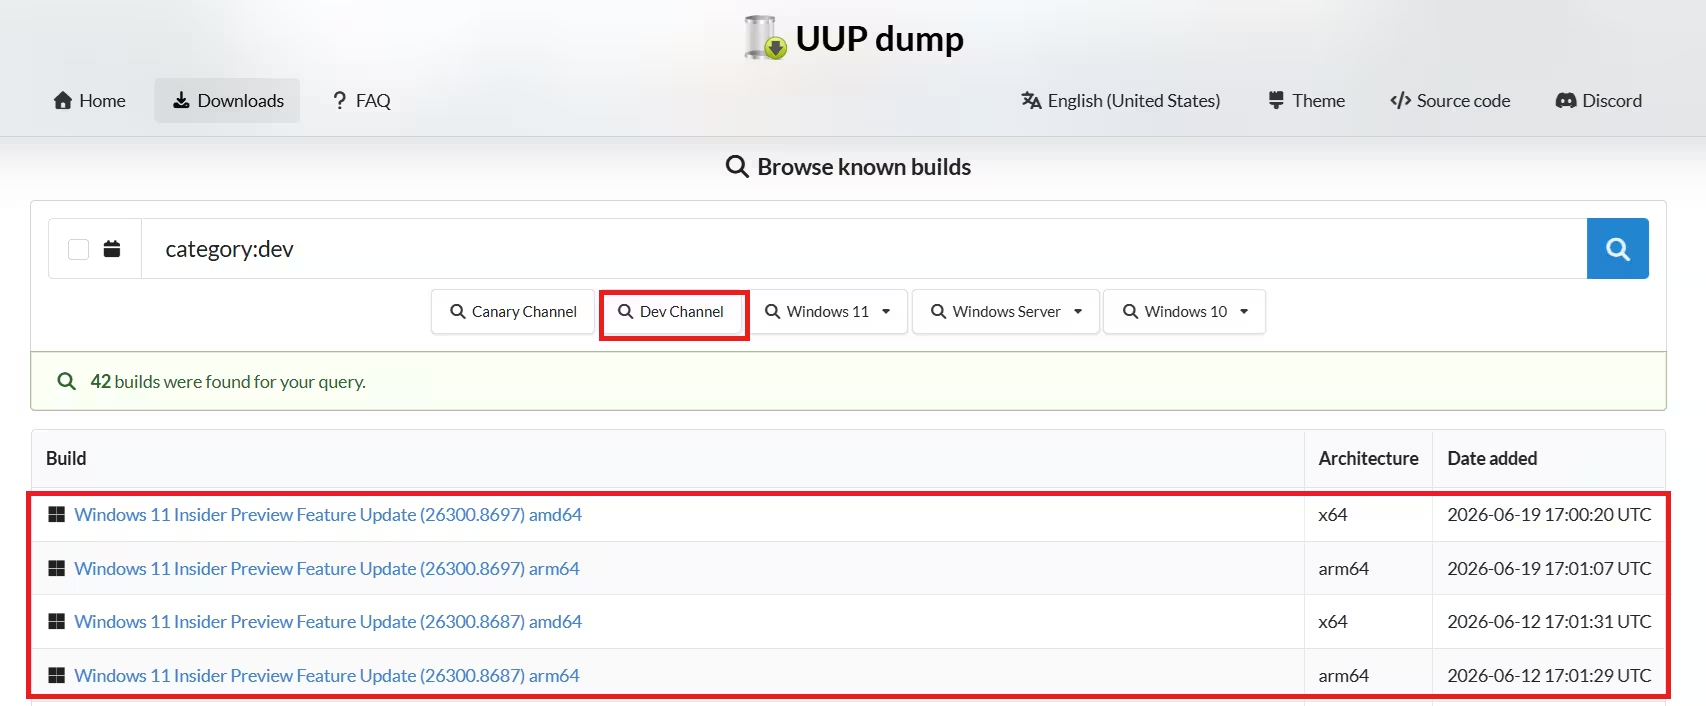
- Open your browser and go to uupdump.net.
- Click the Dev Channel button on the homepage, or type
category:devin the search bar and press Enter. - From the results, select the latest Windows 11 Insider Preview Feature Update (26300.xxxx) amd64 entry. Always pick the entry with the higher build number. If your device uses an ARM processor or qualifies as a Copilot+ PC, select the arm64 entry instead.
- Choose your language from the Language dropdown, then click Next.
- Select the Windows 11 editions you want in the ISO (Home, Pro, or both), then click Next.
- Under Download method, select Download and convert to ISO.
- Check Include updates (Windows converter only). This tells the script to integrate the latest patches and produces a proper 26H2 ISO.
- Click Create download package. UUP Dump saves a small ZIP file to your PC.
Step 2: Run the Conversion Script
- Open the downloaded ZIP file in File Explorer.
- Click Extract all, choose a destination folder, then click Extract.
- Inside the extracted folder, right-click uup_download_windows.cmd and select Run as administrator.
- If Windows SmartScreen blocks the file, click More info then Run anyway.
- When the Command Prompt window prompts you, press R then Enter to run the script.
The script downloads all 26H2 build files from Microsoft’s servers. This step takes 20 to 60 minutes. Do not close the window while it runs.
- After the download and conversion finish, press 0 to close the script window.
- The completed Windows 11 26H2 ISO file appears inside the folder where you extracted the UUP Dump tool.
Note: If you plan to set up a virtual machine, you can mount this ISO file directly into your hypervisor (Hyper-V, VMware, or VirtualBox) and skip the USB creation steps entirely.
Troubleshooting: If the script fails partway through, right-click Remove_Failure_MountDr_TempDir.cmd in the same folder and select Run as administrator. After that cleanup finishes, run the UUP Dump script again from Step 3 above.
Step 3: Create a Bootable USB Drive with Rufus
Rufus handles partitioning, formatting, and writing the ISO in one pass. It also offers bypass options for devices that do not meet Windows 11 hardware requirements, which makes it the most practical tool for this job.
- Go to rufus.ie and download the latest version from the Download section.
- Double-click the rufus.x.xx.exe file to launch the tool. Rufus does not require installation.
- Plug in your USB drive. Rufus detects it automatically. Confirm the correct drive appears under the Device dropdown before you continue.
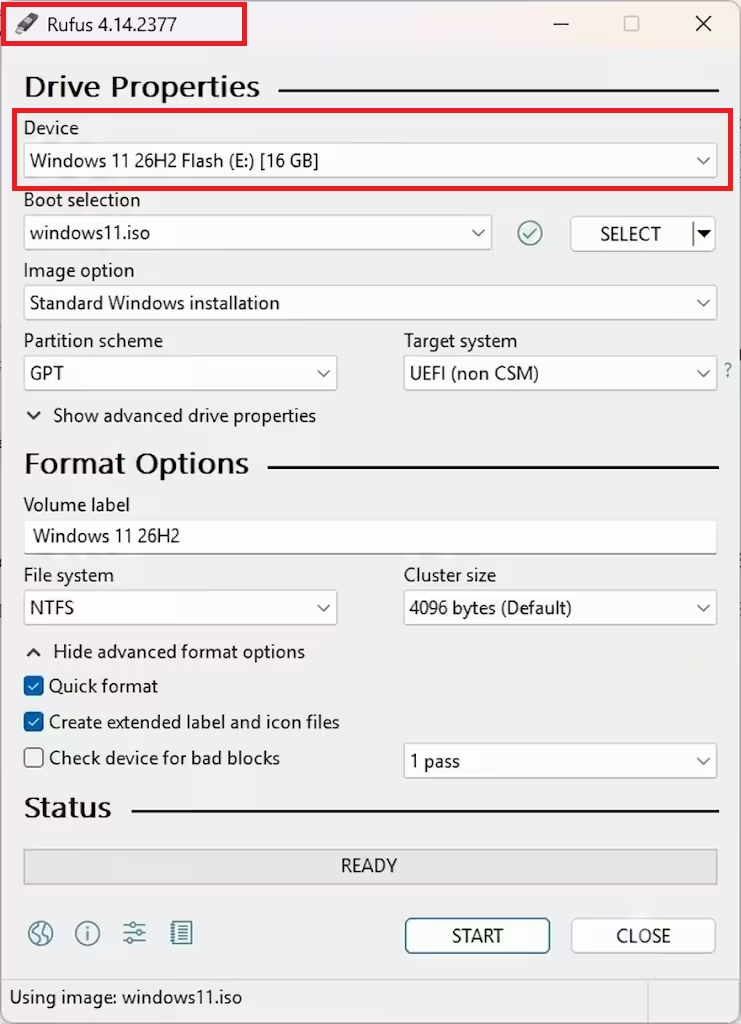
- Click Select, browse to the Windows 11 26H2 ISO file you built in Step 2, then click Open.
- Under Image option, select Standard Windows 11 Installation.
- Set Partition scheme to GPT.
- Set Target system to UEFI (non-CSM). Switch to MBR only if you install on an older BIOS-only system.
- In the Volume label field, enter a name such as
Windows 11 26H2 - Leave File system and Cluster size at their defaults.
- Check Quick format.
- Check Create extended label and icon files.
- Click Start.
Rufus displays a Windows User Experience dialog after you click Start.
- If your hardware meets Windows 11 requirements: Clear all checked options and click OK.
- If your hardware does not meet Windows 11 requirements: Check the options that apply to your device. “Remove requirement for 4 GB+ RAM, Secure Boot, and TPM 2.0” bypasses the RAM, firmware signature, and Trusted Platform Module checks. “Remove requirement for an online Microsoft account” lets you create a local account during setup instead of signing in with a Microsoft account.
Click OK to confirm. Rufus warns you that all data on the USB drive will be erased. Click OK again to proceed. The writing process takes 5 to 10 minutes.
Step 4: Set Your PC to Boot from USB
Before you can run the installer, you need to set the USB drive as the first boot device in your firmware settings.
- Shut down your PC completely.
- Plug the Windows 11 26H2 USB drive into a USB port.
- Power on the PC and immediately press the firmware key. Common keys are F2, F12, Delete, or Esc depending on your motherboard or laptop manufacturer. Check your PC manufacturer’s support page if you are unsure which key to use.
- Inside the UEFI or BIOS settings, navigate to the Boot or Boot Order section.
- Move the USB drive to the top of the boot order.
- Save the changes and exit. The PC restarts and boots from the USB drive.
Step 5: Run the Windows 11 26H2 Clean Install
- When the Windows Setup screen appears, select your installation language and regional format, then click Next.
- Select your keyboard or input method, then click Next.
- Click Install Windows 11.
- Check the box to confirm that this process will delete everything on the drive, then click Next.
- Click I don’t have a product key. Windows activates automatically after setup if your device has a digital license linked to your Microsoft account or tied to your hardware.
- Select the Windows 11 edition your license activates (Home or Pro), then click Next.
- Click Accept to agree to the license terms.
- Select each partition on Drive 0 and click Delete to remove existing partitions. Drive 0 is typically where your current OS lives. Delete all partitions on the target drive until only unallocated space remains.
- Select Drive 0 Unallocated Space as the installation destination, then click Next.
- Click Install.
Windows Setup copies files and installs the OS. Your PC restarts automatically one or more times during this process. Do not remove the USB drive until setup prompts you to remove it or the desktop appears.
Step 6: Complete the Out-of-Box Experience (OOBE)
After the installation restarts, Windows 11 26H2 walks you through the initial setup screens.
- On the first screen, select your region and click Yes.
- Select your keyboard layout and click Yes. Click Skip if you do not need a second keyboard layout.
- Connect to your network. Ethernet connects automatically. Wi-Fi requires you to select your network and enter the password.
- Optionally set a name for your PC and click Next.
- Click Sign in and enter your Microsoft account email and password. If you bypassed the Microsoft account requirement in Rufus, click Sign-in options and select Offline account to create a local account instead.
- Click Create PIN, enter a four-digit Windows Hello PIN, and click OK.
- Review the privacy settings toggles, then click Next twice and click Accept.
- Click More options, then select Set up as a new PC.
- Skip the Android phone link, OneDrive backup, and Microsoft Edge setup prompts if you prefer.
Windows 11 26H2 completes the setup and loads the desktop.
After the Clean Install
Open Settings, go to Windows Update, and click Check for updates. The first update check after a clean install often delivers driver updates and additional patches. Install everything and restart if prompted.
If Windows 11 26H2 does not activate automatically, go to Settings, click System, then Activation. Click Troubleshoot if your device has a digital license. If you have a product key, click Change product key and enter it there.
Remove the USB drive once the desktop loads and you confirm the system works correctly. Store the drive somewhere accessible. You can reuse it to reinstall on other devices or use it as a recovery option later.
Frequently Asked Questions
Do I need a product key to clean install Windows 11 26H2?
No. Click “I don’t have a product key” during setup. Windows activates automatically if your device has a digital license tied to your Microsoft account or hardware. If your device has never been activated, you need a valid product key to activate after setup.
Will a clean install delete my files?
Yes. A clean install removes everything on the target drive, including personal files, installed apps, and settings. Back up your data to an external drive or cloud storage before you start.
What is the difference between GPT and MBR in Rufus?
GPT works with UEFI firmware, which all modern PCs use. MBR works with older BIOS-only systems. Use GPT and UEFI unless you install on legacy hardware that does not support UEFI boot.
Can I use the same USB drive on multiple PCs?
Yes. The bootable USB works on any compatible device. Make sure each target PC meets the [Windows 11 26H2 system requirements](https://www.fdaytalk.com/windows-11-26h2-system-requirements/), or confirm that you applied the correct bypass options in Rufus before writing the drive.
My PC does not have TPM 2.0. Can I still clean install Windows 11 26H2?
Yes. In Rufus, check “Remove requirement for 4 GB+ RAM, Secure Boot, and TPM 2.0” in the Windows User Experience dialog before writing the USB. This bypasses the TPM and Secure Boot checks during setup without requiring any manual registry edits.
When does the official Windows 11 26H2 ISO release?
Microsoft targets late September or early October 2026, with a phased rollout to consumers. Once a stable build ships, Microsoft will publish the official ISO on the Windows Insider Preview Downloads page. Until then, UUP Dump remains the most reliable method to get a 26H2 ISO directly from Microsoft’s servers.
How long does a clean install take?
The file copy and install phase takes 15 to 30 minutes depending on your drive speed. Adding the ISO build time from UUP Dump (20 to 60 minutes) and the OOBE setup, budget around 60 to 90 minutes for the full process from start to desktop.

