Windows 11 stores temporary files, app data, and system cache to speed up everyday tasks like opening apps, loading websites, and syncing your location. Over weeks of regular use, this data quietly builds up, and it’s often the reason your C drive keeps losing free space even when you haven’t installed anything new. Left unchecked, a bloated cache can also slow down boot times and cause minor glitches in apps that rely on outdated cached data.
You don’t need any third-party software to fix this. Windows 11 ships with several built-in tools that safely target cache and junk files without touching your personal documents or installed programs. This walks you through every method, from automated cleanup with Storage Sense to manual steps like Disk Cleanup and flushing the DNS cache, so you can pick whichever fits your needs.
1. Clear Cache with Storage Sense
Storage Sense removes temporary files and empties the Recycle Bin on a schedule you set.
- Press
Win + Ito open Settings. - Go to System, then click Storage.
- Select Storage Sense and turn it on.
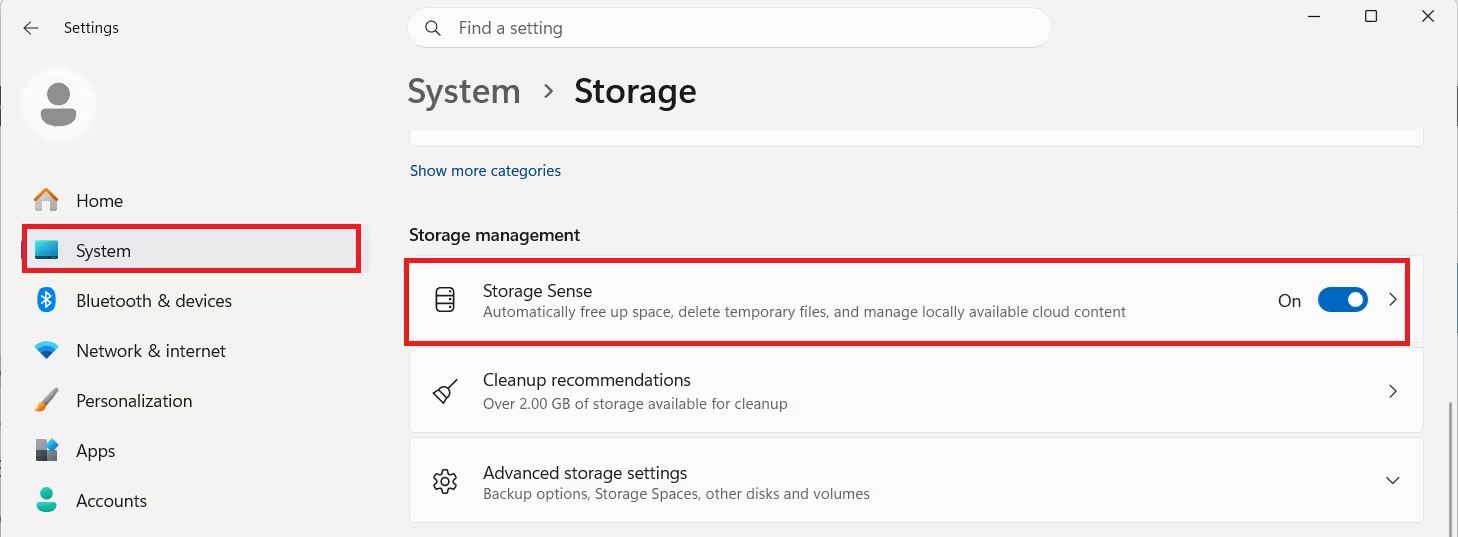
- Set it to run automatically when disk space runs low, or on a weekly or monthly schedule.
2. Clear Temporary Files Manually
Windows keeps a folder of temporary files that apps create and rarely clean up on their own.
- Go to Settings > System > Storage > Temporary files.
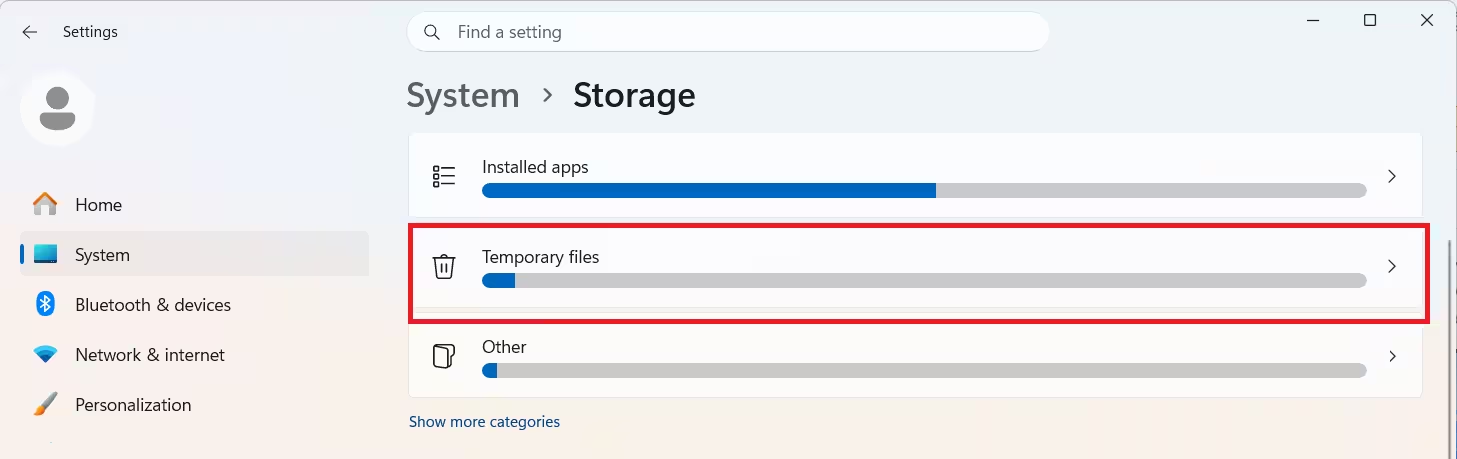
- Check the categories you want to remove, such as Temporary files, Downloads, or Recycle Bin.
- Review the Downloads folder first, since it may contain files you still need.
- Click Remove files.
3. Clear Cache Using Disk Cleanup
Disk Cleanup is an older but reliable utility that clears system cache, setup logs, and internet temporary files in one pass.
- Type Disk Cleanup into the search bar and open it.
- Choose your system drive from the dropdown and click OK.
- Select the file types to delete, such as Temporary Internet Files or System error memory dump files.
- Click OK, then confirm with Delete Files.
4. Clear the Location Cache
Windows caches location data to support location-based apps and services. Clearing it doesn’t affect app functionality going forward.
- Press
Win + Ito open Settings. - Select Privacy & security, then click Location.
- Scroll to Location history and click Clear.
5. Clear the Microsoft Store Cache
A corrupted Microsoft Store cache can block app downloads and updates.
- Press
Win + Rto open the Run box. - Type
wsresetand press Enter. - Wait for the blank Command Prompt window to open and close on its own. No further action is needed.
6. Clear the DNS Cache
If websites load slowly or show outdated content, flushing the DNS cache can resolve it.
- Press
Win + Rto open Run. - Type
cmdand press Enter to open Command Prompt. - Type
ipconfig /flushdnsand hit Enter. - Look for the confirmation message once the cache clears.
7. Clear Cache Using Cleanup Recommendations
Windows 11 can scan your drive and suggest large files, unused apps, and temporary data safe to remove in one place, a feature Microsoft folds into its Storage settings under cleanup recommendations.
- Go to Settings > System > Storage.
- Scroll to Cleanup recommendations.
- Review the suggestions under temporary files, large or unused files, and unused apps.
- Select what you want removed.
Frequently Asked Questions
Is it safe to clear cache on Windows 11?
Yes. Built-in tools like Storage Sense and Disk Cleanup only target temporary and cached files, not personal documents or installed programs.
How often should I clear cache on Windows 11?
Running Storage Sense on a weekly or monthly schedule keeps cache buildup under control without any manual effort.
Will clearing cache delete my saved passwords or files?
No. Clearing system and app cache doesn’t affect saved passwords, documents, or installed software. Browser cache clearing may log you out of some sites temporarily.
Does clearing the DNS cache disconnect me from the internet?
No. Flushing DNS only clears stored website address records. Your connection stays active, and Windows rebuilds the cache as you browse.

