VMware Workstation Pro is one of the most powerful desktop hypervisors available for Windows. It lets you run multiple operating systems simultaneously on a single PC without rebooting. Since May 2024, Broadcom made VMware Workstation Pro completely free for personal use, which means you no longer need a license key to use it at home.
The current version is VMware Workstation Pro 25H2, which replaced the older 17.x series. This guide walks you through every step to download and install VMware Workstation Pro 25H2 on Windows 11.
What Is VMware Workstation Pro 25H2?
VMware Workstation Pro 25H2 is the successor to the version 17.x series. Broadcom shifted to a calendar-based naming system, where the number reflects the year and half of year of release. So 25H2 means second half of 2025, and it effectively serves as what would have been “Workstation 18.”
Version 25H2 brings several improvements over the 17.x line:
- ditcTool: A new command-line utility that lets you inspect and edit
.vmxvirtual machine configuration files without opening the graphical interface. - Improved Hyper-V diagnostics: Better visibility into whether the virtual machine runs in User Level Monitor (ULM) mode when Windows Hyper-V is active, helping you diagnose performance problems faster.
- Better Linux performance: Many users report significantly improved interface responsiveness and 3D acceleration on Linux hosts compared to later 17.x builds.
- Security patches: Fixes for CVEs present in earlier version 17 builds.
- Improved Windows 11 25H2 compatibility: Better support for the latest Windows and Linux kernel updates.
If you currently run VMware Workstation 17, upgrading to 25H2 is recommended. Both versions are free from the Broadcom Support Portal, so there is no reason to stay on the older version unless you have a specific hardware bug.
What You Need Before You Start
Before you begin, confirm your system meets these requirements:
- OS: Windows 11 or Windows 10 (64-bit)
- Processor: 64-bit multi-core x86 CPU at 1.3 GHz or higher with virtualization support (Intel VT-x or AMD-V)
- RAM: Minimum 4 GB (8 GB or more recommended)
- Storage: At least 1.2 GB free disk space for the application, plus extra space for virtual machines
- Display: 1024 x 768 resolution or higher
Also make sure hardware virtualization is enabled in your BIOS/UEFI before installation. See Step 1 below.
Note: If you currently have VMware Player installed, uninstall it before installing Workstation Pro. Your existing virtual machines will still work after the upgrade.
Step 1: Enable Virtualization in BIOS
If virtualization is already enabled on your PC, skip to Step 2.
- Restart your PC and press the BIOS key during startup. The key is typically Del, F2, F10, or F12, depending on your motherboard brand.
- Navigate to the Advanced or CPU Configuration section.
- Look for Intel Virtualization Technology (VT-x) or AMD-V / SVM Mode.
- Set it to Enabled.
- Save changes and exit BIOS. Your PC will restart.
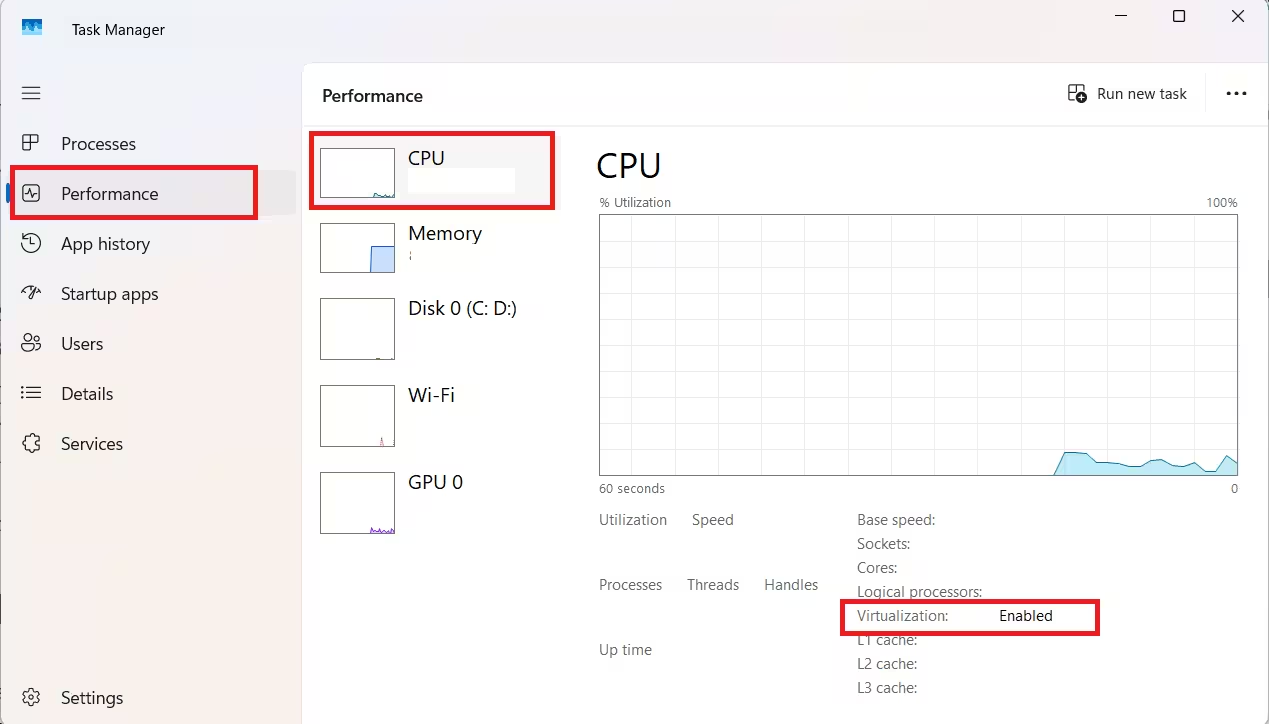
To confirm virtualization is active inside Windows 11, open Task Manager, go to the Performance tab, click CPU, and check that Virtualization shows Enabled.
Step 2: Create a Broadcom Account
Broadcom distributes VMware products through its own portal. You need a free Broadcom account to download VMware Workstation Pro 25H2.
- Open your browser and go to the Broadcom Register page.
- If you already have an account, click Login from the top-right corner and skip to Step 3.
- Enter your email address and complete the human verification process.
- Click Next.
- Confirm the verification code sent to your email.
- Click Verify and Continue.
- Fill in the required personal information.
- Click Create Account.
- Click I’ll do it later if prompted about additional setup.
Step 3: Download VMware Workstation Pro 25H2
- After logging in, open the Software menu at the top.
- Choose VMware Cloud Foundation and click My Downloads.
- Click the Free Software Downloads available Here option.
- On the right side, click VMware Workstation Pro.
- Click VMware Workstation Pro 25H2 for Windows.
- Click the latest version available, for example 25H2.
- Check the I agree box to make the download button active.
- Click the Download button.
- Click Yes to confirm.
- Click Submit to complete the trade compliance verification.
- Click Download again if prompted.
The installer file is around 600 MB to 700 MB, so the download may take a few minutes.
Step 4: Run the VMware Workstation Pro 25H2 Installer
- Open File Explorer and navigate to your Downloads folder.
- Double-click the VMware Workstation Pro
.exeinstaller file. - Windows may show a User Account Control (UAC) prompt. Click Yes to continue.
- The VMware Workstation Pro Setup Wizard will open. Click Next.
Step 5: Accept the License Agreement
- Read the End User License Agreement.
- Check the box that says I accept the terms in the License Agreement.
- Click Next.
Step 6: Review the Hyper-V Compatibility Check
The installer shows a compatibility check screen with one of two messages:
- “Hyper-V is not detected on the host. Virtual machines will run using VMware’s hypervisor.” This is the ideal scenario and means VMware will run at full performance.
- “The installer detected that the host has Hyper-V or Device/Credential Guard enabled. Virtual machines will be launched using Windows Hypervisor Platform.” The installation will still complete, but VMware will use Windows virtualization technology instead of its own hypervisor. This can reduce virtual machine performance.
If you see the second message and want the best performance, cancel the installation, disable Hyper-V (see the Errors section below), restart your PC, and then run the installer again.
Click Next to continue.
Step 7: Choose Installation Options
The installer presents two optional features:
- Enhanced Keyboard Driver: Improves keyboard input handling inside virtual machines, especially for international keyboards. Enable this if you use special characters or shortcuts inside VMs.
- Add VMware Workstation console tools to the system PATH: Allows you to run VMware command-line tools from any terminal window.
Select your preferences and click Next.
Step 8: Configure User Experience Settings
- (Optional) Check for product updates on startup: Keeps VMware Workstation Pro updated automatically. Recommended to leave this enabled.
- (Optional) Join the VMware Customer Experience Improvement Program (CEIP): Sends anonymous usage data to Broadcom. Uncheck this if you prefer to opt out.
Make your selections and click Next.
Step 9: Choose Shortcut Locations
- Check Desktop to add a shortcut to your Windows 11 desktop.
- Check Start Menu Programs Folder to add the app to the Start Menu.
Select your preferences and click Next.
Step 10: Complete the Installation
- Click Install to begin copying files.
- The installation takes a few minutes. A progress bar shows the current status.
- Once it finishes, click Finish.
- Your computer will restart to complete the installation.
Step 11: Launch VMware Workstation Pro
- After the restart, open VMware Workstation Pro from the desktop shortcut or Start Menu.
- On first launch, a license screen appears. Select Use VMware Workstation Pro 25H2 for Personal Use and click Continue.
- Click Finish on the confirmation screen.
VMware Workstation Pro 25H2 is now ready to use.
How to Create Your First Virtual Machine
Once the app is open, you can set up a virtual machine in minutes:
- Click Create a New Virtual Machine on the Home screen.
- Choose Typical (recommended) and click Next.
- Select your installation source. You can use an ISO file, a physical disc, or install the OS later.
- Follow the wizard to select the guest OS, assign a name, set disk size, and allocate RAM and CPU cores.
- Click Finish to create the VM, then power it on to begin the OS installation.
Storage tip: Store virtual machine files on a secondary drive rather than your primary system drive. This avoids performance impact on your main Windows installation and makes VM management easier.
Troubleshooting VMware Workstation Pro Installation Issues on Windows 11
1. Hyper-V Conflict Causing Reduced Performance
VMware Workstation Pro works best when Hyper-V is disabled. With Hyper-V active, VMs run through Windows Hypervisor Platform instead of VMware’s native hypervisor, which reduces performance.
To disable Hyper-V:
- Open Control Panel and go to Programs and Features.
- Click Turn Windows features on or off.
- Uncheck Hyper-V, Virtual Machine Platform, and Windows Hypervisor Platform.
- Click OK and restart your PC.
- Run the VMware installer again.
2. “Setup Cannot Continue” Installation Error
This usually means a conflict with an existing hypervisor or a permission issue. Right-click the installer and select Run as Administrator, then try again. If the error persists, disable Hyper-V using the steps above.
3. “Virtualization Not Enabled” Error After Install
Go back into BIOS and confirm that Intel VT-x or AMD-V is enabled. Some OEM systems label this setting differently, so check your motherboard manual if you cannot find it.
4. Installer Freezes at “Installing Driver” Screen
Right-click the installer file and select Run as Administrator to give it the permissions it needs to install system drivers.
How to Uninstall VMware Workstation Pro on Windows 11
If you need to remove VMware Workstation Pro from your system, the process is straightforward. Before you uninstall, you can save your Workstation Pro configuration so that it carries over if you reinstall later.
- Log in to Windows as an Administrator or a user with local administrator privileges.
- Open File Explorer and navigate to the folder where you saved the original VMware Workstation Pro installer file.
- Double-click the
VMware-workstation-xxxx-xxxxxxx.exeinstaller file. - Click Next on the Welcome screen.
- Click Remove.
- Optional: Check the box to save your Workstation Pro configuration files. This keeps your settings intact if you reinstall later.
- Click Next to begin uninstalling.
- Click Finish when the process completes.
- Restart your PC if prompted.
Note: Do not change the default installation directory path during any reinstall. The default location at
C:\Program Files (x86)\VMware\VMware Workstationcarries the correct system permissions. A custom directory may create privilege escalation vulnerabilities.
Frequently Asked Questions
Is VMware Workstation Pro really free now?
Yes. VMware has made Workstation Pro and Fusion Pro free for personal use on Windows, Linux, and macOS. Commercial use still requires a paid license, which users can choose based on their needs.
Do I need a product key to use VMware Workstation Pro for free?
No. For personal use, no product key is required. You only need a free Broadcom account to download and install the software.
What is the difference between VMware Workstation Pro 25H2 and version 17?
Workstation Pro 25H2 is the successor to the 17.x series and uses a new calendar-based naming system. It includes security fixes, better Linux performance, improved 3D acceleration, clearer Hyper-V diagnostics, and a new command-line tool called ditcTool for editing VM configuration files.
Should I upgrade from VMware Workstation 17 to 25H2?
Yes. Version 25H2 offers better compatibility with Windows 11 25H2 and newer Linux kernels, improved performance, and is free to download. There is little reason to stay on version 17 unless you have a specific hardware conflict.
Does VMware Workstation Pro work with Hyper-V enabled?
It can run with Hyper-V enabled, but virtual machine performance will be reduced because VMs use the Windows Hypervisor Platform instead of VMware’s native hypervisor. Disabling Hyper-V gives the best performance.
Is VMware Workstation Pro better than VirtualBox?
For most advanced users, yes. VMware Workstation Pro generally offers better performance, stronger 3D acceleration, and more mature tooling than VirtualBox, especially for Windows 11 and modern Linux distributions.
Can I run Windows 11 preview builds using VMware Workstation Pro?
Yes. VMware Workstation Pro works well for running Windows 11 Insider Preview builds, test environments, and alternative operating systems without dual-booting.
What are the system requirements for VMware Workstation Pro on Windows 11?
You need Windows 10 or Windows 11, a 64-bit multi-core processor with hardware virtualization at 1.3 GHz or higher, at least 4 GB of RAM, and around 1.2 GB of storage, not including virtual machine files.
Do I need to uninstall VMware Player before installing Workstation Pro?
Yes. Uninstall VMware Player first, then install Workstation Pro. Your existing virtual machines will still work after the upgrade.
Related Guides
- How to Install and Set Up VirtualBox on Windows 11
- Windows 11 Requirements for VMware and Hyper-V (Complete Setup Guide)
- How to Enable Hyper-V on Windows 11: Step-by-Step Guide
VMware Workstation Pro 25H2 gives you a full-featured virtualization environment on Windows 11 at no cost for personal use. Once you complete the setup, you can run Linux, older Windows versions, or test environments without touching your main OS.

