Xbox Full Screen Experience on Windows 11 replaces the standard desktop shell with a controller-friendly, full-screen dashboard built around the Xbox app. Microsoft originally designed this feature for handheld gaming devices like the ASUS Xbox ROG Ally X, but you can force-enable it on any regular desktop or laptop running Windows 11. This guide covers both the easy GitHub one-click method and the manual Registry approach so you can pick whichever fits your comfort level.
What Is Xbox Full Screen Experience on Windows 11?
Xbox Full Screen Experience (also called Xbox mode in newer preview builds) swaps out the Windows 11 taskbar, Start menu, and desktop shell for a simplified, game-first launcher. When you enable the startup option, Windows skips loading the standard shell processes at boot and defers background apps until the first time you switch to the desktop. The result is lower memory usage, faster startup, and a UI that feels closer to a console than a traditional PC.
Microsoft officially named this feature “Full screen experience” in Settings on the stable channel. The name has since been updated to Xbox mode in the latest preview builds, and that label will reach stable after the Windows 11 May 2026 Security Update.
Limited PC Edition vs Full Handheld Edition
Microsoft’s native rollout gives standard PCs only a Limited PC edition of FSE. That version has no “Choose home app” setting and no “Enter on startup” toggle, so you have to open FSE manually every time from Task View or the Xbox app.
The GitHub tool unlocks the Full Handheld edition, which is identical to what ships on the ROG Xbox Ally series. This version includes the “Choose home app” setting, the “Enter Xbox mode on startup” toggle, and the “Restart for better performance” prompt that boots into an optimized performance mode with more memory freed for gaming. The manual Registry method also targets this full edition.
It is important to understand what FSE actually improves and what it does not. You gain faster boot times and lower memory footprint because Windows strips out several background processes and legacy networking drivers. Frame rates in games see little to no change. If you rely on a VPN at startup, or use multiple monitors daily, FSE is not ready for your setup yet.
Requirements Before You Start
Check these before attempting either method. Skipping this step wastes time.
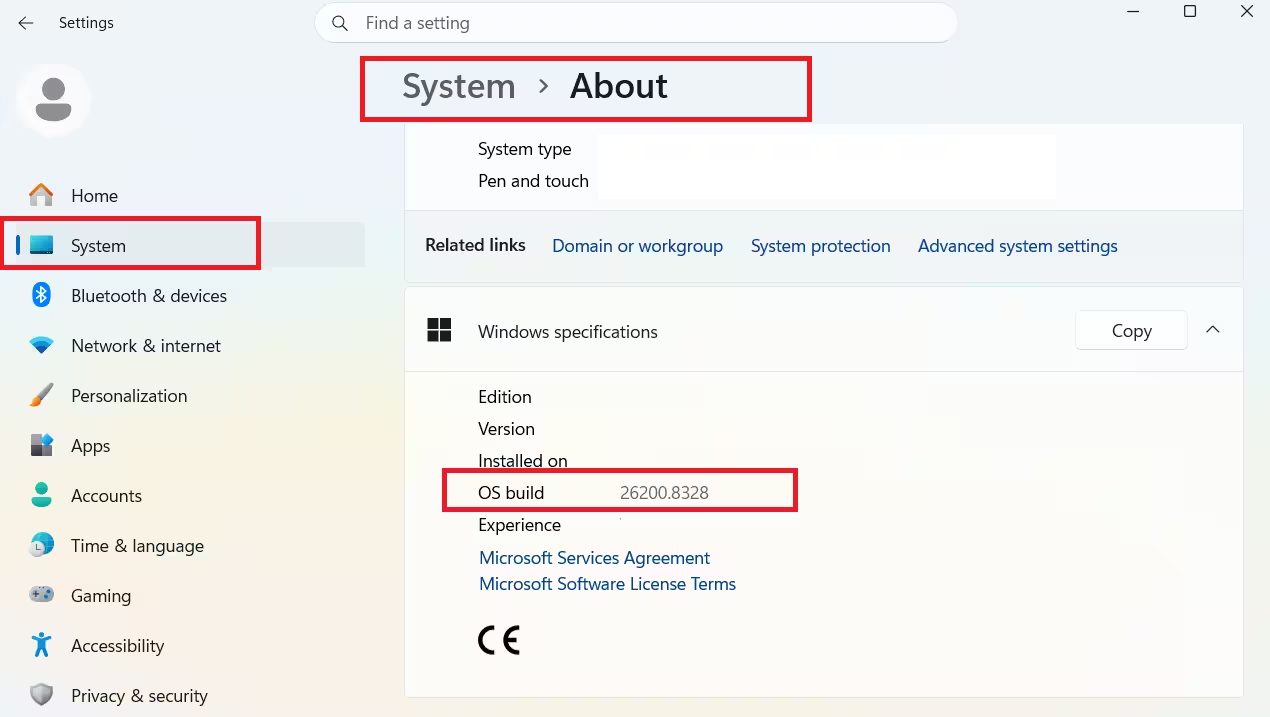
- Windows 11 version 24H2 or 25H2, with build 26100.8328 or newer for 24H2, or 26200.8328 or newer for 25H2. These are the Native builds that give reliable boot-into-FSE behavior and require no screen dimensions override. Older builds work but may boot to the desktop occasionally due to a startup race condition.
- Xbox app installed, updated to the latest version, and signed in with your Microsoft account. If you run into issues signing in, check the Xbox error 0x8007041D fix before proceeding.
- Administrator access on the PC. Both methods require elevated privileges.
- An XInput controller with an Xbox button is strongly recommended. FSE is built for gamepad input. Using it with only a mouse and keyboard defeats the purpose.
- A full system backup before touching the Registry. The manual method modifies system-level keys, and a backup is not optional.
Recommended Upgrade Workflow
If your PC is not yet on a Native build, upgrade Windows first, then install or update the tool. The tool automatically applies the correct Native configuration when it detects a qualifying build. If you install the tool before upgrading Windows, simply open the tool after the upgrade and click Enable again to migrate to the Native configuration.
Step 1: Check If the Toggle Already Exists in Settings
Some users on qualifying builds already have FSE available through Microsoft’s staged rollout. Check here first before downloading anything.
- Open Settings.
- Click Gaming.
- Look for Full screen experience (or Xbox mode on newer builds).
If the page appears, skip to the Configure Xbox FSE in Settings section at the bottom of this guide. You do not need either method below.
If the page does not appear under Gaming, move to Step 2.
Method 1: GitHub Tool (Recommended for Most Users)
The community-built Xbox Full Screen Experience Tool automates the entire setup without requiring Registry edits or command-line work. It works on Windows 11 24H2 at build 26100.8328 or newer, and 25H2 at build 26200.8328 or newer.
Important: This is a community utility, not a Microsoft-signed application. Review the source on GitHub before running it. Proceed only if you accept that tradeoff.
Choose Your Installer
The tool comes in two versions:
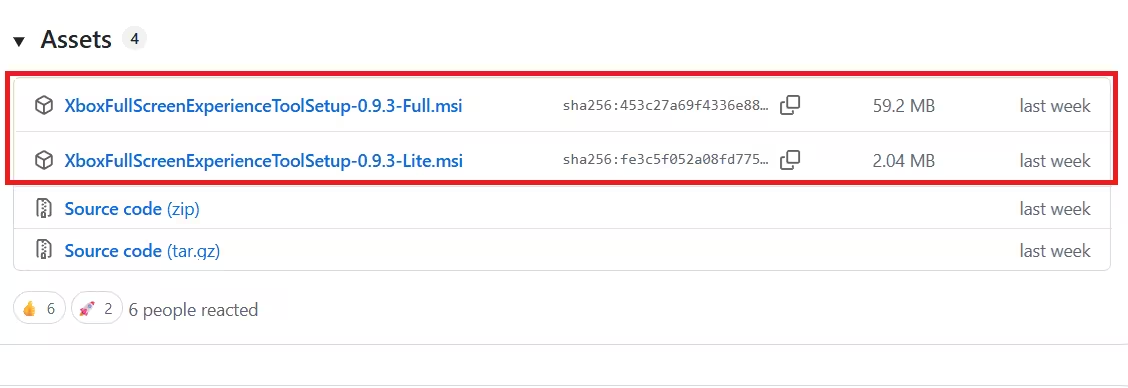
- Full (Setup-x.x.x-Full.msi) — Recommended. Includes all prerequisites. No additional software needed.
- Lite (Setup-x.x.x-Lite.msi) — Smaller download but requires the .NET 8 Desktop Runtime (x64) installed separately first.
Steps to Enable Xbox Full Screen Experience via GitHub Tool
- Open the Xbox Full Screen Experience Tool GitHub repository page.
- Scroll down to the Assets section.
- Click XboxFullScreenExperienceToolSetup-x.x.x-Full.msi to download the Full installer.
- Save the file to your computer.
- Right-click the
.msiinstaller and choose Open. - Click Next three times through the setup wizard.
- Click Close when the installer finishes.
- Open Start and search for Xbox Full Screen Experience Tool.
- Click the top result to launch the app.
- Check Simulate touch input on startup to enable the gamepad keyboard. (This is strongly recommended so the on-screen keyboard works reliably with your controller at the Windows sign-in screen.)
- Click Enable Xbox Mode (FSE).
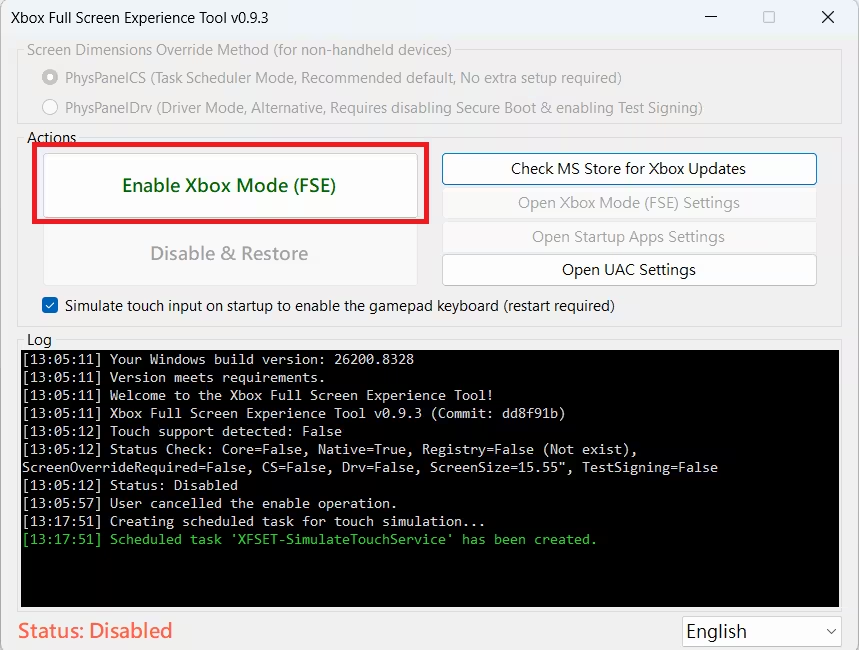
- Click OK, then Yes, then OK again to confirm.
- Click Close to restart the computer.
After the restart, proceed to the Configure Xbox FSE in Settings section below.
Windows Defender flag: If Defender flags the tool during installation, click Keep anyway to proceed. Download only from the official GitHub repository to stay safe.
Method 2: Manual Path (Registry + ViVeTool + PSExec + Physpanel)
This method gives you direct control over every change. It involves three layers: enabling a hidden feature flag, setting a Registry value that tells Windows the PC is a handheld device, and scheduling a boot task that reports compact panel dimensions. Use this if the GitHub tool does not work on your build, or if you prefer to make each change individually.
Warning: Modifying the Registry can cause serious problems if done incorrectly. Create a full system backup before starting. This workaround is unsupported by Microsoft and may break after major Windows updates.
Part A: Update to Windows 11 Native Build
- Open Settings.
- Click Windows Update.
- Click Check for updates.
- Turn on Get the latest updates as soon as they’re available.
- Click Download and install for the Windows 11 version 25H2 option if it appears.
- Click Restart now and let the upgrade complete.
Confirm you are on build 26100.8328 or newer (24H2) or 26200.8328 or newer (25H2) before continuing.
Part B: Set the DeviceForm Registry Value
This Registry change tells Windows the machine is a handheld-class device, which is a prerequisite for FSE to surface.
- Open Start, search for regedit, and click the top result.
- Navigate to the following path:
HKEY_LOCAL_MACHINE\SOFTWARE\Microsoft\Windows NT\CurrentVersion\OEM- Right-click the OEM key, select New, then choose DWORD (32-bit) Value.
- Name the new value DeviceForm and press Enter.
- Right-click DeviceForm and select Modify.
- Set Value data to
2eand confirm Base is set to Hexadecimal. - Click OK.
- Restart the computer.
Part C: Enable the Feature Flag with ViVeTool
- Download ViVeTool from its GitHub repository and extract the ZIP file.
- Copy the path to the extracted folder.
- Open Start, search for Command Prompt, right-click it, and select Run as administrator.
- Navigate to the ViVeTool folder:
cd C:\path\to\ViveTool-folder- Run the following command to enable the FSE feature flag:
vivetool /enable /id:59765208- Restart the computer.
Build note: If feature ID
59765208does not surface the setting after a restart, try IDs52580392and50902630instead. Earlier builds may respond to those IDs. Make a note of whichever ID you use because you will need it to revert later.
Part D: Download PSTools and Run PSExec
PSExec opens a SYSTEM-level Command Prompt with the privilege level that Physpanel requires.
- Go to the PSTools page on Microsoft Sysinternals and click Download PsTools suite.
- Save the ZIP file to your computer.
- Open the ZIP file in File Explorer and click Extract all, then Extract.
- Copy the path to the extracted PSTools folder.
- Open Command Prompt as administrator and navigate to the PSTools folder:
cd C:\path\to\PSTools- Run the following command and leave the window open:
psexec -s -i cmd.exeA new elevated Command Prompt session opens with SYSTEM privileges.
Part E: Download Physpanel and Schedule the Boot Task
Physpanel reports a compact panel size at boot so Windows passes the FSE handheld device check. Desktop PCs with no internal display need this step. Laptops and devices on Native builds (26100.8328+ or 26200.8328+) may pass the check automatically, but running this step still causes no harm.
- Go to the Physpanel GitHub page and download
physpanel_0.1.1_x86_64-pc-windows-msvc.zip. - Extract the ZIP file and copy the path to the folder.
- In the SYSTEM-level Command Prompt from the previous step, run the following command. Replace the path with your actual Physpanel location:
schtasks /create /tn "SetPanelDimensions" /tr "C:\path\to\physpanel.exe set 155 87" /sc onstart /ru SYSTEM /rl highest /f- Restart the computer.
Laptop on battery: If you use a laptop without constant AC power, open Task Scheduler, find the SetPanelDimensions task, go to the Conditions tab, and uncheck Start the task only if the computer is on AC power. Without this change, FSE will not engage when you disconnect from power.
After the restart, proceed to the section below to finish the setup.
Configure Xbox Full Screen Experience in Settings
After completing either method above, follow these steps to activate FSE:
- Open Settings.
- Click Gaming.
- Click Full screen experience (or Xbox mode on newer builds).
- Under Choose home app, select Xbox. If you installed OmniConsole through the GitHub tool, you can also select it here to boot into Steam Big Picture, Epic Games Store, Playnite, or any other platform you configured.
- Turn on Enter full screen experience on start-up.
- (Optional) Turn on Show accessibility control hints in Task View to add a one-button shortcut for switching between FSE and the desktop.
- Restart the computer.
Windows 11 now boots directly into the Xbox app in full-screen mode. You can access your games, Xbox Game Pass library, and console-style interface right from startup.
How to Switch Back to the Windows Desktop from Xbox FSE
FSE does not remove the desktop. You can switch between the two at any time.
- Press Win + Tab and click Windows Desktop, then click Continue.
- Alternatively, press Win + F11 to toggle between FSE and the desktop.
- Right-click the Xbox icon in FSE and select Close window to exit the app.
To return to FSE after switching to the desktop, sign out of Windows and sign back in.
How to Revert All Changes
If FSE causes problems or you simply want to go back to the standard desktop, follow these steps:
Using the GitHub Tool
Launch the Xbox Full Screen Experience Tool, click Disable and Restore, and restart.
Manual Revert Steps
- Go to Settings > Gaming > Full screen experience and set Choose home app to None.
- Open an elevated Command Prompt, navigate to the ViVeTool folder, and run the disable command for whichever ID you used:
vivetool /disable /id:59765208- Open Registry Editor, navigate to
HKEY_LOCAL_MACHINE\SOFTWARE\Microsoft\Windows NT\CurrentVersion\OEM, and delete the DeviceForm value. - Open Task Scheduler and delete the SetPanelDimensions task.
- Restart the computer.
The system returns to the standard Windows 11 desktop after the restart.
Troubleshooting Common Problems
1. “Full screen experience” is still missing after restart: Confirm your build is 26100.8328 or newer (24H2) or 26200.8328 or newer (25H2). If the build is correct but the toggle does not appear, try the alternate ViVeTool IDs (52580392 and 50902630). In some cases, enrolling in the Xbox Insider program may be an additional requirement.
2. PC boots to the desktop instead of FSE: This is a startup race condition that affects older builds. Upgrading to a Native build (26100.8328+ for 24H2 or 26200.8328+ for 25H2) and combining it with the tool’s Native Mode resolves this and gives 100% reliable FSE boot. After upgrading, open the tool and click Enable again to apply the Native configuration.
3. Xbox icon in Task View is broken or missing: Microsoft introduced a regression starting with build 26200.7705 (KB5074105) that replaces the Xbox icon in Task View with a generic placeholder and breaks the button. FSE itself still works normally. The fix is to upgrade to build 26100.8328+ (24H2) or 26200.8328+ (25H2) and then install or run the tool version 0.9.3 or newer. The installer migrates you to Native configuration automatically and restores the Task View button.
4. On-screen gamepad keyboard does not appear at the sign-in screen: Enable the Simulate touch input on startup checkbox inside the tool before clicking Enable. This checkbox requires tool version 0.9.0 or newer and is the only way to get reliable on-screen keyboard support at the Windows sign-in screen with a controller.
5. Pressing A too quickly causes the PIN pad to glitch and disappear: This is a known bug in Microsoft’s LogonUI.exe that also affects native FSE devices like the ROG Xbox Ally. Do not press A immediately when the sign-in screen appears. Wait a few seconds until the Wi-Fi icon in the bottom right becomes solid or the Windows Spotlight text appears, then press A to reliably trigger the on-screen keyboard.
6. FSE does not engage on battery: Open Task Scheduler, find the SetPanelDimensions task, go to the Conditions tab, and uncheck the AC power requirement.
7. Windows Defender flags Physpanel: Download the latest signed release directly from the official Physpanel GitHub page.
8. Secondary monitors go blank when docked: This is a known limitation. FSE has poor multi-monitor support at this stage. If you use external displays regularly, wait for the official rollout.
9. Sleep or wake behavior is inconsistent: FSE does not change Windows’ underlying sleep implementation. Hibernation is consistently more reliable than S3 sleep under FSE. Set your power plan to use hibernation to avoid unexpected wakeups or battery drain.
10. Xbox app launch errors after enabling FSE: If you encounter error codes like error 0x80070490 when the Xbox app fails to launch or update, follow the dedicated fix guide. Sign-in issues specifically may point to the Xbox Identity Provider service, which you can resolve through the Xbox error 0x8007041D guide.
11. Background apps do not launch at startup: This is expected behavior. When FSE’s startup option is active, Windows defers background apps until the first desktop session. To override this for a specific app, go to Settings > Apps > Startup and manage it there.
Should You Enable Xbox Full Screen Experience?
FSE delivers real gains in boot speed and memory usage because Windows skips loading the taskbar, Start menu, and several legacy networking drivers at startup. Frame rates in games see little to no improvement, so do not enable it expecting fps benchmarks to change.
The feature pairs well with Windows 11’s Low Latency Profile (CPU Boost) if you want both a faster boot and a temporary CPU frequency lift when launching games.
Skip FSE for now if you use multiple monitors, depend on a VPN at boot, or run background software that needs to start before you launch any game. The stripped networking stack means VPN protocols like L2TP, PPTP, and SSTP do not load until you switch to the desktop first.
Microsoft is already rolling out Xbox mode to standard PCs through the May 2026 Security Update. If you prefer to wait, the Settings toggle will appear on its own for qualifying devices, and this entire workaround becomes unnecessary.
Frequently Asked Questions
Does Xbox Full Screen Experience work on Windows 11 24H2?
Yes. Both the GitHub tool and the manual method work on 24H2. For the most reliable experience with no startup race condition, use build 26100.8328 or newer on 24H2, or 26200.8328 or newer on 25H2.
Do I need a controller to use Xbox Full Screen Experience?
You do not strictly need one, but FSE is designed for controller input. An XInput controller with an Xbox button is required for Game Bar, FSE gamepad features, and the on-screen keyboard. Using it with only a mouse and keyboard makes the experience awkward.
Does enabling FSE affect game performance?
FSE reduces memory usage and speeds up boot time, but it does not improve frame rates during gameplay. Real-world testing on devices like the ROG Xbox Ally X showed minimal fps changes.
Can I still use my regular Windows desktop after enabling FSE?
Yes. Press Win + Tab and select Windows Desktop, or press Win + F11 to switch back. The standard desktop remains fully accessible.
Will Xbox FSE break after a Windows update?
The workaround may break after major Windows updates because it relies on Registry edits, hidden feature flags, and a scheduled boot task. Check each layer after any major update and reapply if needed.
What happens to background apps when FSE is active at startup?
Windows defers background apps until you switch to the desktop for the first time. You can adjust individual apps in Settings > Apps > Startup.
Can I use platforms other than the Xbox app as my home screen?
Yes. The GitHub tool includes OmniConsole, which lets you set Steam Big Picture, Epic Games Store, Armoury Crate SE, Playnite, or any custom executable as your FSE home. Select it under Choose home app in Settings after enabling.
Can I play Xbox 360 backward-compatible titles through FSE?
FSE is designed to be backward compatible with games that run on standard Windows. If you run into backward compatibility issues unrelated to FSE, check the Xbox 360 games not working on Xbox Series X guide for relevant troubleshooting context.
Related Tech Guides
- How to Enable Xbox Mode in Windows 11 (Fix Missing Toggle with ViVeTool)
- How to Enable Low Latency Profile (CPU Boost) on Windows 11 Using ViveTool
- Windows 10 KB5087544 (May 2026): What’s New, Fixes, and Known Issues

