Tiny11 is back. NTDEV, the developer behind the popular debloated Windows 11 project, has teased a ground-up rebuild just as Windows 11 26H2 reaches general availability. The new version should install Windows 11 22H2 through 26H2 on almost every PC, including many that Microsoft does not support.
This guide covers what the teaser reveals, how to build a safe Tiny11 26H2 ISO today with the official script, and simpler ways to run 26H2 on unsupported hardware.
New Tiny11 Teased for Windows 11 26H2: What NTDEV Announced
NTDEV posted a teaser on X saying Tiny11 is being “reimagined from the ground up.” The post includes a single screenshot of the Tiny11 Builder interface and no feature list, release date, or technical detail.
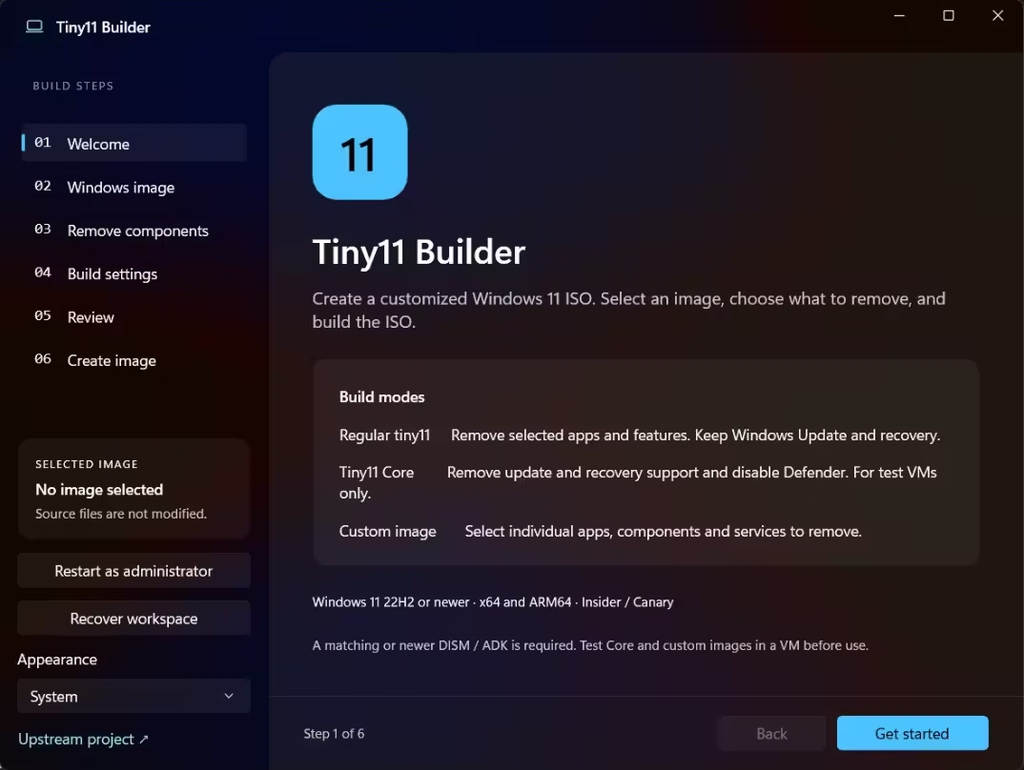
The last Tiny11 update shipped in November 2025, so this is the first sign of life in almost a year. If the rebuild lives up to the early talk, it could install every Windows 11 version from 22H2 through 26H2 and add more options and performance tweaks.
The hardware limit still applies. Windows 11 24H2 and later need CPU instructions such as POPCNT and SSE4.x, and no installer bypass can add those instructions to an old processor. A separate utility called POP4.2 reportedly works around that limit on some older CPUs.
Why Windows 11 26H2 Already Runs on Low RAM
Early testers report surprisingly low RAM use when they install 26H2 with Rufus and its newer options. Microsoft also tuned 26H2 for low-memory systems. Despite that, the official system requirements have not changed, and Microsoft keeps closing the bypass tricks people rely on.
Tiny11 vs Tiny11 Core vs Nano11: What Is the Difference?
NTDEV has built several related tools over the years:
- Tiny11: the original debloated Windows 11 image, first released in February 2023.
- Tiny11 Builder: a PowerShell script that creates a tiny ISO from any Windows 11 image you supply.
- Tiny11 Core: an extreme stripped-down image for testing that Windows Update cannot service.
- Tiny10: the same idea for Windows 10.
- Nano11: a script that shrinks a Windows 11 install to under 3GB.
For daily use, pick the regular builder. Core trades servicing for size, so keep it for throwaway test machines.
Is Tiny11 Safe? Why You Should Build the 26H2 ISO Yourself
Many sites offer prebuilt Tiny11 ISOs, and you have no way to know what their publishers changed. The safer route is to build the image on your own PC from Microsoft’s official ISO and the open-source script.
The official ntdevlabs tiny11builder repository does not offer a prebuilt 26H2 ISO. Its Releases page only hosts the builder. Windows 11 26H2 reached general availability on September 29, 2026, and an open GitHub issue from October 5 asks whether the builder needs changes for the new stock ISO. The maintainer has not replied yet. That does not prove a problem, but it means you should test every build in a virtual machine first.
What You Need to Build Tiny11 26H2
- A Windows PC with plenty of free disk space (plan for roughly 70GB for working files)
- The official Windows 11 26H2 ISO from Microsoft
- The
tiny11maker.ps1script from github.com/ntdevlabs/tiny11builder - Windows PowerShell 5.1 with administrator rights
- Rufus, if you plan to write the ISO to a USB drive
- A VM tool such as Hyper-V, VirtualBox, or VMware for testing
You do not need a product key to build the ISO. Activation happens after you install Windows.
Step 1: Download Windows 11 26H2 ISO and Verify the SHA-256 Hash
Open Microsoft’s Windows 11 download page and pick the x64 disk image in your language. Then check the file in PowerShell:
Get-FileHash C:\path\to\Windows11.iso -Algorithm SHA256Compare the result with the SHA-256 value Microsoft lists for your language. The two must match exactly. Do this before you run any third-party script against the file.
Step 2: Download tiny11builder from the Official GitHub Repo
Download the script only from the official tiny11builder GitHub repository. Skip lookalike sites, YouTube links, SourceForge uploads, and forks from other users. Before you build, read the README and the latest commits, because the script changes often and 26H2 is new.
The repository has two builders:
tiny11maker.ps1builds the regular image. The project recommends it for normal use, and Windows Update still works on it.tiny11Coremaker.ps1removes far more, including servicing support. Use it only for quick tests.
This guide uses tiny11maker.ps1.
Step 3: Mount the Windows 11 26H2 ISO
Right-click the Microsoft ISO in File Explorer and choose Mount. Note the new drive letter, for example D:.
Step 4: Allow Scripts in PowerShell (Process Scope Only)
Search for PowerShell, right-click it, and choose Run as administrator. Then allow scripts for this session only:
Set-ExecutionPolicy Bypass -Scope ProcessThis setting expires when you close the window, so it never changes your permanent policy.
Step 5: Run tiny11maker.ps1
Run the builder and point it at your mounted drive letter:
C:\path\to\tiny11maker.ps1 -ISO D -SCRATCH CSwap D for your ISO’s drive letter and C for the drive you want to use for temporary files. The script asks which Windows edition to use. Pick one and let the process finish without interrupting it.
The script uses DISM to remove bundled apps, apply setup changes, compress the image, and create a bootable ISO. Depending on the version, removed apps can include Clipchamp, News, Weather, Xbox, Quick Assist, OneDrive, Copilot, Teams, and Edge. The setup changes include a local account option and bypasses for CPU, RAM, storage, TPM, and Secure Boot checks.
Step 6: Find tiny11.iso and Record Its Hash
The script saves tiny11.iso in the folder where you extracted it. Record its hash:
Get-FileHash C:\path\to\tiny11.iso -Algorithm SHA256This hash does not prove the image is safe, because no official 26H2 hash exists to compare against. It does let you confirm later that the file has not changed since you built it.
Step 7: Test the Tiny11 ISO in a VM
Create a disposable VM and install from tiny11.iso. Then check that:
- Setup finishes without errors and Windows reaches the desktop
- Device Manager loads normally
- Windows Update runs and the PC reboots cleanly
- The Microsoft Store and Winget work if you need them
- The edition matches the one you selected
- Activation behaves as expected for your license
If Windows Update fails inside the VM, do not install that ISO on a physical PC.
Step 8: Create a Bootable USB with Rufus
Open Rufus, select a USB drive of at least 8GB, and choose tiny11.iso. Rufus erases the drive, so back up anything on it. On a modern PC, pick GPT and UEFI, then click Start. The script already applies the hardware bypasses, so you rarely need to stack extra Rufus options on top.
How to Install Windows 11 26H2 on Unsupported Hardware Without Tiny11
You do not always need a custom ISO. Two simpler options exist:
- Already on Windows 11 24H2 or 25H2: Install the latest cumulative update (KB5124010 or newer), then install the KB5121794 enablement package. It switches on the 26H2 features that already sit on your system, and it keeps your apps and files.
- On Windows 10 or older Windows 11: Mount Microsoft’s official ISO and run
setup.exe /product serverfrom a terminal in the mounted drive. The screens mention Windows Server, but the installer still puts Windows 11 on your PC. Choose Keep files, settings, and apps to upgrade in place.
Use the Rufus clean install only when the other methods fail or your PC needs a wider set of bypasses. A clean install can erase your files, so back up first.
Tiny11 Risks: Updates, Support and Removed Apps That Return
Tiny11 is a good fit for virtual machines, test rigs, and old secondary PCs. It is a poor fit for business machines, systems that need vendor support, or any organization that requires unmodified Microsoft media.
Three limits apply:
- Microsoft says PCs that miss the requirements are not guaranteed to receive updates, including security updates.
- Some removed apps, such as Outlook and Dev Home, can return after updates.
- A bypass lets Windows install, but it does not make your hardware officially supported.
How to Verify 26H2 and Keep Your Tiny11 Build Updated
After you install, press Windows + R, type winver, and press Enter. The About Windows box should show Version 26H2. You can also open Settings > System > About and check the Windows specifications.
Next, activate Windows and run Windows Update. On a VM, take a clean snapshot after updates and before you install your own software. Keep your build notes and hashes so you can reproduce the build later.
Before every rebuild, check the ntdevlabs repository for new commits and open issues. The new Tiny11 is still only a teaser, so until NTDEV ships it, building from the official script and Microsoft’s own ISO remains the safest way to get a tiny Windows 11 26H2.
Frequently Asked Questions
Is Tiny11 safe for Windows 11 26H2?
It is safe enough for tests and secondary PCs when you build it yourself from Microsoft’s ISO and the official ntdevlabs script. Avoid prebuilt ISOs from unknown sites, because you cannot see what they changed.
Can Tiny11 run on unsupported PCs?
Yes, in most cases. The builder bypasses the CPU, RAM, storage, TPM, and Secure Boot checks. Very old CPUs that lack POPCNT or SSE4.x instructions still cannot boot Windows 11 24H2 or later.
Does Windows Update work on Tiny11?
It works on the regular tiny11maker.ps1 image. It does not work on the Core image. Microsoft also does not guarantee updates for unsupported hardware.
What is the difference between tiny11maker and tiny11Coremaker?
tiny11maker.ps1 removes bundled apps and keeps Windows serviceable. tiny11Coremaker.ps1 strips far more and removes servicing, so it suits quick testing only.
How do I check that I have Windows 11 26H2?
Press Windows + R, type winver, and press Enter. The window should list Version 26H2.

