Windows Recall takes automatic screenshots of your screen every few seconds to build a searchable activity timeline. If you prefer not to have your PC capture and index everything you do, Windows 11 lets you turn the feature off completely using the Settings app, Registry, Group Policy, Windows Features, or a full feature reset.
What Is Windows Recall
Recall uses a local AI model to save snapshots of your screen activity, including documents, websites, chats, images, and apps you have used. It runs only on Copilot+ PCs equipped with a Neural Processing Unit (NPU), and it stores all data locally rather than uploading it to Microsoft’s servers.
- Requires a Copilot+ PC with an NPU rated at 40+ TOPS
- Needs at least 16GB of RAM and 256GB of storage
- Runs on Windows 11 version 24H2 or later
- Off by default; you must opt in during setup or from Settings
Method 1: Disable Recall From Settings
This is the quickest way to stop new snapshots from being saved.
- Open Settings on Windows 11.
- Click Privacy & security.
- Click Recall & snapshots.
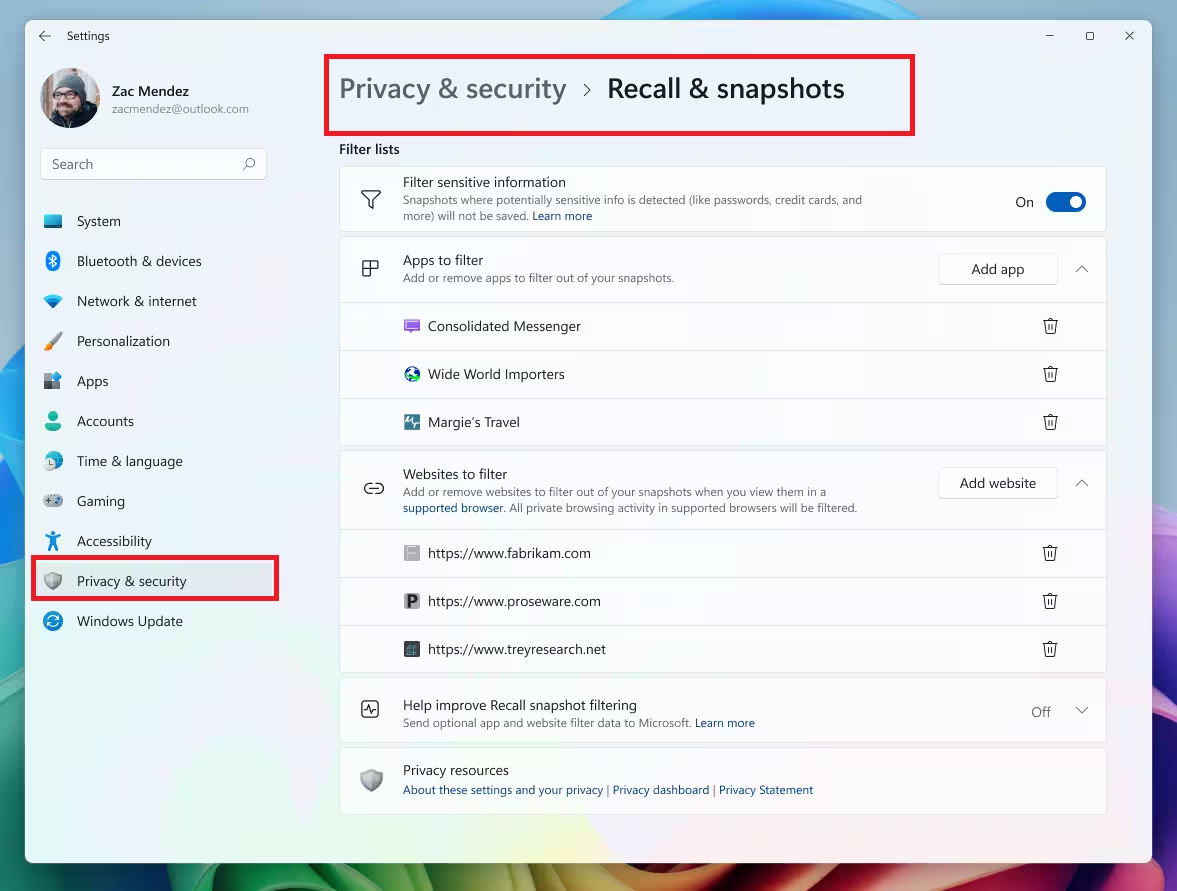
- Turn off the Save snapshots toggle switch.
- (Optional) Click Delete snapshots, then click Delete all to remove existing snapshots.
Once you complete these steps, Recall stops taking snapshots of your activity. If you only want to pause the feature temporarily, click the Recall icon in the taskbar and select Pause until tomorrow. To turn Recall back on later, repeat the same steps and switch the toggle to on.
Method 2: Disable Recall Using the Reset Option
Resetting Recall wipes its data and configuration rather than just switching it off.
- Open Settings.
- Click Privacy & security.
- Click Recall & snapshots.
- Click Advanced settings.
- Click the Reset Recall button.
- Click Reset to confirm.
This deletes all collected snapshots, clears app and website filters, and restores Recall to its original settings.
Method 3: Disable Recall Using the Registry
Use this method if you’re on Windows 11 Home, where the Group Policy Editor isn’t available.
- Open Start and search for
regedit, then open the Registry Editor. - Navigate to:
HKEY_LOCAL_MACHINE\SOFTWARE\Policies\Microsoft\Windows
- Right-click the Windows key, choose New, then Key, and name it
WindowsAI. - Right-click the new WindowsAI key, choose New, then DWORD (32-bit) Value.
- Name the value
AllowRecallEnablementand set it to0. - Click OK and restart your computer.
This disables Recall for all users on the device and removes its components. Existing snapshots are also deleted if the feature was previously in use.
You can apply the same change from an elevated Command Prompt instead:
reg add "HKLM\SOFTWARE\Policies\Microsoft\Windows\WindowsAI" /v AllowRecallEnablement /t REG_DWORD /d 0 /fTo reverse this and re-enable Recall later, run:
reg delete "HKLM\SOFTWARE\Policies\Microsoft\Windows\WindowsAI" /fRestart your PC after running either command.
Method 4: Disable Recall Using Group Policy Editor
This method works on Windows 11 Pro, Enterprise, or Education. It isn’t available on Windows 11 Home.
- Open Start and search for
gpedit, then open the Group Policy Editor. - Navigate to:
Computer Configuration > Administrative Templates > Windows Components > Windows AI
- Right-click Allow Recall to be enabled and select Edit.
- Select Disabled.
- Click Apply, then OK.
Recall stops running and its components are removed once you restart your computer. Any snapshots already stored on the device are deleted as part of this process.
Method 5: Remove Recall Using Windows Features
This method removes Recall as an installed component rather than just switching it off.
- Open Windows Search and type
Windows features. - Select Turn Windows features on or off.
- Find Recall in the list and uncheck it.
- Click OK and restart your computer if prompted.
Your stored snapshots are automatically deleted once Recall is removed this way.
Windows Recall stays off by default and only activates if you opt in, so most users never need to touch these settings. If you already enabled it and changed your mind, any of the five methods above will fully stop it and clear its stored data.
Frequently Asked Questions
Is Windows Recall enabled by default?
No. Recall is opt-in during setup. You must turn it on manually, and you can disable it again at any time.
Does disabling Recall affect other Windows 11 features?
No. Turning off Recall only stops its snapshot and activity tracking. Other Windows features, apps, and Copilot functions continue to work normally.
Does Recall impact performance or battery life?
Microsoft designed Recall to use the Neural Processing Unit to keep resource usage low, so the impact should be minimal. Some users still prefer to disable it to avoid background activity.
Is my Recall data sent to Microsoft?
No. Recall snapshots stay on your device, encrypted, and require authentication to access.
What are the requirements to use Recall on Windows 11?
Recall needs a Copilot+ PC with a supported NPU, at least 16GB of RAM, 256GB of storage, and Windows 11 version 24H2 or later.
Does Recall work on older PCs without an NPU?
No. Recall only runs on Copilot+ PCs with an NPU rated at 40+ TOPS. Traditional Intel and AMD systems without an NPU cannot run it.
Do I need an internet connection to use Recall?
No. Recall works entirely offline, and snapshots are processed and stored locally.
Read More

